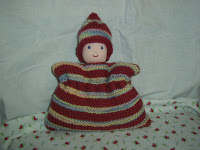
These are rough instructions, if you can knit you should be fine.
You will need:
small square of tricot
small square of lining
crochet cotton or string
clean carded wool
embroidery thread
1 50g ball of yarn
1. Make the head first. I will not give instructions for this here as there are some really good photo tutorials here and here. I also highly recomment the book “Making Waldorf Dolls” by Maricristin Sealey, it is an excellent resource for dollmakers. For this project you will want a small head, about the size of a golf ball or slightly larger. Leave a little fabric and wool beneath the neck of the head so that when you sew the head to the body it is firm, not floppy.
2. Embroider in the doll’s facial features by taking the needle in through the back of the head and out the front. The back of the head will be covered so the thread showing doesn’t matter.
3. Now knit a square measuring approximately 7 inches x 7 inches. You can knit in garter or stockinette stitch, whatever you prefer. I use 8 ply yarn on 3 & 3/4 sized needles. You want a tight knit to prevent your stuffing from poking through. Knit another square identical to the first. Join them together on 3 sides, right sides together, then turn right side out. Leave the top edge open for now. Stuff your pouch with carded wool, not too much or your doll will be very fat!
Insert the head into the top opening and pin in place. Sew up either side of the head firmly. Then, sew around the neck, joining it to the body with matching cotton thread. Sew around twice and check that the head will stay in firmly.
4. Knit a little pixie hat for your doll. Cast on 30 – 40 stitches (depending on the size of head). Knit 2 rows of rib stitch (knit 1, purl 1, repeat to end of row). Then knit in garter or stockinette until the hat will reach the top of the doll’s head. Then start to decrease gradually so that you end up with about 5 stitches left on the needle. Cast off. Join, right sides together so the top of the hat meets in a little point. Turn right side out and fit onto head. Sew on firmly with cotton thread.
5. You can leave the doll as is, or, to give the illusion of little wing – like arms run a gathering stitch with yarn from one side of the body and right around. Pull until you have the right tension.
6. Give the doll to a toddler and watch their face light up!
Note: I’m no expert at knitting, being self taught. If these instructions don’t make sense or you need clarification please let me know so I can improve my online teaching skills!
