

Most of the time when you are weaving on a rigid heddle loom and following instructions, there will be written notes for how to weave a pattern.
For example, in any of my rigid heddle classes you will see threading instructions, telling you which holes and slots to thread, including colour order wherever it’s applicable. You will see any extra instructions for using pick up sticks if they are being used. All these things will be shown and often written in a file with step by step text instructions.
*This post contains affiliate links. For further information please visit my disclosure policy.

But, what about weaving drafts? Weaving drafts are not something that a rigid heddle weaver needs to know, because, as I mentioned above, most weaving patterns or classes for rigid heddle will have written instructions and won’t even mention a weaving draft.
However, learning to read a basic weaving draft can be really useful for two main reasons:
- It helps you to gain an understanding of how your rigid heddle loom actually operates. You will discover this in a moment as we go through how to read a plain weave draft and how it translates to your RH loom.
2. Many rigid heddle weavers choose to venture into multi shaft weaving – either by adapting their rigid heddle loom or by purchasing a table or floor loom. Knowing how to read a draft is invaluable to the weaver who aims to weave with more than two shafts at some stage.
Today, we’re going to look at a simple plain weave, two shaft weaving draft. I chose to help you learn about a two shaft draft because I want you to focus first on learning the basic layout of a non complicated weaving draft, and also because a rigid heddle loom is a two shaft loom.
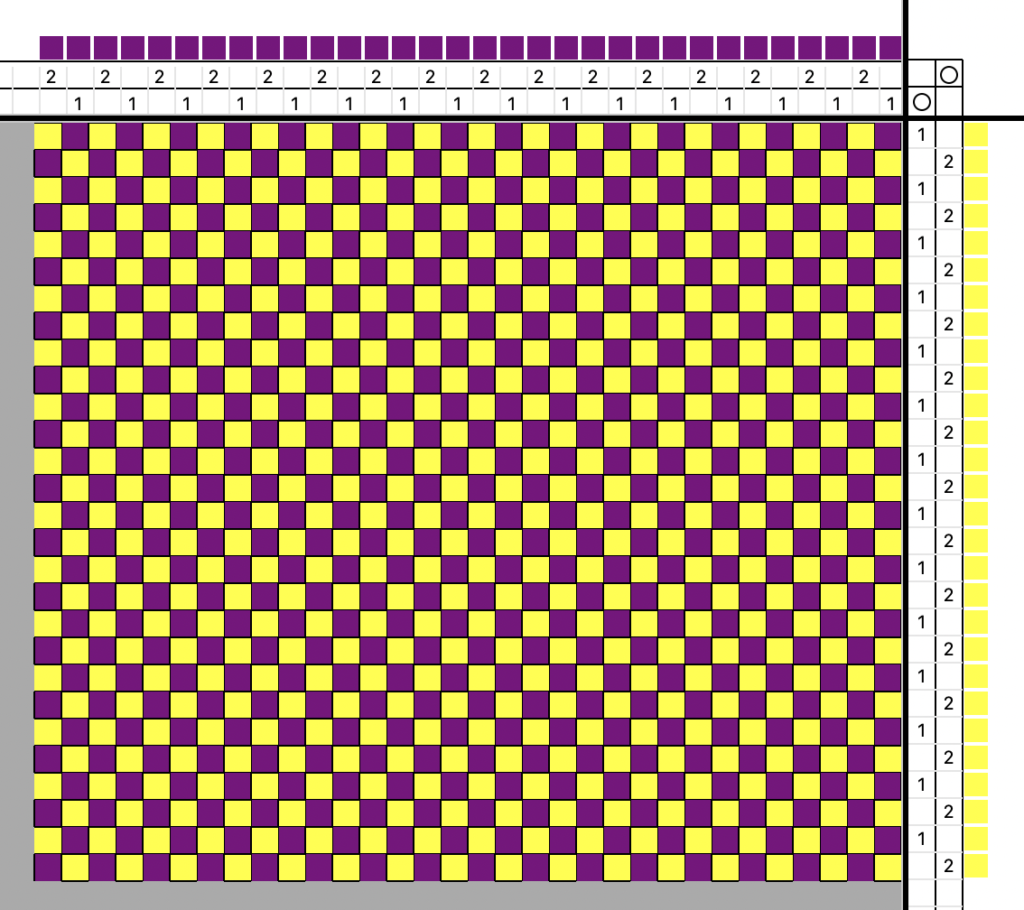
You can see that I opted for bright and contrasting colours so that you can distinctly see the pattern. Personally, I would probably not choose these colours for a project, but some of you may love them! 😬
This is the most typical layout for a weaving draft, but if it is an older draft you are looking at, the information may be in different places, for example, the line of numbers I have at the top may be at the bottom instead.
Alright, let’s get into the nitty gritty by learning the different parts of the draft and what they mean, starting at the top.

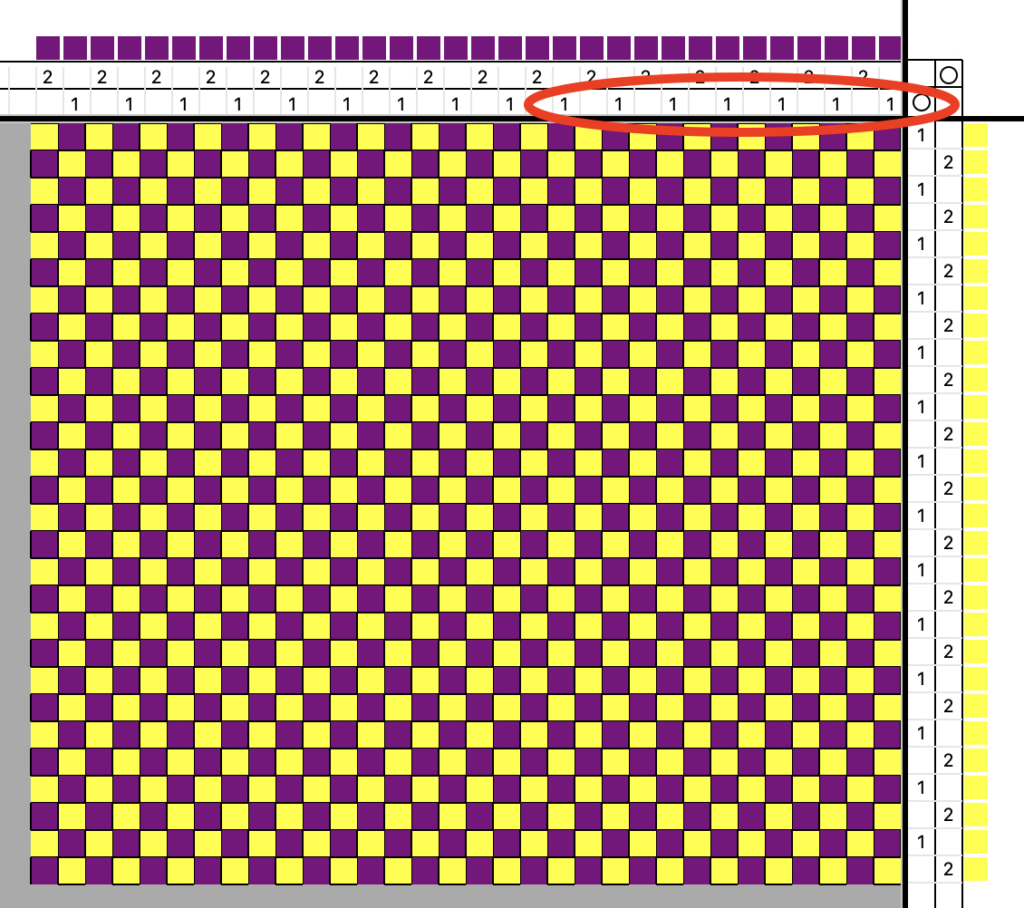
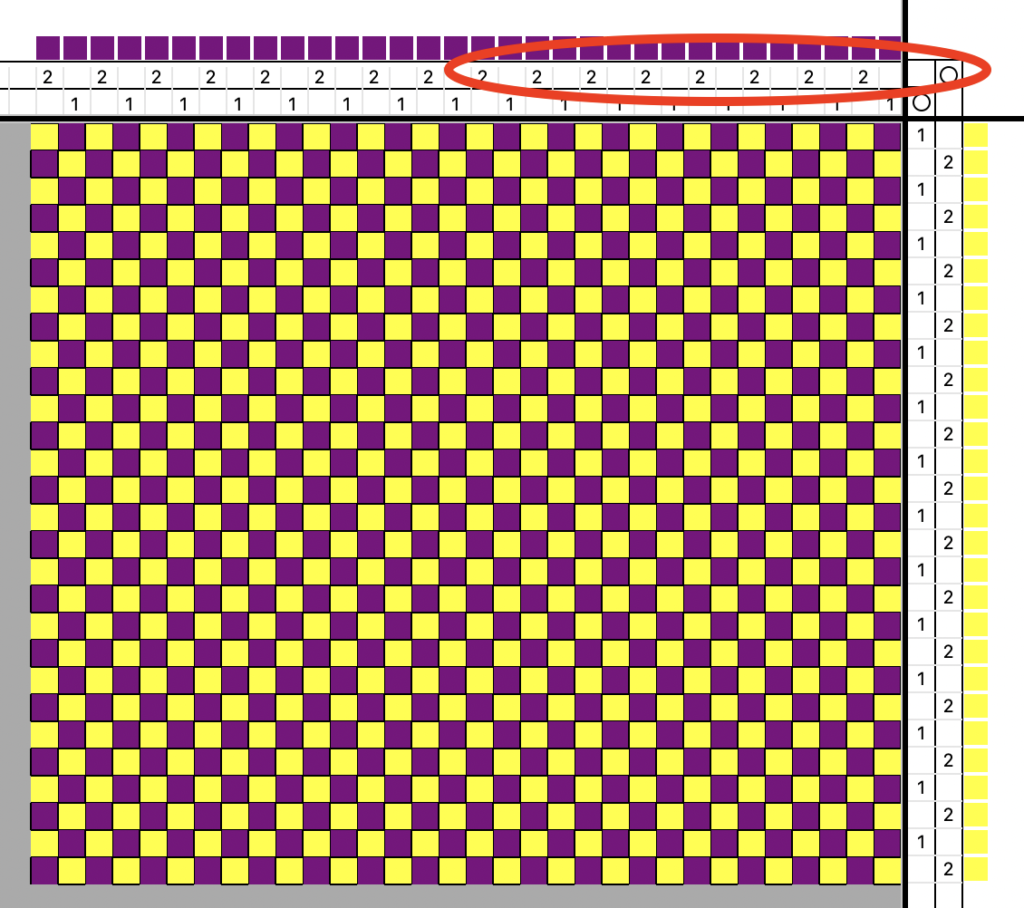
The top section circled in red is the threading. For plain weave on a rigid heddle loom we use two shafts and these are represented by the numbers 1 and 2 that repeat across. The threading section is a horizontal bar on the draft, but indicates the vertical purple warp threads. You can think of these numbers as being like the vertical threads of your warp.
You can think of the holes on your heddle as shaft 1 (number 1 in the threading section) and the slots on your heddle as shaft 2 (number 2 in the threading section).

To find the start of the threading section, we read from right to left, beginning in the first box in the right hand corner, which is a number 1.
Also note the colour that appears above the number 1, which in this case is purple.
This tells me that my first thread for my warp is a purple thread that will be threaded in a hole. The second will be in a slot. Then a hole, then a slot, and so on.
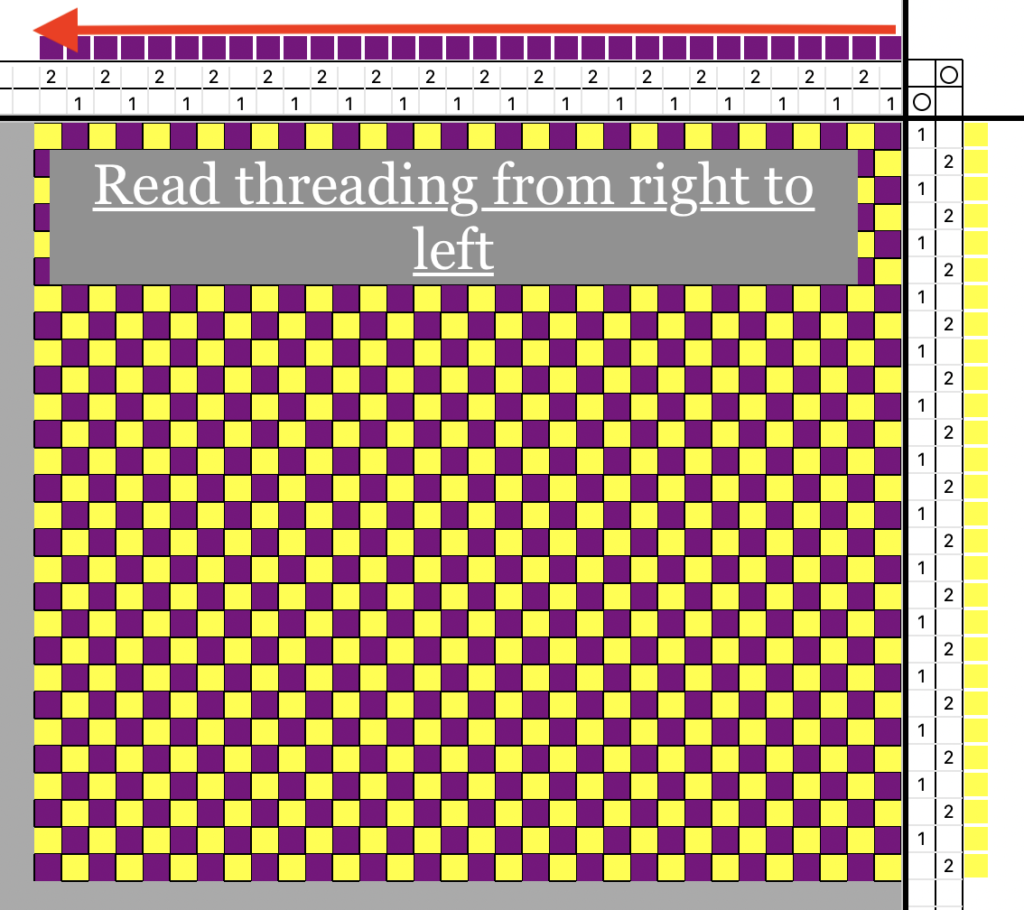
This would be an easy warp as there are no warp colour changes.
Next I want to discuss the tie up box.

When using a multi shaft loom, you need to know which shafts need to be tied up to which treadles, this is where the tie up box in the top right corner of the draft comes in.
The circles you can see in the box match up with either number one or two on the threading section, indicating which shafts are to be used. The circle usually means that the tie up is for a rising shed loom. An “X” will often mean the tie up is for a sinking shed loom.
How is this relevant to the rigid heddle weaver, considering we don’t have to tie up treadles?
It simply shows us which shafts need to be engaged in order to weave the pattern. If we thread our shaft 1 in the heddle holes and shaft 2 in the heddle slots, as described earlier, we don’t need to do anything else (like tie up treadles) in order to start weaving those shafts. The warping and threading of the heddle is all the preparation we need.
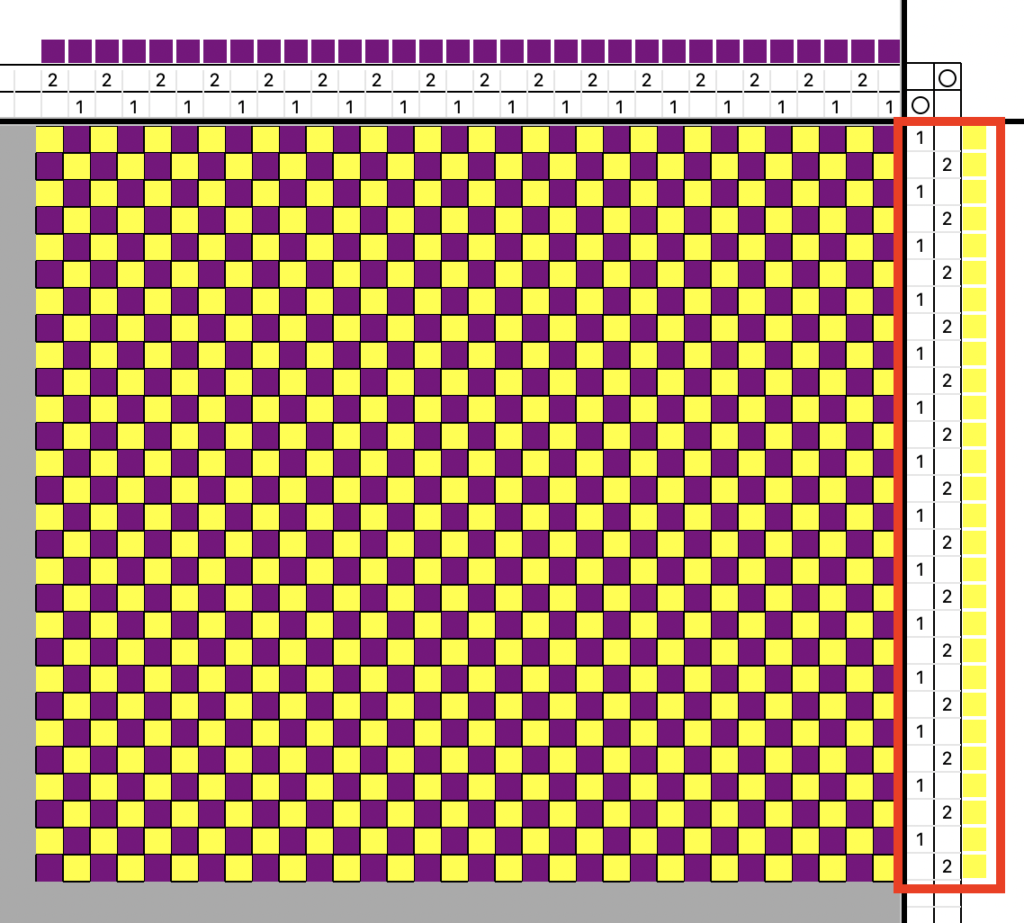
The long, vertical box to the right of the draft is the treadling section. The box is vertical, but indicates the horizontal part of your weaving, which is the weft. My weft is yellow, and this is indicated by the yellow box next to each number.
Again, as rigid heddle weavers, we don’t “treadle” but we do manipulate our heddle in order to open shafts, and this box gives us the correct order we need to use to weave the pattern.
On the rigid heddle, we operate the heddle for plain weave by either lifting it into the up position or placing it in the down position.
When you lift your heddle up, have a look at what is happening with the threads. All the hole threads are lifted up, and the slot threads stay down. The space in between the two layers of threads is our shed.
Now, when you place your heddle down, the opposite occurs – all the slot threads pop up and the hole threads stay down. This creates a second, different shed. In that case:
Heddle up = Shaft 1 engaged
Heddle down = Shaft 2 engaged
So, we understand that the heddle just goes up and down and that makes our 2 shafts. But let’s look more closely at the draft to ensure that we can visually follow the changing of shafts.
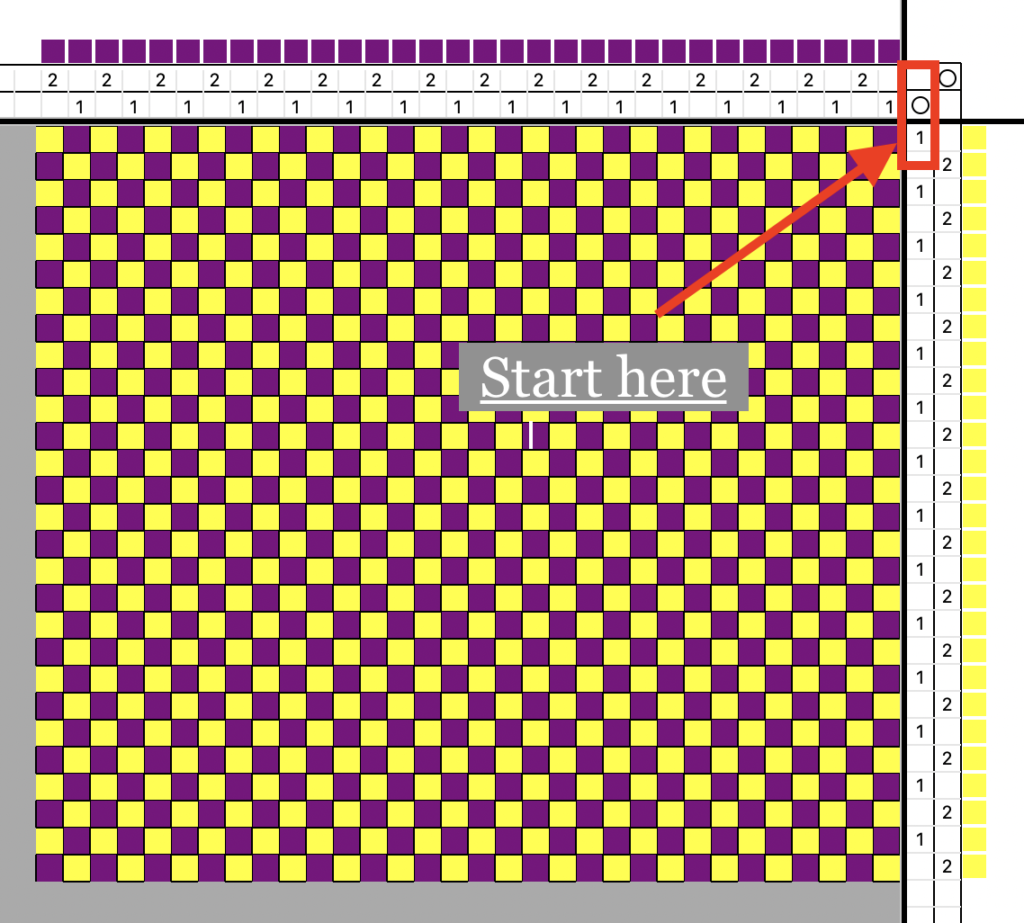
We start reading the treadling (or order of shafts) in the first box that appears under the tie up box. The treadling sequence will not always be indicated by numbers, there may be a filled box, a diagonal slash or similar.
Also, some drafts will use numbers to indicate how many times you are going to weave a certain pick. But, because we are just alternating between shafts 1 and 2, I have used the numbers 1 and 2 underneath the circles.
For this draft, the first number is on the left, underneath the circle that indicates shaft 1. For the RH weaver, shaft 1 means hole threads, which means heddle up.

When you have woven your shaft 1 pick you will then change to the next shed by following along to the next number in the next line down. It is a number 2 and so for the RH weaver, that means the down shed.
After weaving this shed, you then follow to the next row down, which is a shaft 1. And so on.
The last part of the weaving draft is the drawdown.
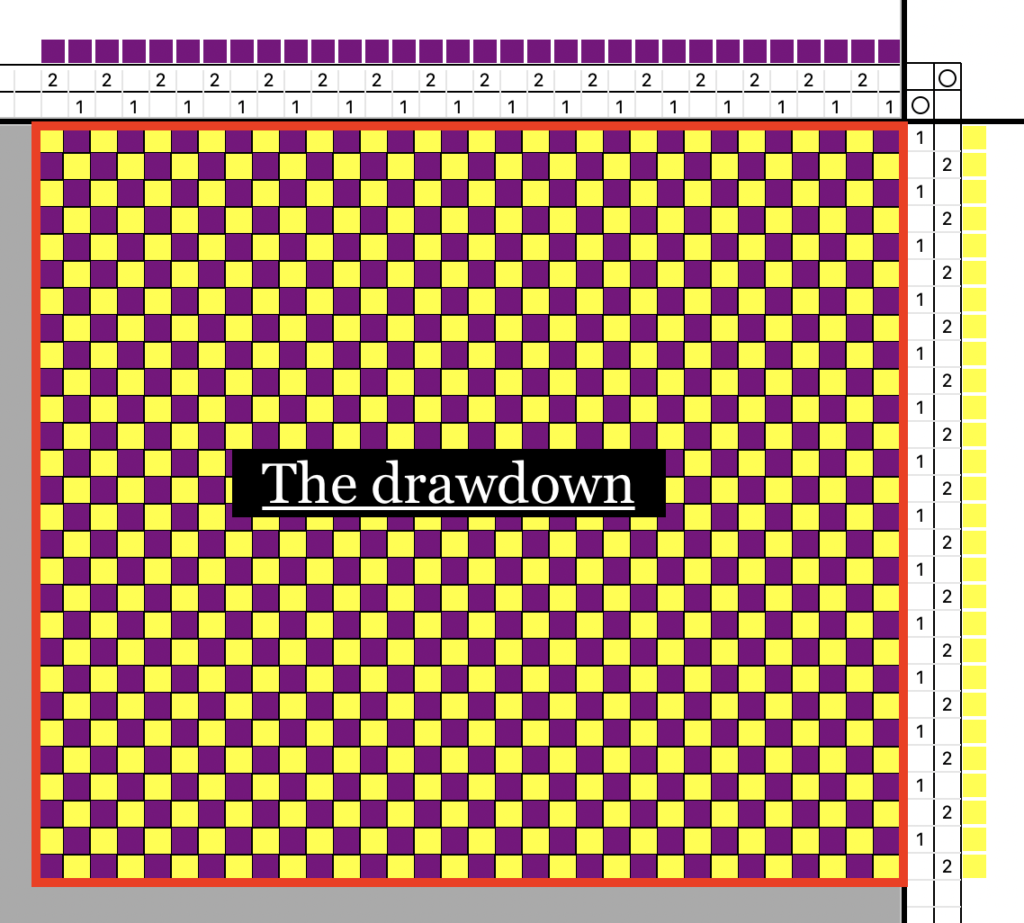
The drawdown is essentially a diagram of the fabric you will weave. It provides you with a visual representation of what your pattern might look like.
Naturally, elements such as your sett and chosen yarns can vary the look of the cloth greatly, so your finished piece will not necessarily look just like the drawdown. It shows the interlacement of your thread colours.
With our plain weave, checkerboard pattern you can easily see that the alternating colours in each row of purple, yellow, purple, yellow represent our warp and weft colours, and also our shafts one and two.
If you would like to use this draft, as well as the fabric view, to print out, I have made a printable PDF for you, which you can download below:
If you would also like to see this post in video format, please visit my Youtube channel:
If you are interested in knowing more about reading weaving drafts, I have two members only classes at my Online Weaving School.
Introduction to reading weaving drafts
Reading a 2 shaft plaid draft for rigid heddle weavers
I hope this was helpful to you. Questions and comments are welcome, I love to hear from you!
Until next time…
Happy Weaving!
Kelly thanks so much for presenting this lesson in written form. Different people learn different ways. Videos are difficult for me. This makes it easy to scroll back to refresh my memory. Thanks also for Krokbragd lesson in Little Looms spring and summer 2024. I’ve always wanted to try it, but can’t afford another heddle. Now I know how to use a heddle rod!! Then here I go and now its a draft I don’t know how to read. You have solved that problem too!! Thank you so much for your lessons. ~~ Pam
I’m so glad to hear that Pam, thank you for sharing! 🥰
This is a great explanation. My brain does well with mnemonics and your explanation made it easy to come up with one.
Shaft 1 Up (fewer letters so it goes with the lower # shaft) and holes (h before s in the alphabet). Shaft 2 Down, slots. I got this!
Thanks again. Some patterns I’ve found use drafts, though not many. Now I don’t have to exclude those from things I want to try.
Great, thanks for the feedback, Janet!
Thanks so much Kelly.
I found a draft that I would like to try but it has the pick sequence listed on the left hand side of the drawdown diagram and the first 3 picks are shown in the same shed, (not sure if it is the down or up shed), then one pick in the next shed, repeating this 3/1 sequence. Is that possible on a rhl?
It should be, but how many shafts is it?
It is 2 shafts Kelly.
OK, that simplifies things, you would just need one heddle and a pick up stick.
Thanks Kelly, this is a great place to start learning to read a draft. You’ve made it very easy and clear to see how everything is related, excellent information to build on!
Thank you for that Gai!
Thank You. That was very informative. I’ll file it away for future reference.
Great, thanks for your feedback, Kathy!
Thank you! Very clear explanation!
You’re most welcome!
Hey Kelly! Thank you so much. I was still mixed up about drafts and how to read them for my RH. Weaving when I can.
Beverly in Mississippi
You’re welcome, Beverly!
This is awesome info Kelly! I’ve heard explanations before, but didn’t wrap my brain around it very well. I love that you took it clear down to 2-shaft plain weave… all of a sudden it made sense! Thanks so much!
That is wonderful! 😄
Thanks Kelly for a nice simplistic explanation. It really helps to have a starting place to understand this information. It gives me a great base to work off of in my weaving journey😊
Awesome, thank you 😊
The simplified method you used..got me to finally realize that reading a draft could be accomplished..Thank you for showing us this work.
I’m glad you found it easy to follow!
Nice….thank you Kelly!
You’re welcome!
Very good instruction
I appreciate
Thank you
Thank you!