
A reed substitution chart is extremely useful for those times you want to weave at a certain sett but don’t have a reed to match.
Purchasing extra reeds can be expensive and even with additional sizes you may find that you can’t achieve the sett (ends per inch) you were hoping for.
Using a reed substitution chart means that you don’t need to buy reeds in all the sizes and you can often achieve either an exact desired sett or something very close to it.
A reed is a tool for spacing your warp ends at a specific distance apart. Because our sett is a certain number of ends per inch, we can figure out how many ends we need to place in each dent (space) in the reed to achieve that number. And, we can change the number of threads to suit the required sett.
For myself, I find that I tend to weave within a fairly set range of ends per inch for many of my projects. One of my floor looms and my table loom have a 10 dent reed and the other floor loom has a 12 dent reed.
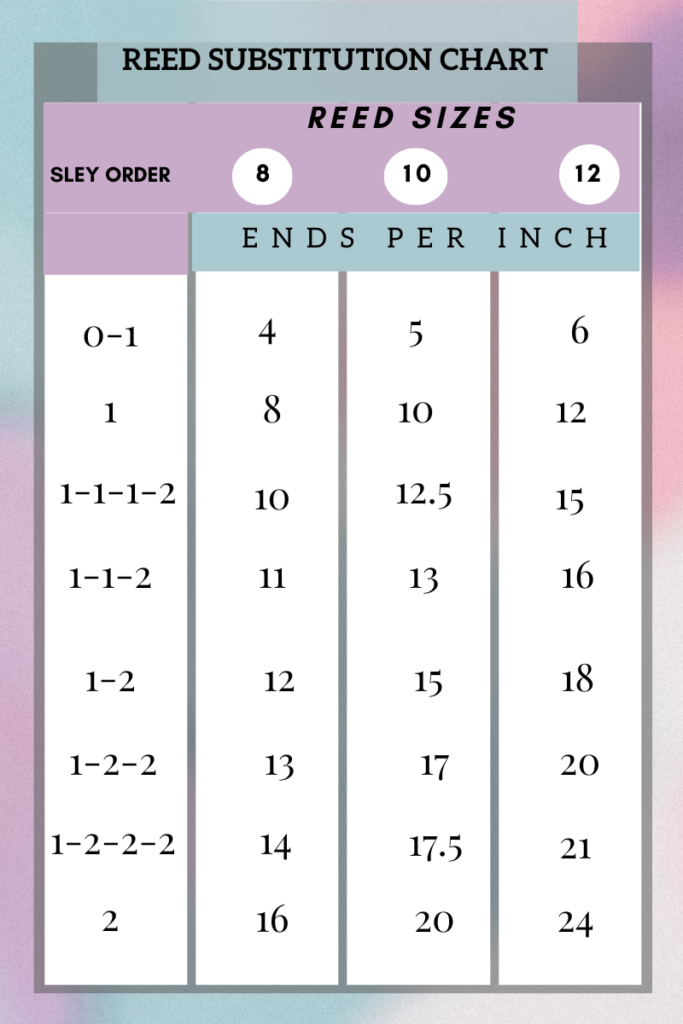
So, the chart you see below is a simple version for the numbers I use frequently. I’ve also included the 8 dent reed as many weavers do have that size.
How to use the chart?
It’s really easy and hopefully the way I have it set out is simple for you to follow. The reed sizes are in circles at the top. The ends per inch are listed in columns underneath and the sled order to the left.
Let’s do an example together.
Say I have a 12 dent reed and for my project, with the particular yarn I’m using, I want to weave at 18 ends per inch. First look at the “12” which is circled. Look down the vertical column underneath the 12 until you see “18”. Now follow horizontally to the left until you’re looking at the “sley order” section. You will see the numbers 1-2. This means that when you sley your 12 dent reed, you will place 1 thread in the first dent, then 2 in the second, 1 in the next and 2 in the next, and so on.
If you would like to download and print out this chart you can do that here:
I hope this helps you in your weaving journey!
Looking for help with your loom? Check out my popular classes here:
Introduction to Floor Loom Weaving
Until next time…
Happy Weaving!