

DIY Warping Stand: How We Made an Affordable and Sturdy One at Home
I had been wanting a warping stand for a long time, but the store-bought versions were just too expensive. Thankfully, my husband stepped in! After I showed him a few pictures and explained how it works, he offered to make one—and he did an amazing job.
When I shared the finished stand on social media, the response was overwhelming. So many of you asked how to make one yourselves. I’m happy to share that my husband not only created a set of free plans and measurements, but we also filmed a full YouTube tutorial to walk you through the process.
🧰 Good news: You don’t need fancy tools or woodworking experience to make this warping stand. With a little effort and some basic supplies, you’ll have a strong, functional tool that will last for years.
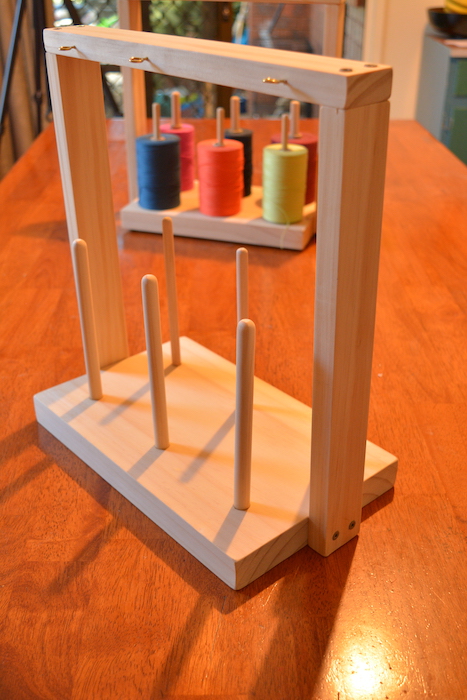
How to use a warping stand
Using a warping stand is super simple and will make your warping experience so much easier!
Simply place your yarn cone over one of the dowel pieces:

Pull up the yarn end to thread through the eye hook directly above the dowel:

Place the warping stand on the floor, ready to use 😊

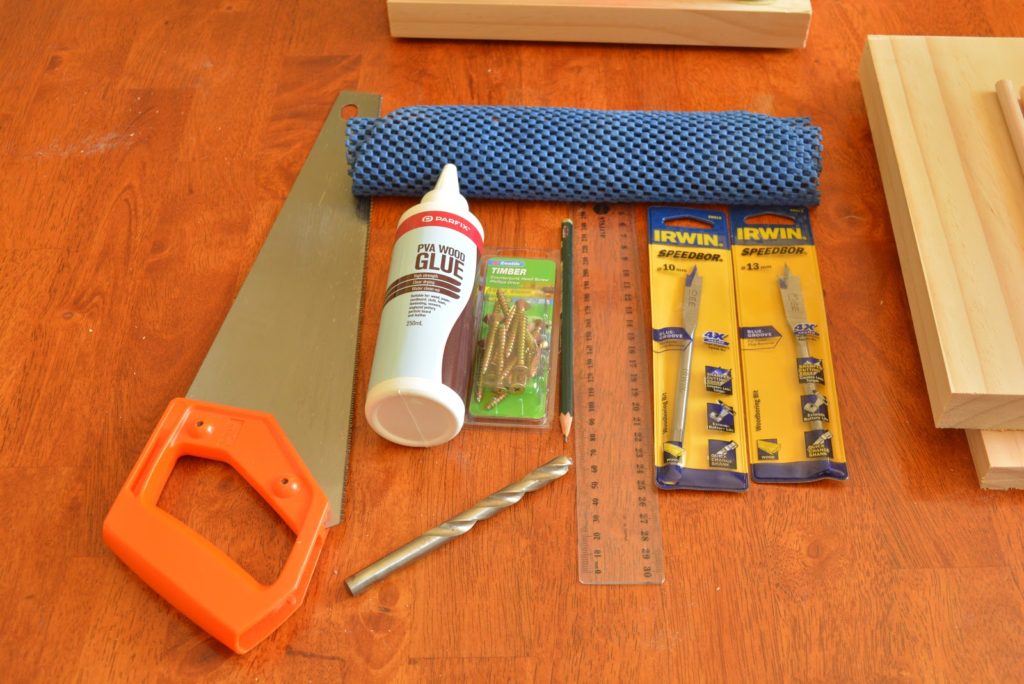
🛠 Tools and Materials Needed
Here’s a list of the tools and materials we used to make the DIY warping stand:
-
Electric drill – (these ones are great!)
-
Drill measuring rod (usually included with your drill)
-
Wood boring bits – 13mm and 10mm sizes
-
Rubber or non-slip matting – A small piece to stabilize the base
-
6 x eye screws – 23mm long, 2mm diameter
-
8 x 10-gauge screws – 45mm long (we used square head screws)
-
Square drive drill bit No. 2 – (came with our screws)
-
Pre-drill bit – Same size as your screw body
-
PVA wood glue – Just a small amount
-
Ruler or measuring tape
-
Sandpaper – Medium and fine grit
-
HB pencil – For marking your cuts
- ——————————————————————————————-
Why I Love My DIY Warping Stand
-
Affordable – Costs a fraction of store-bought versions
-
Customizable – Make it the perfect size for your space
-
Sturdy & Reliable – Built to last, even with regular use
-
Beginner-Friendly – No fancy tools or woodworking skills needed
- No More Rolling Cones of Yarn! – I used to get really annoyed when my yarn cone would not stay put. I rigged up a cardboard box with a chopstick as a temporary holder, which worked ok but was bulky, dust gathering and the chopstick hole would get bigger with use.
✨ Bonus Tips
-
If you don’t have a handsaw, many hardware stores will cut the wood to size for you, you just have to ask and give them the specifications.
-
Use clamps while gluing for extra strength.
-
Sand well to avoid yarn snags during warping.
- You can use a wood finish if you prefer. This will protect the wood, making your stand last even longer. Beeswax, wood oil or varnish are all suitable.
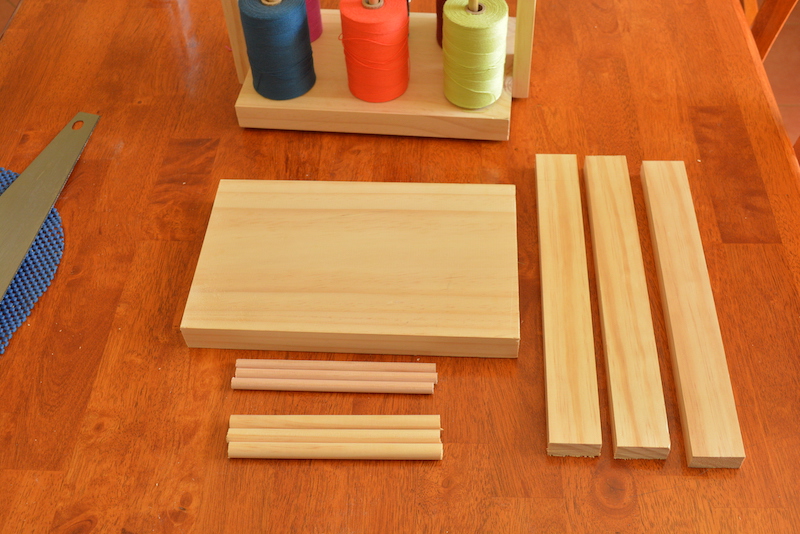
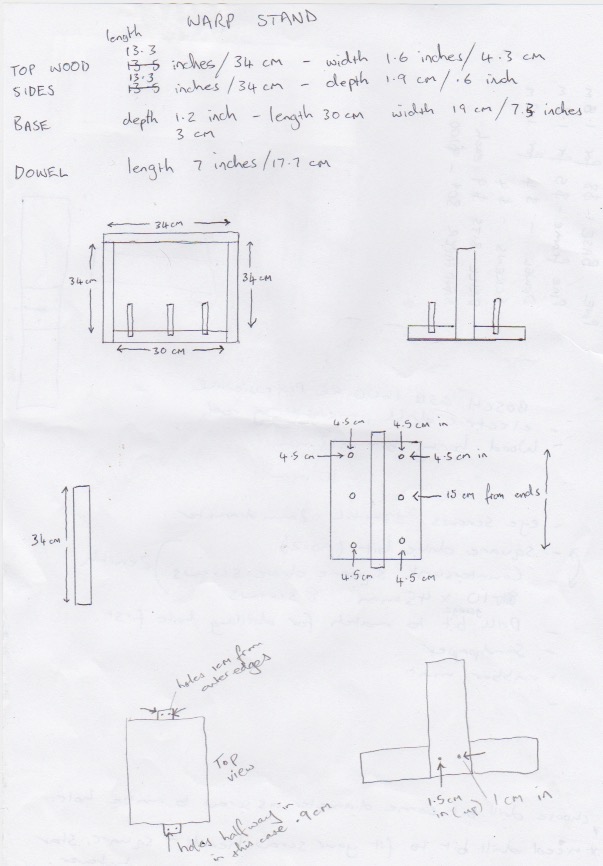
🪵 Wood Measurements & Materials (Premium Pine)
We used premium pine for this project because it’s lightweight, affordable, and easy to work with. Here’s a breakdown of the wood pieces:
| Part | Quantity | Dimensions (cm) | Dimensions (inches) |
|---|---|---|---|
| Base piece | 1 | 30 L x 19 W x 3 D | 11.8″ x 7.3″ x 1.2″ |
| Side pieces | 2 | 34 L x 4.3 W x 1.9 D | 13.3″ x 1.6″ x 0.75″ |
| Top piece | 1 | Same as side pieces | — |
| Thick dowels | 3 | 17.7 L x 1.27 Ø | 7″ x 0.5″ |
| Thin dowels | 3 | 17.7 L x 0.95 Ø | 7″ x 0.37″ |
📏 Note: The measurements don’t have to be exact. As my husband says, small variations are totally fine—just aim for consistency and functionality.
📐 Reference Diagrams
We’ve included hand-drawn diagrams to help guide you alongside the video tutorial. These are meant to support your build visually in case anything gets confusing while following the video.
🎥 Don’t skip the video! This blog post is intended to complement the full video tutorial, not replace it. Be sure to use both for the best results.
💰 How Much Does It Cost?
One of the best things about this DIY warping stand project is how inexpensive it is compared to a store-bought warping stand. Please note that prices change over time due to inflation so these original figures may differ to current figures:
-
If you already have some tools (like we did), the total cost for materials was between $25–$40 AUD
-
If you already have the wood, screws, and bits, it could be a completely free project!
That’s a huge saving when commercial stands often cost over $100!
Don’t forget to check out the video tutorial:
❤️ We Hope This Helps!
We truly hope this project helps you get a functional, custom-made DIY warping stand at a fraction of the cost. If you have any questions, feel free to reach out in the comments below 👇
🙏 Was this post helpful? We gratefully accept donations if you’d like to support more free tutorials like this.
My husband is making mine out of the scraps from the reed stand he just finished, and we had some dowels on hand. The only thing needed was the eyelets.
That is going to be a very low cost project for you then, how wonderful!
This is perfect. Just a quick question – how did you attach the rubber/non slip matting?
There is no non slip matting and I haven’t found it necessary to have that. I guess you could purchase little rubber feet that would screw into the bottom, if that is important to you.
I noticed the rubber/non slip matting in the tools and just assumed it was for the bottom of the warping stand but I did notice in the video that your husband was using it during the building process. Brilliant make. Hubby and I just finished mine and now I’m eagerly awaiting the glue to dry. Thanks for the tutorial.
You’re welcome, you will get a lot of use out of it. My husband made 2 for me and I use both of them in different locations of the studio – so handy!
Just finished my warping stand. It looks great. I even put a handle on top to make it easier to carry. Thanks for the plans. They were easy to follow and I just used some scrap wood I had in the garage. Sorry I can’t send you a photo. Regards, David Burrous
I love your addition of the handle on top, very clever!
Thanks, Kelly! That’s super helpful. I’ve been wanting my husband to make me one, so this is great!
Fabulous, they are so handy!
Thanks so much. I don’t have a husband so will make this myself. Looked at buying one and it was so expensive.
Yes, they are really expensive! Best of luck with making your own, it’s really not complicated so I think you will be fine 😊
Thank you, looking forward to making it. Do you have a video on using pegs on my Ashford 32” to make an indirect warp? I think that is what it is called. Love that you are Australian, just across the ditch. Really valuable in getting supplies that you recommend.
Rigid heddle or table loom?
Thanks so much for the video, my husband is going to make one for me!!
Many thanks Kelly and husband for the plans. I had already asked my husband to make a stand for me, but I may see it sooner now that all the thinking has already been done for him!
That is wonderful! 😊
My husband took your husband’s plans and was able to make it! Thank you for sharing
I am so glad your husband is not a professional woodworker because I am able to follow what he is doing. Most times when I watch on hoe to build things it is way over my head and I can't copy it. It is also good that you don't have all the fancy tools, much easier for everyone to follow. The bit to drill holes into the base is called a spade bit in the USA and I don't think it is really necessary to convert the measurement because anybody could just buy a ruler or something with the metric system on it. Often times those measuring tapes or rulers come with both. So, thank you again.
Brigitte
I will pass that on, thanks very much!
This is just awesome Kelly, thank you very much and please thank your husband as well, he is great.