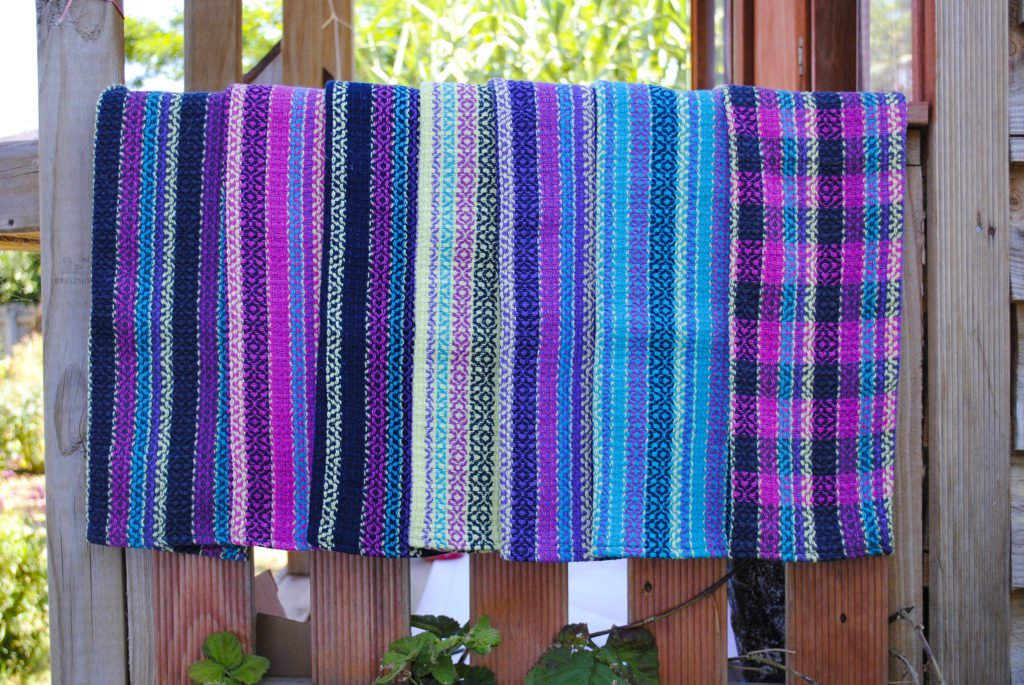
I’ve talked a lot about rigid heddle looms in general here, but today I’m going to focus on the actual rigid heddle.
I’m going to explain what it is, what the measurements mean, how you can match up different sized yarns with different heddles, and basic care of your rigid heddle to ensure longevity.
*This post contains affiliate links. For more information, please see my disclosure policy.
Sometimes you will see a rigid heddle referred to simply as a “heddle”, and
sometimes you’ll see them called a “reed”. I usually refer to it just as a heddle to simplify.
They’re actually a combination of both, because the frame contains a way for you to thread your yarn and also doubles up as your beater, for beating in the weft. This is really a very unique piece of equipment.
For more traditional or multi shaft weaving, the heddles are made of string, texsolv, or metal, and they are movable. Every single thread has its own heddle.
But a rigid heddle is basically just what it sounds like. The heddles, or the spaces through which the threads go are set in the frame and don’t move.
Generally, a rigid heddle is constructed from wood for the frame and plastic for the heddles and slots, though the entire heddle can be made of wood. You will find some “toy” style rigid heddle looms made entirely of plastic, and some folks are utilising 3D printers to print their own rigid heddles these days, which is pretty cool!
This article was prompted by a student question, which was “what does the dent mean“.
Well, when we’re referring to rigid heddles, we talk about the dent as basically a space through which
your thread can go.
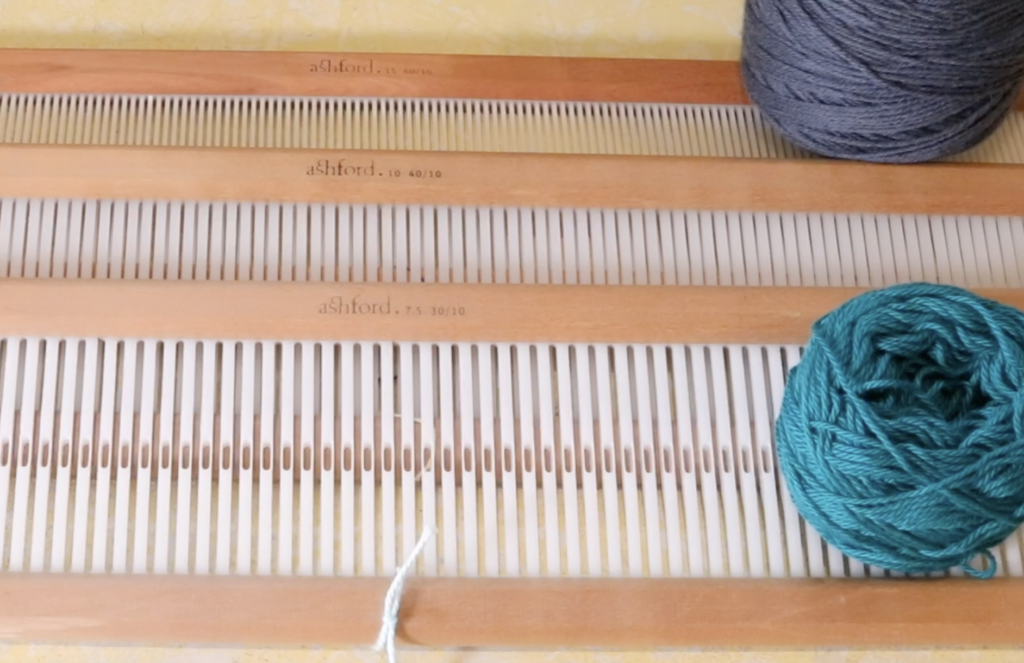
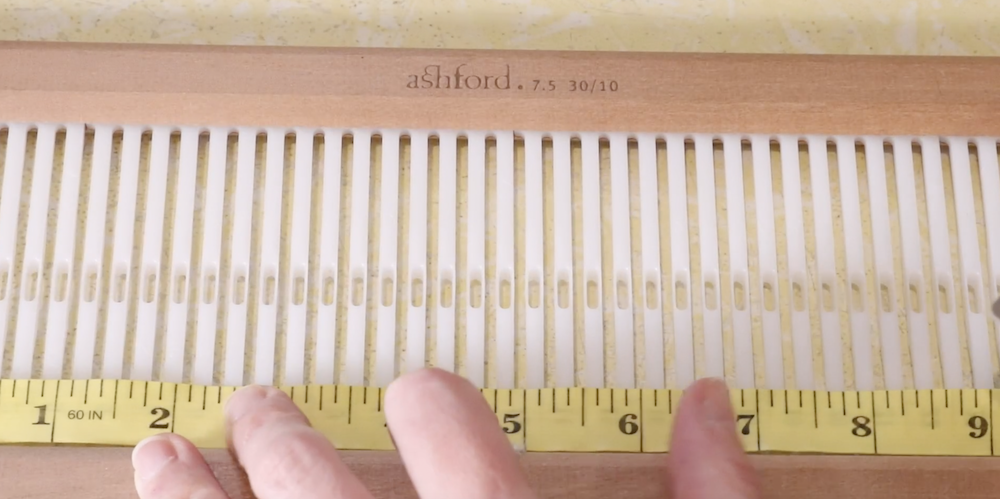
If you look up to the top of your own rigid heddle there will probably be some numbers. This depends on the manufacturer, as some loom companies leave their heddles blank. (It’s much easier if the numbers are there, in my opinion!)
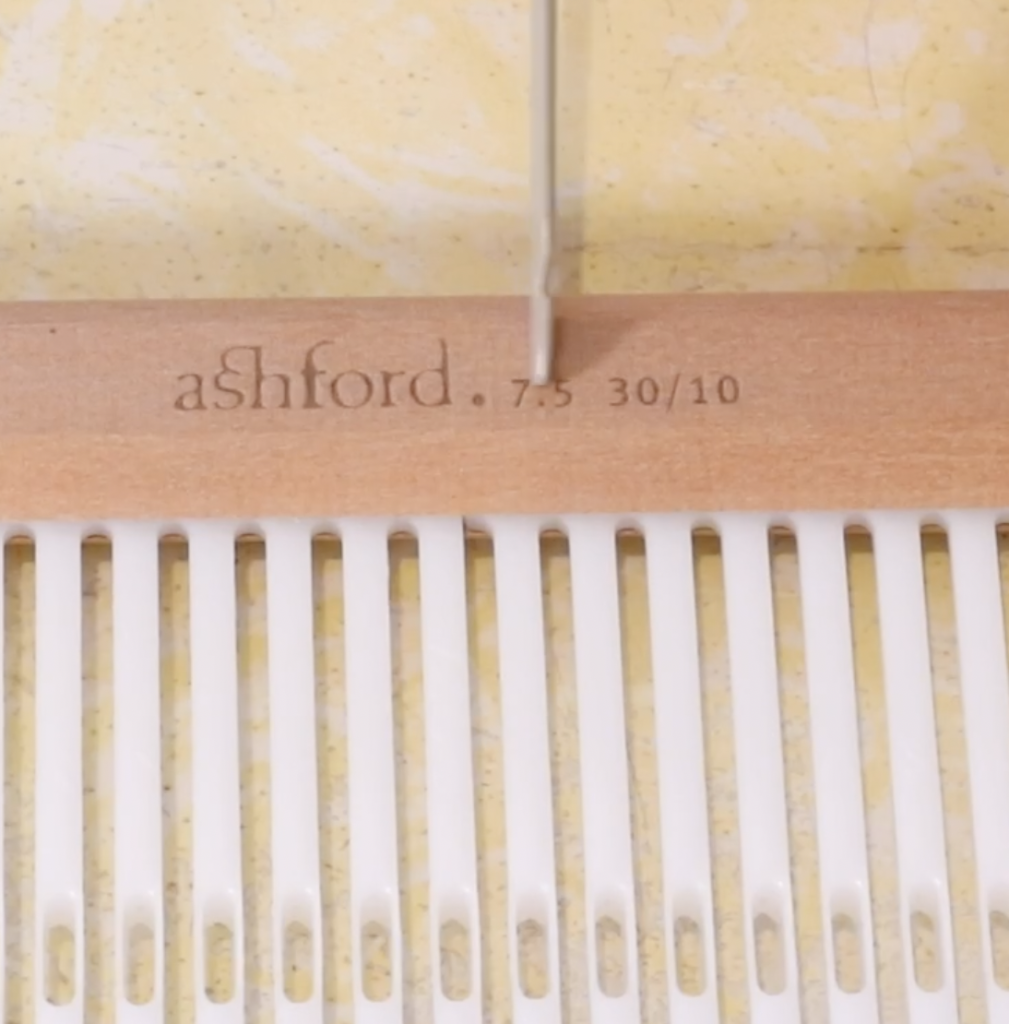
This one says 7.5 at the top, and that tells me that it’s a seven and a half dent heddle. But what does
that actually mean to you as the weaver?
Well, it means that if you use this particular heddle, you can achieve 7.5 ends per inch. This is one of the differences between a rigid heddle loom and a different kind of loom. The sett or the ends per inch are already set in place by the size of your heddle.
So, you choose a heddle that suits the type of yarn or the size of the yarn that you want to use at any time. I’ll
talk about that a little bit more in a minute, but first I want to show you how the measurements on your heddle work.
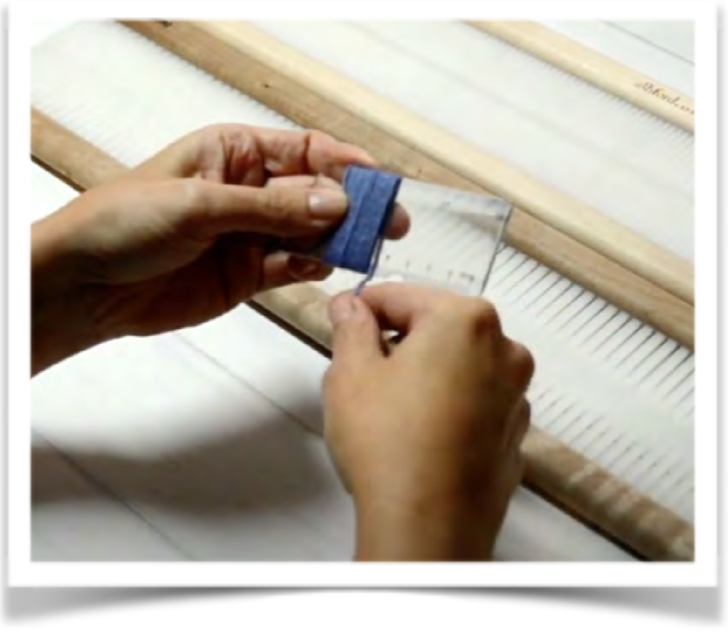
I mentioned that this is a seven and a half dent heddle. So, looking at my tape measure over about an inch, I’m
going to count every single space through which a thread can go on this heddle.
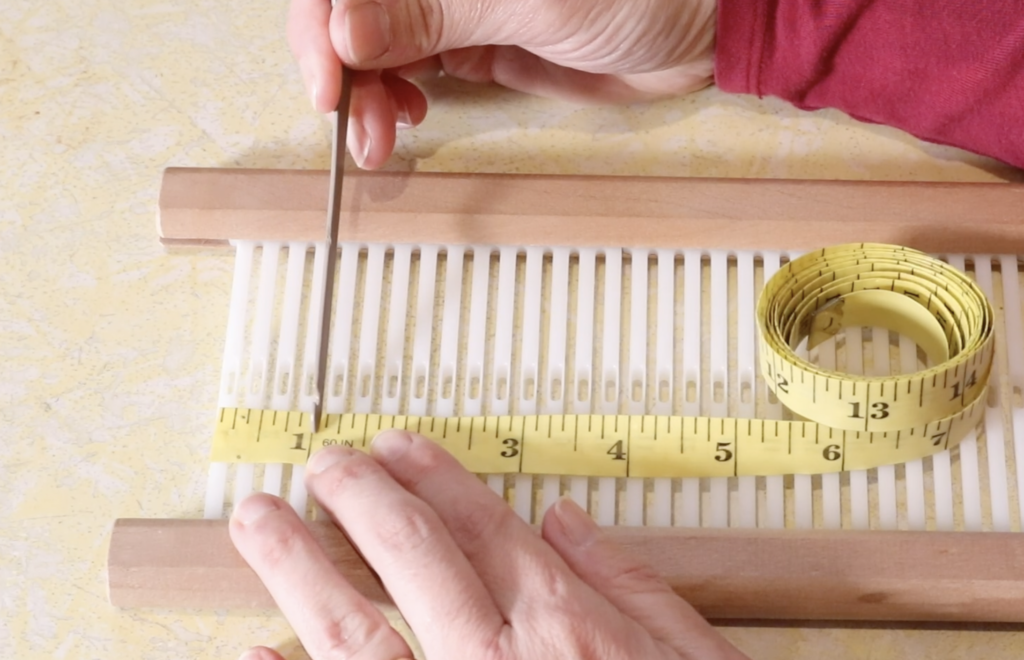
I’m counting the holes because we use both the holes and the slots on the rigid heddle for a balanced plain weave.
I begin by counting from the first hole at the start of the tape measure, and continue to count every hole and slot until I reach the one inch mark.
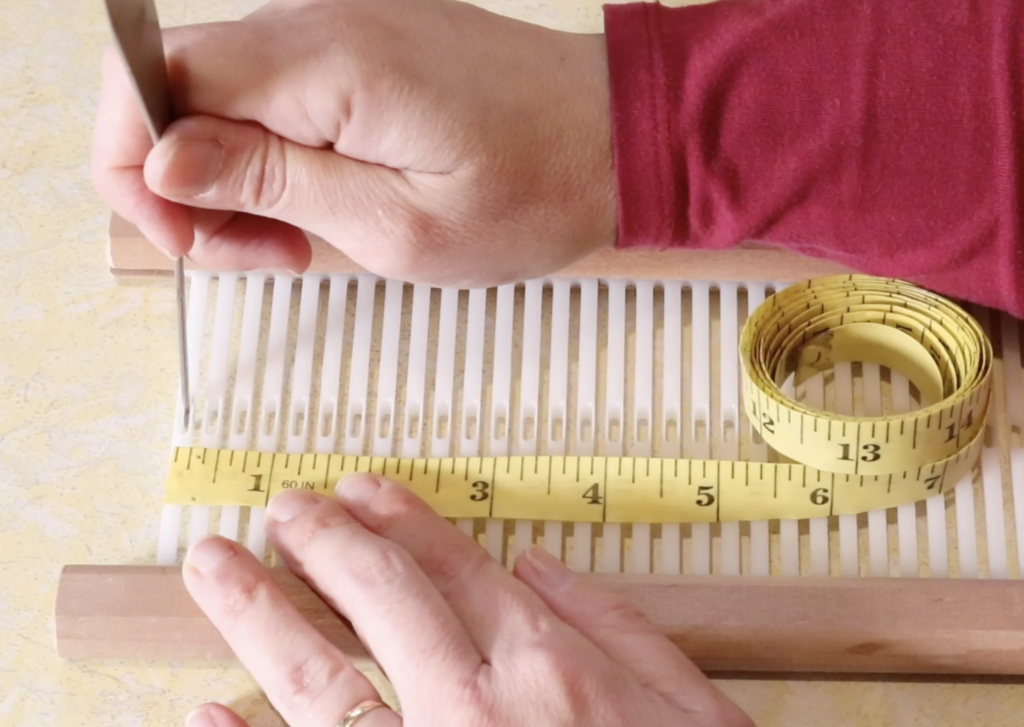
Because this is a 7.5 dent heddle, I won’t count the last slot at the one inch mark as a full slot, but as a half. This is reflected in the fact that the counted holes and slots don’t fit evenly within the inch measurement. For a heddle that has a rounded number, for example, a 10 dent heddle, you will find that you can measure exactly 10 spaces in the inch.
So, how does this information actually translate to the loom?
Well, it’s extremely important that we match the right yarns to the right heddles. Let’s say that
hypothetically, I wanted to do a balanced weave on my seven and a half dent heddle. The first thing you need
to do is your sett test.
If you’re not familiar with sett, or you’re not sure how to figure out the sett for your
particular yarn, I have two videos that will help:
Once you know about sett you have such freedom, something will click in your brain and you will suddenly
understand so much better how yarn size relates to the size of your heddle.
Here is an example of how they tie together:
I wrap the yarn I want to use around my inch ruler and find that it has roughly 15 wraps per inch. Divide the wraps in half for a balanced plain weave. This gives me 7.5.
Now I know that if I want to do a plain weave on my rigid heddle loom, the 7.5 dent heddle is almost perfectly
matched to this particular yarn.
When you have a heddle size that doesn’t exactly match the sett that you’ve determined for your yarn, then
you can start making decisions. The decisions will usually be based on the project itself and how you want it to turn
out.
If the sett you determine for your yarn is not exactly the same as any of your heddle sizes, but is very close, you may choose to either go up or down in heddle size.
As an example, imagine that the wraps per inch for my chose yarn comes to 18 wraps. Divided in half, this will be 9 ends per inch (or a sett of 9.)
There are no loom companies that make a nine dent rigid heddle. But that’s okay, because we can compromise, based on what the planned project is. Do I want a lighter, airier and softer fabric? Or do I want a firmer and denser fabric?
For placemats or a table runner I would be looking for a firmer fabric, for a scarf or wearable I would be hoping for something softer and lighter. For the firmer option, I would choose to weave the yarn with a sett of 9 in a 10 dent reed. For the softer option, I would choose the 7.5 dent heddle.
These decisions become easier over time and experience with all different yarns and different types of
projects.
There are a couple of other things that I want to point out about your rigid heddle. When you have a look at the information at the top of the heddle frame, you’ll notice that, at least on an Ashford, there are some other numbers printed. In the case of the 7.5 dent heddle, the other printed figures are 30/10. This is metric information rather than Imperial. The 30/10 just means that over 10 centimetres, you will fit 30 threads in that 10 centimetres.
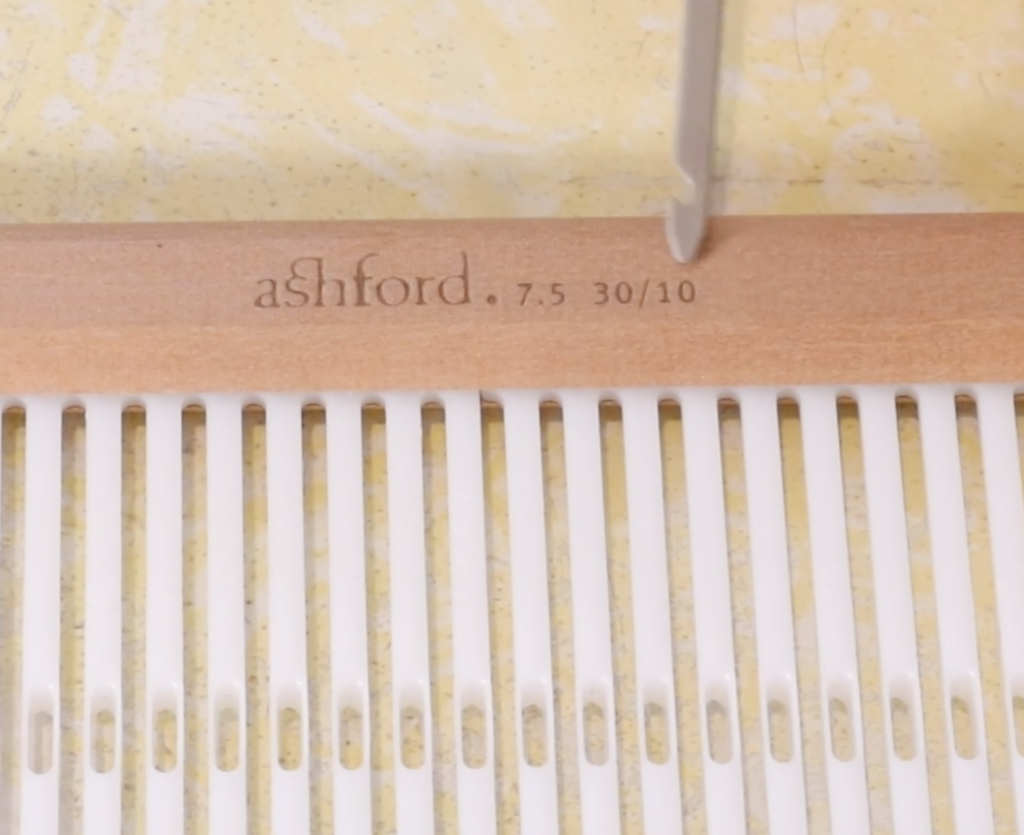
Also, if you look in between where it says “Ashford” and “7.5” you’ll see a dot. That dot means that directly underneath this is the very middle of your rigid heddle. This is really handy information!
I like to keep a piece of waste yarn tied at this middle marker for easy visual reference. It also makes measuring out your intended project before you begin warping. Simply place a measuring tape and line up the half way measurement with the half way mark on the heddle.
For this 10″ wide piece, I line up the 5″ mark with the centre of the heddle. I can then mark the start of the tape measure and the 10″ mark with more waste yarn tied onto the heddle for quick and easy warping.
The last thing I want to go over with you today is some tips on the care of your rigid heddles for their longevity.
New heddles are not cheap to buy, especially if you want to have a lot of sizes.
If you’re getting into weaving with two and three heddles you will be looking at quite an investment. Some basic care will help prolong the life of your heddles.
The first thing is to not store heddles in a place that is damp. Doing that will probably warp your wood over time and may render the heddle unusable.
Another thing is to not keep heddles in a place that is too hot. We are dealing with plastic here, so if it gets too hot, or it gets near a source of heat too much, the plastic component can melt and warp as well.
The third point is to go easy on your heddle. Don’t be overly rough on it when you’re threading. I know that might sound a little bit silly, but a heddle like a 15 dent heddle is very thin and not as strong as a larger sized heddle. Rough threading could bend or break the plastic.
The basic moral of the story is that if you treat your rigid heddles right, they will treat you right!
If you would like a handy guide for your rigid heddle loom, I recommend The Weaver’s Toolkit. It includes information such as the right yarns for the right sized heddles, yarn conversion sheets, calculation sheets and many more useful guides.

The Weaver’s Toolkit ebook is available for purchase here.
Would you like to view this post in video format?
Until next time…
Happy Weaving!