• Skip to main content
  • Skip to primary sidebar

Kelly Casanova Weaving Lessons

  • Hi! I’m Kelly!
    • Disclosure
  • Online Weaving School Class Index
    • Common account issues
    • Common technical issues
    • What do I get with a membership?
  • New to rigid heddle weaving? Start here!
    • Never heard of the rigid heddle loom?
    • How to weave neat edges on the rigid heddle loom
    • Rigid heddle weaving
    • Rigid Heddle Weaving Patterns
  • Patterns
  • Subscribe

Recipes and food

Chocolate crunchy slice

by Kelly 3 Comments

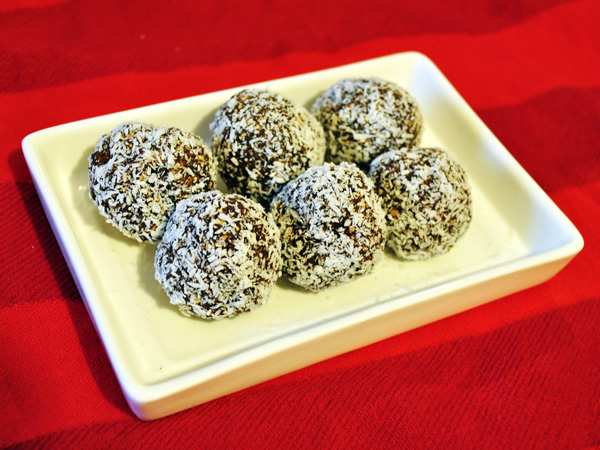
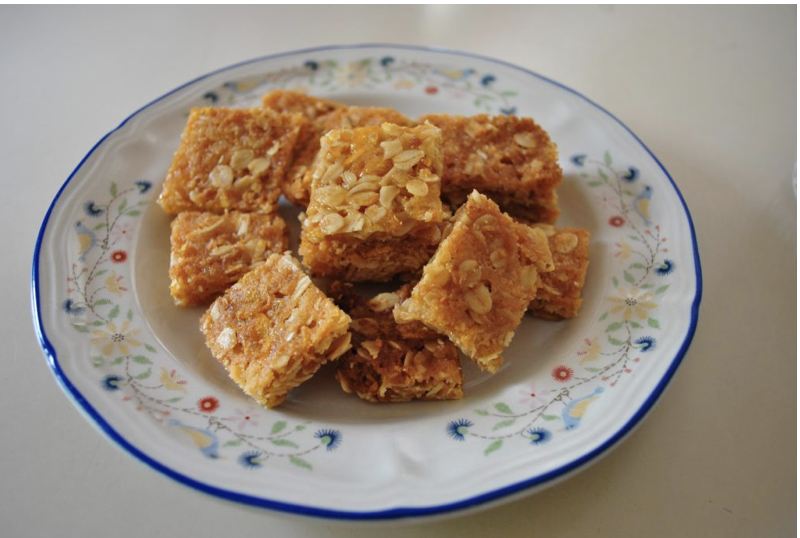
I suddenly remembered this recipe yesterday. It is one of my Mum’s old recipes and now that she is gone I have her recipe book which is largely hand written.
As a girl I would make it for my Dad while he was working – I’d take him a cup of coffee and some slice and his most common response was “Goody!” while rubbing his hands together.
It’s really easy for kids to make too, my 5 year old made this one with me.
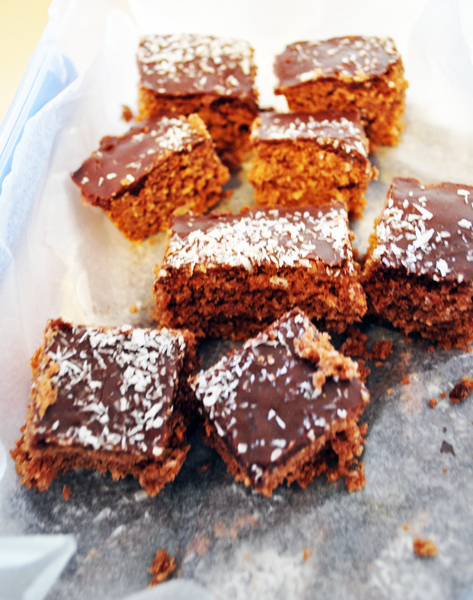
2 cups dessicated coconut
250 grams butter
2 tablespoons cocoa powder
2 cups self raising flour
1 cup sugar
Pre heat oven to 180 degrees. (C)
Melt butter and add to the dry ingredients. Mix well. If mixture seems a little dry add a little milk.
Press into a lightly greased slice tray. Bake for 25 minutes.
When cool you may ice the slice if you wish. I make a simple icing with soft icing sugar, cocoa powder and milk. Spread this on and sprinkle with extra coconut.

Filed Under: Uncategorized Tagged With: Recipes and food

Coconut Cakelets

by Kelly Leave a Comment

They don’t look like much. You will have to trust me on this one – they taste a lot better than they look. I made some and the kids gobbled them and begged for more.
This recipe is slightly adapted from the Primus Rice Paper recipe for cakelets.
120g dessicated coconut
220g white sugar
1/2 cup white flour
2 large eggs
Enough milk to make it mushy!
2 sheets of rice paper
Set oven to preheat 180 degrees (C)
Mix all dry ingredients together, then work in the wet. Adjust the milk so that your mixture is moist and thick but not too wet or sloppy.
Lay 2 sheets of rice paper on a baking tray. Place blobs (1 dessertspoon full for large cakelets or teaspoon fulls for little cakelets) onto rice paper.
Bake in the oven until golden brown (around 15 minutes)
These are really delicious if eaten while still warm but very nice cold as well.
Enjoy!

Filed Under: Uncategorized Tagged With: Recipes and food

Been sewing a little..

by Kelly 2 Comments

The cooler weather brings not only the urge to sew but the necessity as little girls become less little and need new, warm clothes.
This pattern is called Burda kids t-shirt, which seems rather drab to me – it’s more of a crossover top. The fabric is a stripy Japanese knit from Spotlight which I was keen to test out. I found it a little slippery under the machine, not too bad, but I prefer the Euro and Australian knits I usually buy. Yes, they’re more expensive, but you get what you pay for.
Gem loves the top šŸ™‚

Funky pants – pattern and beautiful velour fabric both from Crafty Mamas.
The pants were too long, so I cut them off, hemmed them and made a matching headband from the excess.

I have plans for more leggings and long sleeved tops, of, and guess what?! I finished another cardigan, it just has to blocked and buttoned now šŸ™‚

This has been a bit of a staple breakfast here of late – porridge with maple syrup and double cream. Yum!
Now I’m off to bake my bread and make a large pot of minestrone for dinner. Who says cold weather is dull?!

Filed Under: Uncategorized Tagged With: Clothes sewing, Recipes and food, Winter

Kefir, berry and yoghurt smoothie

by Kelly 1 Comment

My children are addicted to these smoothies and it’s all my fault!
I must admit that I’m delighted they love them so much and it’s a great way to disguise the taste of kefir, which none of them like.
I don’t have an exact recipe, it’s mostly dictated by what I have at the time. 
But here is an overview of ingredients for a full batch for 5-6 people:
2 bananas
1/2 cup yoghurt (I usually use my natural homemade but any yoghurt is fine)
As much kefir as I have available, usually 1/2 – 1 cup
1 tablespoon honey
handful of berries or other fruit that I have
Fill up the rest with milk
Process the fruit, honey and yoghurt first. Then tip everything else in and process till smooth.

You can add all sorts of other ingredients. For a breakfast smoothie, add 1 – 2 vita brits. LSA mix. Crushed ice. A little fruit juice. With yoghurt. Without yoghurt. With kefir. Without kefir. Get the picture? So easy and adaptable.

As my children grow older I’m finding it more challenging to satisfy their appetites and smoothies are a great way to either boost a lighter meal or as an inbetween meal snack.
Would you like to know more about milk kefir? Google will give you a lot of results to sift through, but I’m happy to share my knowledge and experience thus far if anyone is interested – just let me know šŸ™‚

Filed Under: Uncategorized Tagged With: Recipes and food

Wholemeal, rye and linseed bread

by Kelly Leave a Comment

I’m back into baking (at least on the cooler days anyway!) and that means more experiments for me. I still dream of having my own grain mill and grinding my own grain. I’m having another go at a sourdough starter too, hopefully with more success this time around.
Imagine baking with your own sourdough starter + freshly ground flour, now wouldn’t that feel authentic!

So, here is what I came up with yesterday – Wholemeal, rye and linseed loaf.


200g wholemeal flour
100g rye flour (I used organic)
700g good quality unbleached plain flour
1 teaspoon dry yeast
2 tablespoons linseeds (whole)
2.5 tablespoons sunflower oil
2.5 teaspoons salt
 around 700 ml warm water – you may need less or more.

Mix flours, seeds and yeast in a mixmaster bowl. Attach dough mixers and arrange bowl ready for the machine to mix it.  Start the machine mixing on low. Start to slowly pour in the water, taking several breaks to observe the wetness of the dough. Don’t add in all the water yet. Add the oil, allow to mix in, then add the salt.
* I do the water by feel. What you want with this dough, given that it has rye and wholemeal components which have the potential to be dry, is a nice moist dough. Keep adding the water until you’re happy the dough is moist enough.  It should look sticky. I make this dough much wetter than my usual white loaf.
Keep it mixing for about 10 minutes.

Turn out onto an oiled surface and knead the dough – stretching it out and pulling it in. This part is not absolutely necessary but I always do it to get a feel for the dough. It shouldn’t feel too stiff and definitely shouldn’t feel dry. It should be sticky and firm but stretchy to handle.

Place in an oiled bowl and cover with oiled cling wrap. Now, this is important: this dough requires a long rising time as we only used a little yeast. The long rising time also allows the flavours to develop beautifully. I won’t give you a perfect time frame, it depends on the weather, but at least a few hours rising time to double in size.

When doubled in size turn out onto the oiled surface again and press and shape into loaves. You can make just freeform loaves on a tray or place them in loaf tins as I did. Cover with the same oiled wrap and set aside to rise again, until the dough is high in the tin or doubled again on the tray. Lets say about an hour šŸ™‚ While the second rise is happening, preheat the oven to 240 degrees (C).

Slash the loaves with a sharp knife.

Place in the very hot oven for 12 minutes.
After 12 minutes, turn the oven down to 190 deg. (C) and continue to cook for another 20 minutes.

Turn out onto baking racks and cool.

Filed Under: Uncategorized Tagged With: bread, Recipes and food

“Mum, there’s nothing to eat!”

by Kelly Leave a Comment

Do you ever hear this? I bet you do! You need to do the shopping but haven’t had time, you open the pantry and can’t see the food that is there from lack of motivation to cook, plus all those other reasons for the dreaded “no food syndrome”.

However, when we have a good look around we realise we are usually far from destitute and starving.

Lunchtime today I’m met with the dreaded words so I decided to go for a fossick and see what I could use up. I found:
2 sheets of puff pastry
3 slices of ham
A small portion of cheddar cheese
Butter
Strawberry jam

And here is the result:

Ham and cheese scrolls
Jam scrolls
And some satisfied children šŸ™‚

Filed Under: Uncategorized Tagged With: Recipes and food

White & dark choc chip cookies

by Kelly 1 Comment

125g butter
1/2 cup brown sugar
1/4 cup caster sugar
1 egg
1 cup plain flour
1 cup SR flour
1/4 teaspoon bicarb soda
1/4 cup white chocolate dots (add more if you like)
1/4 cup chopped milk cooking chocolate (add more if you like)
1 teaspoon vanilla extract

Cream the butter and 2 sugars together. Add egg and continue to beat. Slowly add flours and bicarb. If mixture is a little dry you can add a splash of milk and mix in.
With a wooden spoon mix in the 2 chocolate types.
Spoon very generous teaspoonfuls onto a greased tray and press lightly with a fork.
Bake for around 10 minutes at 180 degrees (C)
Cool on a wire baking rack.

Filed Under: Uncategorized Tagged With: Recipes and food

Healthy treats!

by Kelly 1 Comment

When I saw Cathie’s Healthy Chocolate Oat balls I had to give them a go, being a fan of
1. Anything chocolate
2. Anything sweet and shaped into a ball!

They haven’t disappointed either – they are totally delicious! I rolled mine in coconut, don’t they look festive?
One point to consider – if your food processor is cheap and tired it won’t like making these at all! Recipe here.

Filed Under: Uncategorized Tagged With: Recipes and food

Cornflake slice recipe (very,very easy!)

by Kelly 10 Comments

Mother in Law’s recipes are great – these ladies who cooked on wood stoves (and my MIL still does) and fed the hungry hoards (my MIL had 10 little ones to feed) really knew what they were doing.
 
We “modern” homemakers can learn so much from their ways. This corn flake slice recipe is from my Mum in law šŸ™‚
 
Another aspect of older recipes that I love is they were built around ingredients every Aussie housewife would have in the pantry – no special shopping trip for fancy ingredients.
 You may not have Corn Flakes in your pantry but they are readily available and one of the more affordable cereals.


Corn Flake Slice (very, very easy!)

Print Recipe Pin Recipe
Ingredients Method

Ingredients
  

  • 125 grams butter
  • 1 tablespoon honey
  • 1 cup rolled oats
  • 1/2 cup white sugar
  • 1 cup cornflakes
  • 1 cup desiccated coconut

Method
 

  1. Preheat oven to a moderate (around 180 degrees celsius or 170 fan forced).
  2. Melt butter and honey together.
  3. Add to mixed dry ingredients.
  4. Place in a shallow slice tin, press to even and flatten out a little.
  5. Bake in the oven until golden brown (about 15 minutes) and leave in tin to cool.
  6. Turn out and cut into squares.
 
Easy?
*Affiliate link
 

Filed Under: Recipes Tagged With: frugal living, Recipes and food

Spelt, honey and linseed bread recipe

by Kelly 2 Comments

Once you have a basic bread recipes you can tweak it in so many ways to make different loaves. My husband bought me some beautiful organic spelt flour recently and I already had the linseeds plus some local honey. Voila! New recipe šŸ™‚
This will make 2 regular loaves.
I mix my dough with the mixmaster but of course it can be done by hand also.

100g spelt flour
900g unbleached bread flour
2.5 tspn dried yeast
2.5 tspn salt
2 tblsp canola oil
1 tblsp honey
3 tblsp linseed
600ml warm water
Place flour and yeast in a bowl, add yeast and seeds. Measure water into a jug and add in the honey and oil. If using mixer with dough hooks start the machine and gradually pour in the liquid. Allow to mix until combine. Sprinkle salt on, one spoon at a time and leave dough mixing for 5 -10 minutes. Turn out onto oiled kneading surface and knead for a couple of minutes.
If mixing by hand add the wet ingredients to the dry in the same way and mix with a wooden spoon, adding the salt after dough is a little combined. When it’s too hard to mix with the spoon, turn the dough onto your kneading surface and begin to knead for about 10 minutes or until your dough is soft and elastic.
Place dough into oiled bowl and cover with plastic wrap. Leave until at least doubled in size.
Turn out onto your kneading surface again and press the air out. Cut dough in half and arrange each one for the bread tins. Cover loosely with the same wrap and turn the oven to 240 degrees (C). Leave dough in tins for about half an hour.
Slash dough with a sharp knife and place in the oven for 15 minutes. Turn the temperature down to 190 deg. (C) and bake for a further 20 minutes. When cooked, turn the loaves out of tins onto baking rack.
TIPS FOR BAKING BREAD
*There is no need to wash your bread tins after each baking – I rarely wash or oil mine and the bread does not stick.
* To get a nice shape in the bread tin I flatten out my dough piece into a rectangular shape, fold in the longest sides to meet in the middle, then roll up fairly tightly.
*One of the most helpful things I’ve learned is that a moist dough is a good dough! I used to keep adding flour to the dough if it seemed sticky but that resulted in a dry loaf. Now I oil my working bench and my hands to make the dough workable.
If I’ve missed anything please let me know – all this stuff is in my head and it’s a challenge to actually think about my methods and write them down.
Happy Baking!

Filed Under: Uncategorized Tagged With: honey and linseed bread recipe, Recipes and food, spelt

  • « Go to Previous Page
  • Page 1
  • Interim pages omitted …
  • Page 3
  • Page 4
  • Page 5
  • Page 6
  • Page 7
  • Interim pages omitted …
  • Page 11
  • Go to Next Page »

Primary Sidebar

Hand crafted boat shuttles

Categories

Archives

Meta

  • Log in
  • Entries feed
  • Comments feed
  • WordPress.org

Copyright © 2025 Kelly Casanova Weaving Lessons on the Foodie Pro Theme