• Skip to main content
  • Skip to primary sidebar

Kelly Casanova Weaving Lessons

  • Hi! I’m Kelly!
    • Disclosure
  • Online Weaving School Class Index
    • Common account issues
    • Common technical issues
    • What do I get with a membership?
  • New to rigid heddle weaving? Start here!
    • Never heard of the rigid heddle loom?
    • How to weave neat edges on the rigid heddle loom
    • Rigid heddle weaving
    • Rigid Heddle Weaving Patterns
  • Patterns
  • Subscribe

frugal living

Healthful Toasted Muesli (Granola)

by Kelly 10 Comments

 
I know, I know, there are thousands of recipes for toasted muesli (or granola) on the internet. But I’ve been fiddling around to try and make a healthy, not too oily, but not too dry recipe.


And I’ve hit on something pretty darn good! There is the base recipe, but then you can add to that according to what you have at the time. This batch was timed to coincide with a visit to a Lebanese nut shop, so we had a lot of extra delights to put in.
 
The best part is that many of these ingredients are easily accessible and may be in your pantry already.


It includes those wonderful staples such as rolled oats, raw honey, olive oil, shredded coconut, vanilla extract and sultanas.
 
All you need to make this recipe is an oven and a roasting pan.
 

Healthful Toasted Muesli (Granola)

Kelly
Base recipe
5 from 1 vote
Print Recipe Pin Recipe
Prep Time 5 minutes mins
Cook Time 30 minutes mins

Equipment

  • Oven, roasting tray

Ingredients
  

  • 5 cups rolled oats
  • 1/4 cup honey
  • 3 tbsp olive oil
  • 1 cup shredded or desiccated coconut
  • 2 tsp vanilla extract
  • 1 egg white (optional)
  • 1/2 cup sultanas

Instructions
 

  • Preheat oven to 170 degrees (C).
  • Mix all dry ingredients in a tray with sides so it doesn’t spill. A roasting tray is ideal.
  • Warm the honey until runny and mix in olive oil and vanilla. Pour evenly over dry mix. Mix thoroughly.
  • Now pour over the egg white and mix thoroughly.
  • Place tray in the oven and set the timer for 10 minutes.
  • After 10 minutes, take out the tray, turn the ingredients and return to the oven.
  • Repeat until the muesli has baked for 30 minutes.
  • Remove from oven and stir in the sultanas.

This recipe is super flexible, making it great for when you have certain ingredients on hand. Here are a few options for ways you can vary your muesli.

Add ins (examples of)
1/2 cup chopped peanuts
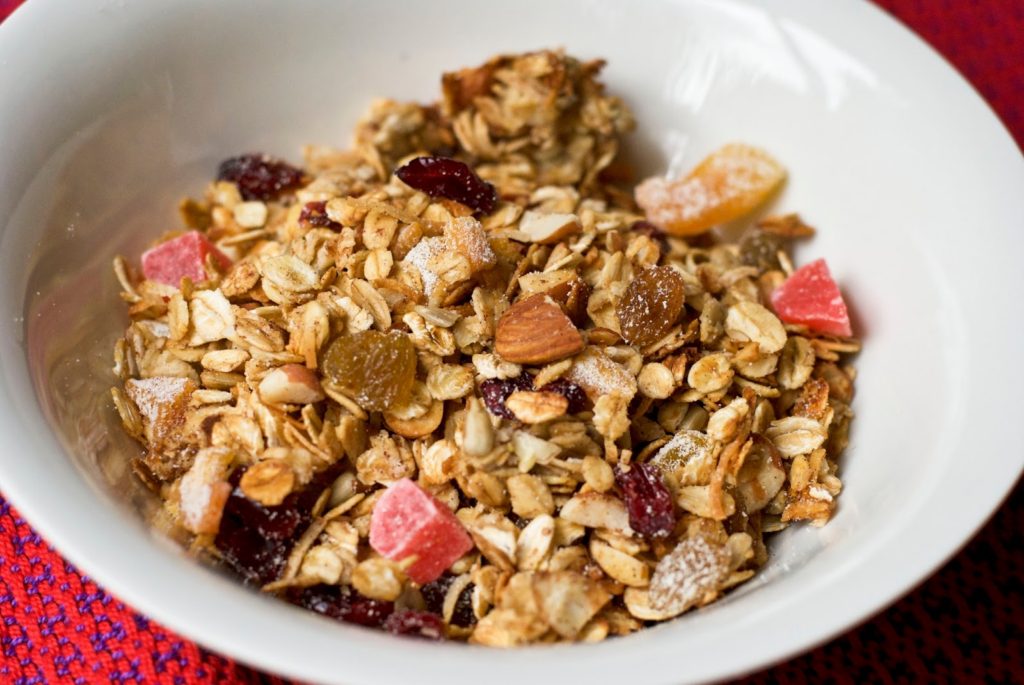
1/4 cup chopped almonds
1/4 cup sunflower seeds
1/4 cup chopped macadamias
1/4 cup chopped cashews
1/4 cup pistachios 
1 cup LSA mix
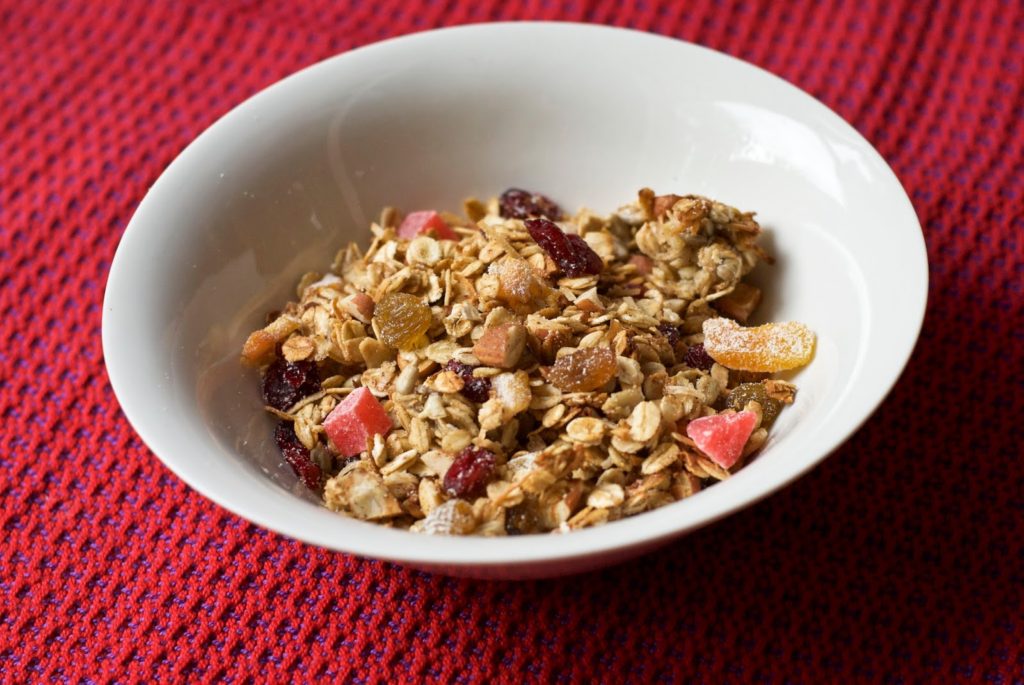
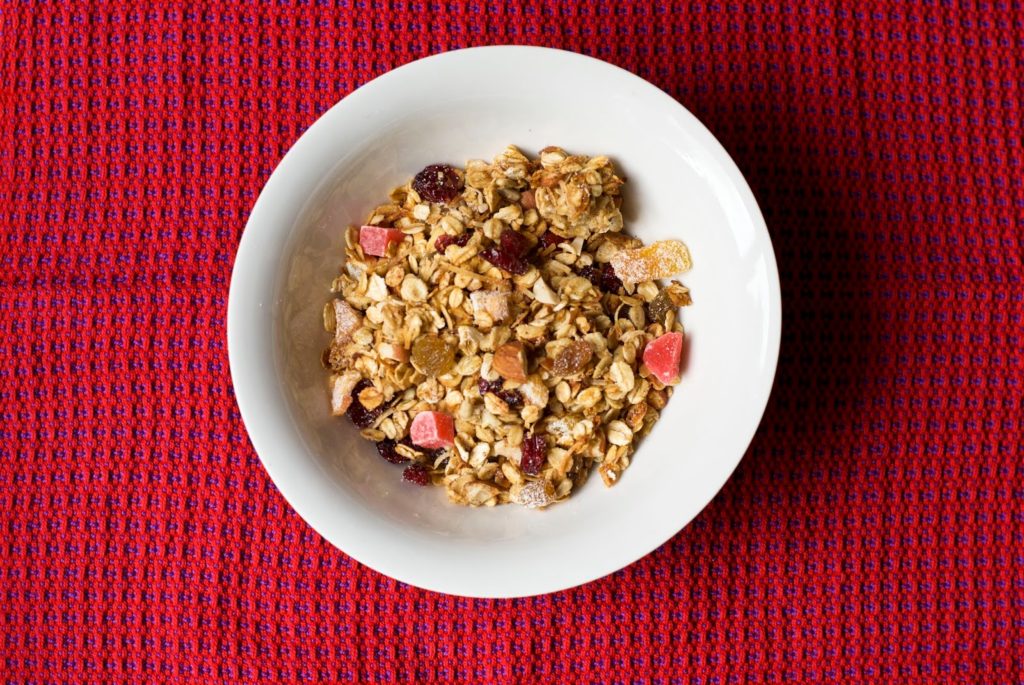
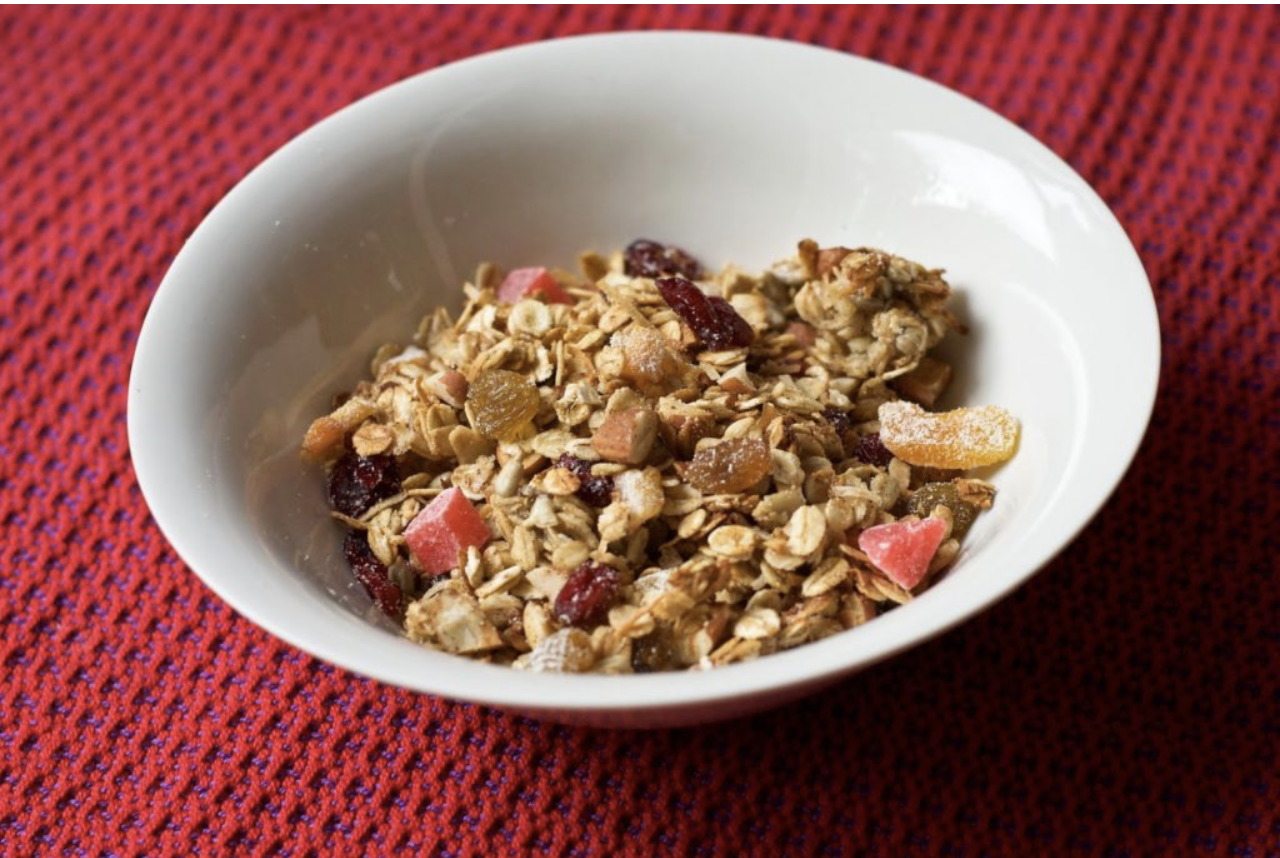
Chopped dried fruit eg. apricots, peach, paw paw, apple, dates, cranberries
Rules for add ins
*For seeds and nuts, add these in at the dry mix stage. 
*For dried fruit add ins, mix in when the muesli has finished baking.
 
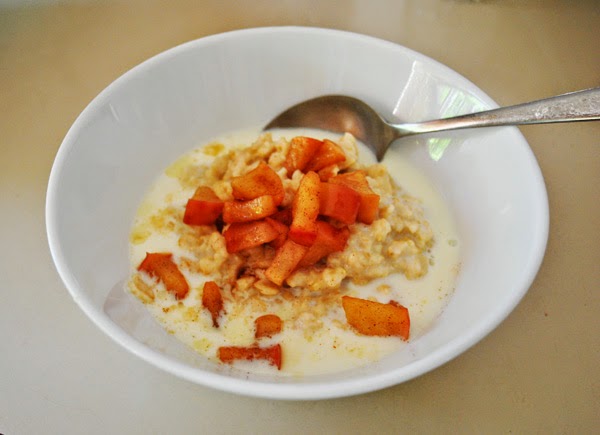
Allow the muesli to cool before placing it in an airtight container. Serve with milk or use as a delicious topping on stewed fruit and yoghurt.
 
Also makes a delightful gift when placed in an attractive jar.

I hope you enjoy this recipe! Don’t forget to comment and let me know how yours turned out. If you love it, you could even leave me 5 stars 😉

Filed Under: Health and home, Recipes Tagged With: frugal living, healthy food, muesli, my recipes, Recipes and food

When your life is on hold

by Kelly 32 Comments

Where to start when writing a post like this? It’s not like I’ve ever experienced anything like this before. But that’s the thing that really unites all of humanity at the moment. We’re all in this together and none of us are immune from the possible and real effects of the coronavirus.

Many of us are isolated in our homes, some working from home, others facing the uncertainty of job insecurity. No social meet ups. No extended family meet ups. No popping out to the shops to pick up some milk. It’s a completely different lifestyle to what most of us are accustomed to.

I know that there is some concern about the impact all of this could have on mental health if the isolation has to continue for some time. We don’t know at the moment when it will be safe to resume former activities, we don’t know if we will contract the virus, and if we do, we don’t know how bad it will be. There is so much we just can’t predict or plan for.

In many ways, it feels like life is completely on hold. No planning ahead, no getting ready to go back to work or school or social activities. For now, we just have to BE.

People have been talking about the state of JUST BEING for a long time. Of being present in the moment in whatever we’re doing. To think, be grateful, live slow. In the busy, noisy world of today, that goal can feel unrealistic and unobtainable.

Enter quarantine. And self isolating. And social distancing. Enter 2020 and COVID 19.

What if we completely turned this pandemic thing on it’s head and focused on the positives of what it means for us right now?

How many times, as you were rushing off to work in the morning or dragging yourself home at the end of the day, have you wished that you had more time? Have you thought to yourself “if only I had an extra day, I could take the time to learn to…… (fill in the blank)”. Or when you’ve been absolutely run off your feet and wondered why? Why am I doing this? Is this what I was meant for? Then why am I so unhappy?

That hobby that you’ve “always wanted” to get started with. “Maybe when I retire!” you may have joked. Or “I’ll do it once the kids have all left home and I have some time to myself”.

How about now? In this time of major uncertainty, perhaps you feel a bit lost. But maybe it’s time to search and find. Maybe it’s time to discover what God is leading you to – what talents are waiting to be revealed, perhaps even find out what you should really be doing and who you really are.

I’m finding that it’s wonderful time, not just for discovery, but re-discovery as well. I am taking more pleasure and satisfaction in my daily tasks as a homemaker. Baking bread is not just something that I do an have done for a long time anymore, now it’s an important skill that provides my family with food.

Preserving vegetables is something I can take pride in, knowing that my family will have healthy fermented vegetables to eat even if we can’t leave our home to go to the shops.

Our garden has become a major focus as we aim to grow as much of our own food as we can. It’s something that the whole family can work at and reap the rewards and benefits at harvest time. It gives us time out in the fresh air and sunshine too.

I have been thinking for some time how I would like to make soap again, it’s been so long. Now, it happens that you can no longer buy soap, you can however buy ingredients to make soap.

I’ve been writing on this blog since 2008 and if you look back on past posts, many of them are related to simple and frugal living. It’s something I’ve been both striving for and living out for a long time, and something that just makes sense to me. It’s serving us pretty well at the moment!

If you’re interested in reading some of my “posts from the past” related to simple living, I’ll list some here:

The Simple Life

Back to Basics, Frugality revisited

Honey and Oat soap

Cheese and Bacon Scrolls

I have a lot of recipes, all of them are simple and frugal. You can search the “recipes” tab on my blog or type in “bread” or “recipe” in the search bar and you’ll be inundated with posts! I need to do an updated bread blog post, as I make bread in a different, very easy and intuitive way these days.

If you’re looking to learn how to weave, start with my Youtube channel. I promise it will keep you busy for many, many hours!

This has become quite a rambling post, but I guess what I really want to say is: What are you going to do this with this time? How are you going to be different? Are you the person you want to be? The person you were made to be?

Today is the first day of the rest of your life. What will you do with it?

Filed Under: Health and home, Inspiration, Recipes Tagged With: coronavirus, covid19, frugal living, inspiration, life, Recipes and food, self sufficiency, simple living

Easy, frugal, bread, onion and tomato bake

by Kelly 1 Comment

This is such an easy and economical dish and had the added bonus of using up some ingredients that might be past their best.
There is no need to be exact with quantities either, it’s that sort of dish.

I started with some thick slices of homemade bread that was slightly stale and buttered each slice lightly. Cut into cubes.
I chopped 1/2 a red onion.
I chopped roughly 10 tomatoes that were getting a bit old but still perfectly useable.
All this goes into a bowl together and drizzled with some olive oil. Sprinkle with garlic salt if desired and season with pepper.
I tipped all this into a baking dish and sprinkled with a little parmesan, then grated tasty cheese.
Pop into a hot oven (about 180 degrees C or 350 F) until golden brown on top.
Serve!

Filed Under: Recipes Tagged With: frugal living, my recipes, recipes

Natural homemade deodorant

by Kelly 1 Comment

I’ve been using this natural deodorant for almost 10 years now and am so grateful that I made the switch from the nasty store aerosol deodorant.
I wrote this recipe on my blog years ago as part of another post but it’s hard to find and people are constantly asking me for the recipe.
*This post contains affiliate links
It’s a very simple recipe and takes only a few minutes to whip up.
A little goes a long way, so one jar will last for a long time.
 

1/4 cup bicarb soda (baking soda)
1/4 cup cornflour
4 tablespoons organic virgin cold pressed coconut oil 
10 drops essential oil (optional) My favourite is lavender.

Mix all ingredients together until creamy. If the oil is solid it can be melted with heat to combine with the dry ingredients more readily. After your daily shower, just rub about a choc dot sized amount of paste onto the armpit area. In hot weather, your deodorant will melt unless kept in a cool spot, I keep mine at the bottom of the cupboard in the ensuite which is a very cool room so mine only melts on really hot days. If it does melt, it won’t affect the quality, just give it a stir and pop it in the fridge until solid again.

Filed Under: Health and home Tagged With: coconut oil, deodorant, frugal living, handmade, health, natural deodorant, self sufficiency

The Simple Life

by Kelly 5 Comments

It’s quite a popular topic nowadays, the “simple life” and how to obtain it. Do some people spend so much time pursuing this so called simplicity and their ideal of what that is that they miss the point entirely? 


Is the simple life about living the dream or living the reality? The dream for me is a country property and earning a good income through a  handmade business. The reality is suburbia, traffic, very little time to devote to a business of any kind and a very limited budget. But that’s not the point, right? 

The point is, what can I do right now to live the simple life given my circumstances? 


I was pondering the simple life and what simplicity means to me. It occurred to me that one of the most rewarding parts of simple living is that you can take very little and turn it into something 
special.

Home made bread for example. Usually 4 ingredients. Inexpensive, ordinary ingredients. Add time, love, technique and you have something awesome.

Weaving is another example. With threads and a loom I can make the most beautiful variety of things.


Soap making? Once again, very few ingredients. A bit of time and attention and you have a whole batch of creamy, natural soap for your family.


That property in the country may or may not ever happen, in the meantime I will try to be grateful for all I have and all I can do. And if it does happen, I guess I’ll be well prepared 🙂

Filed Under: Uncategorized Tagged With: bread, frugal living, simple living, soap making, weaving

Debt free habits

by Kelly 2 Comments

I love being debt free. I really do. I also love to help and inspire others to become debt free or at least to change their financial situation for the better. 


I have plenty of other posts here filed under frugal living but here are a few more thoughts and recommendations:


Stop spending so much on what you can’t see.  
Electricity, gas, and water may be essentials of daily life, but because we don’t really see what we’re spending until we’re hit with the nasty bill, it’s easy to let this area slip. Longer showers, leaving the heating or cooling on longer than is necessary, not bothering to make an effort to water save – all these things can end up costing hundreds of dollars more than you need to every year.

image credit

Have a plan. 
Write it down. Know what you want your finances to look like and what you need to do to achieve it. Make it realistic and achievable. Then stick to it.


De clutter. 
This is a very valuable activity – not only does it make your home tidier and more spacious, it also shows you how much you spend on what you don’t need. Once you have seriously decluttered, make a commitment to not buy rubbish you don’t need!


Change your mindset. 
You don’t have to give expensive birthday gifts, you don’t have to have the best or the latest, you don’t need every gadget. If you are not prepared to simply stop buying, at least change the way you buy. Give handmade gifts instead or buy at sales. 

image credit


Set yourself apart. 
You don’t have to keep up with anyone or prove yourself through the things you buy. Sure, the guy who drives past in his shiny red Ferrari looks impressive, but he should be pitied, can you imagine the level of his debt? Just because you’re a woman doesn’t mean you need lots of shoes or handbags or the latest fashion. Set your own standards and forget the rest.


Reality check. 
The end. You can’t take stuff with you when you die. 


You may be gone, but your debt carries on. Who is going to pay off your credit card in the event of your death? How big is your mortgage and who will that fall to when you’re gone? You are responsible for your spending but the consequences of your debt can affect others in a major way.

Filed Under: Uncategorized Tagged With: frugal living

Home made peanut butter

by Kelly 6 Comments

We go through plenty of peanut butter here and our youngest daughter in particular is mad about it on toast for breakfast. She is also a huge Nutella devotee.
I had heard that peanut butter is really easy to make and I don’t know why I’ve never tried, but yesterday I was gripped with the thought this was something I needed to do!

I’m glad I did! It is different to store bought peanut butter (it tastes more nutty, more natural, more REAL!) 

Why don’t you try it too? Here is how I made it:

* 500g roasted, salted peanuts 
1 teaspoon of salt
2 teaspoons of honey
 ** 2 tablespoons of peanut oil

Place your nuts in a food processor. Blend until they are coarsely ground. At this point, if you want chunky peanut butter (like I did) take about 1/3 of the ground nuts out and set aside.
Add the salt and honey. Continue to blend until your mix is smooth or starts to look like a paste. Times really vary depending on your food processor, but it’s generally a couple of minutes to get to the paste stage. Now, drizzle your oil in and blend until it’s a smooth paste. Add your coarse nuts back in and mix through. Put your paste into a jar or sealed container. Drizzle a little more oil over the top as a seal.
I’ve been told that in needs to be kept in the fridge – I’m not sure if this is totally necessary, I think I will experiment by leaving some out to see how it goes.

* If you want to use peanuts from the shell or raw peanuts you can roast them yourself. Then just follow the steps from the beginning.
** If you find your paste is dry try adjusting the oil amount.

Isn’t that simple? Next up I want to try doing Nutella and almond butter would be fun too. Let me know if you give it a go!

Filed Under: Uncategorized Tagged With: frugal living, home made peanut butter, Recipes and food

Frugal February in the kitchen

by Kelly 4 Comments

The months of December through to March are our most challenging financially. Christmas, followed by holidays, plus bills and insurance mean that we really have to pull in the reigns and make an extra effort to save money. I thought I would share with you a few of the thrifty things I’ve been doing in the kitchen. 


Last month I set myself a water challenge. It’s Summer here in Australia and we’re using a lot of water on the garden (we have a tank for the garden, but without rain there is no tank water). 


*Place a container in the sink and use the water from rinsing fruit, vegetables and eggs on the garden.
* Run water into a jug while waiting for hot water – I get heaps of water this way, which either goes into our purification jug or onto the garden.
*Halve the amount of water you normally wash up with. There is no need to fill the sink with hot water to do the dishes! I’ve been really surprised by how little I can use for this purpose. This goes for floor washing too – you don’t need that much (not that I wash my floors all that often, ahem..)
Next up is the use of appliances and utilities (gas, electricity) in the kitchen.

*If steaming vegetables, boil until steaming is underway, turn off the gas and keep the lid on. I find this is enough to steam the veggies without having to use another 5 – 10 minutes of gas.
*The oven can also be turned off early. When I make bread, I turn off the oven 5 minutes before the bread is done and let it sit with the door closed. It stays hot enough to cook and it saves 5 minutes of cooking time. Add that up over a year and it would be a lot of time!
*Bake your own bread. I’ve been doing this for a long time and it saves us a lot of money. The whole family prefers homemade loaves too. I bake 4 at a time to get the most out of the oven.
*Think about the appliance before you use it. Is it really necessary to plug into the electricity if you can do it by hand? For example, we sweep hard floors instead of vacuuming, our cooking ingredients are often mixed by hand and all our dishes are done in the sink with no dishwasher.

I’d love to hear your frugal tips for February too!

Filed Under: Uncategorized Tagged With: bread, frugal living, Recipes and food

Hand woven dish cloths

by Kelly 9 Comments

Over the weekend I wove some dish cloths with some beautiful Australian 10ply cotton that I rainbow dyed. I’ve been wanting to try out waffle weave and thought that kitchen cloths would be perfect.
All of these were woven on the same warp on my rigid heddle loom. Did you know you can do that? Warp once, weave many, much easier! Just leave a gap of 5 – 6 inches between each cloth, towel or whatever item you’re weaving. I hemstitched each one on the loom and left a short fringe at each end.

They sold like hot cakes with an order for more and I’m not surprised. If you’ve never tried a handmade cotton kitchen cloth (either woven, knitted or crocheted) you really should, they are far superior to any commercial cloth. I use mine as a multi purpose kitchen cloth for wiping and washing. They last a long time and can be thrown in the wash and line dried. My next order is for re-usable baby wipes – another great idea.


These are some other cloths I wove last year in plain weave so the baby wipes will be similar – fairly thin and very soft for baby skin.
The next thing for me to look at is tea towels. I really wasn’t happy with my last lot – I think the cotton was too thick, I need specific weaving cotton. 

If you’re interested in trying waffle weave on your own rigid heddle, there is a great pattern sequence HERE, look specifically in the comments section for the sequence.
You need one pick up stick but it’s very easy to master.

Specifications for my cloths: 
10 ply cotton (warp & weft)
7.5 dpi
60cm rigid heddle loom
Hemstitched on loom.
Wet finished, laid flat to dry.

Linking up with Creative Friday on Natural Suburbia.

Filed Under: Uncategorized Tagged With: frugal living, hand dyed yarn, weaving

3 ways to save money today – Volume 8

by Kelly 5 Comments

1. Don’t buy cereal.
I’ve noticed a real drive by cereal companies for us to mimic American culture in our pursuit for cereal. It’s really expensive, usually unhealthy and really unnecessary! The only type of cereal I buy on a regular basis is Vita Brits, which I find affordable, nutritious and tasty. Occasionally I buy cereal for the kids for a birthday or treat, but I find the novelty wears off pretty quickly anyway.
Oats are fantastic. If you buy a generic brand they are cheap and really versatile. I’ve been making my own muesli, toasted and natural for years.
There are so many alternatives to cereal that are healthier and will cost a fraction of the price. Get googling and find some new, simple breakfast dishes.

2. Make your own bread.
Commercial bread is increasing in price constantly. Yes, you can still buy a cheap white loaf for around a dollar but I find these akin to eating fluff, not nice.
It’s not hard to make bread. It’s a time investment but once you get into a routine it’s very do-able. I’d like to say that I fully supply our family with home made bread but I’m not quite there yet. I’m happy to say that most of the time there is homemade bread in the pantry or freezer.
I have quite a few bread recipes right here on my blog:

Apple and Walnut bread
Wholemeal, rye and linseed bread
Spelt, honey and Linseed bread
Honey and Oat bread
My basic bread
My Everyday bread recipe

3. Make your own toilet spray.
We pay a lot of money for the privilege of spraying chemicals around in our home and it’s not at all necessary! A small spray bottle, some water and some essential oil that you like the scent of, and you’re done. Experiment with quantities of oil to water to get the ratio that suits you. A good essential oil can be a bit of an investment in terms of dollars, but when you consider how long one bottle will last you it’s much cheaper than buying a chemical laden spray.

Filed Under: Uncategorized Tagged With: frugal living, Recipes and food

  • Page 1
  • Page 2
  • Page 3
  • Interim pages omitted …
  • Page 5
  • Go to Next Page »

Primary Sidebar

Categories

Archives

Meta

  • Log in
  • Entries feed
  • Comments feed
  • WordPress.org

Copyright © 2025 Kelly Casanova Weaving Lessons on the Foodie Pro Theme