• Skip to main content
  • Skip to primary sidebar

Kelly Casanova Weaving Lessons

  • Hi! I’m Kelly!
    • Disclosure
  • Online Weaving School Class Index
    • Common account issues
    • Common technical issues
    • What do I get with a membership?
  • New to rigid heddle weaving? Start here!
    • Never heard of the rigid heddle loom?
    • How to weave neat edges on the rigid heddle loom
    • Rigid heddle weaving
    • Rigid Heddle Weaving Patterns
  • Patterns
  • Subscribe

Tutorials

Harvesting and preparation of prickly pear fruit.

by Kelly Leave a Comment

Ouch! Yep, those little spikes hurt and there are plenty of them. But don’t let that deter you – the prickly pear has delicious fruit and you can even eat the paddles (leaves also known as napales) but in my opinion that is an acquired taste, as in, one that I personally have not acquired!


What you need:


Good quality kitchen/washing up gloves. The good quality part is important, they are tougher! *See note.
A plastic bucket
Long handled tongs
Small, sharp paring knife
A large mixing bowl or similar to put your peeled fruit into.
Plastic bag
Water


What to do:


This first part is completed outside.


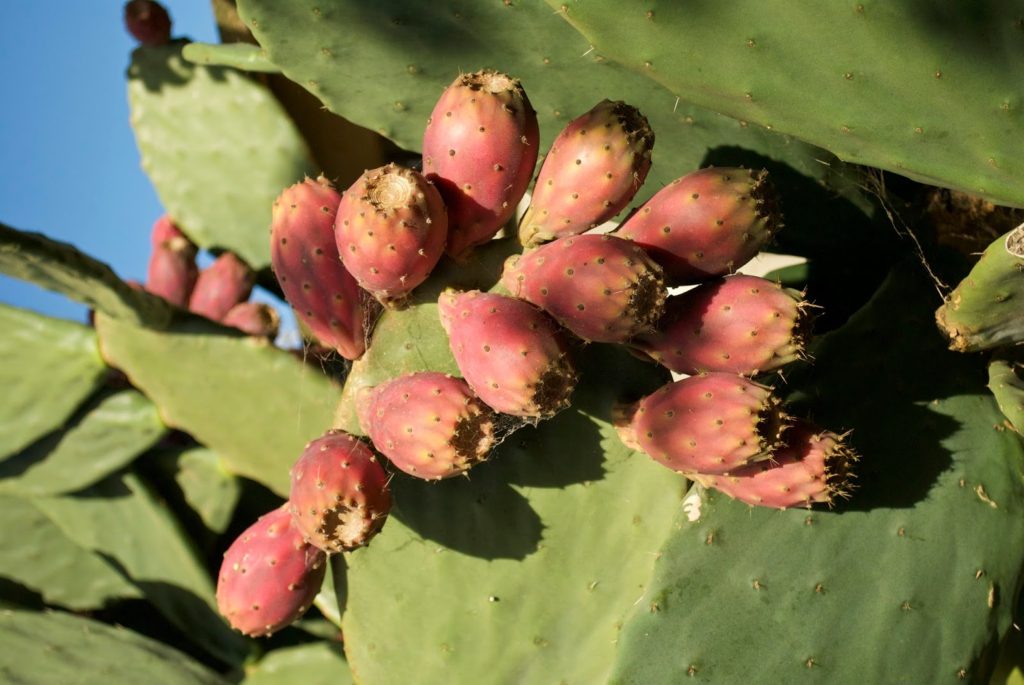
Half fill your bucket with water. Stand back from the cactus (the long handled tongs give you further reach). The hair like spines (glochids) will begin to come off as soon as your tongs touch the fruit, so be aware of where they are falling. For this reason it is better not to harvest on a really windy day.
Grabbing the fruit with the tongs, give a twist or two and place the fruit straight into the bucket. Continue this process until you have the number you require. Make sure the water is covering the fruit.


Now tip the water out, somewhere that no one is likely to walk or weed etc. Using a hose, spray water into the bucket onto the fruit, covering it once more. Tip out once again. You can repeat the spray and tip one more time (I do).


Put on your gloves. If your gloves are strong you should be fine to pick up the fruit now. Cut off each end and make a slit down the centre with the knife. Begin to peel back the skin from the slit until it is all removed. Place the skin either back in the bucket or straight into the plastic bag. Place the peeled fruit into the bowl. Continue for all fruit.


Now you can take the fruit inside to use. I give one last rinse in water just in case there are any remaining spikes. It is delicious fresh or there are lots of interesting recipes to try (I have a prickly pear syrup recipe coming soon!)


Clean up:
I throw all the peelings into the regular rubbish bin in a plastic bag. As far as I know, the peelings can not be composted due to the spines – I certainly don’t want them ending up in my compost. If you have successfully composted peelings, I would be most interested to know.


* I used good quality kitchen gloves to prepare the fruit. After working in the kitchen with the peeled fruit, I went back outside to clean up the peelings. However, I put on a different pair of kitchen gloves, a lower quality, thinner pair. As soon as I touched the bucket with the peelings, I got spiked. So it really is worth having the good quality gloves!

Filed Under: Uncategorized Tagged With: compost, Gardening, Recipes and food, Tutorials

How to make a heddle rod on a rigid heddle loom

by Kelly 2 Comments

My newest video is ready for viewing! It is a tutorial on how to make a heddle rod, which makes weaving with more than one pick up stick on the rigid heddle loom so much easier!

Filed Under: Uncategorized Tagged With: rigid heddle weaving, rigid heddle weaving tutorial, Tutorials, weaving

Simple photography backdrop

by Kelly 2 Comments

Our garden is a great location for photography portraits, but, having just arrived at Autumn, it’s a little dry and not looking it’s best. Being a natural light photographer, I wanted to head outside but I was also wanting something a little different for a portrait session with my littlest sweetie pie and her fluffy friend.
I grabbed my favourite bed sheet, pegged it on the clothes line and we were in business! If it’s a breezy day you will have the challenge of the sheet moving (which you can see in the right corner here) in which case you could possibly weight it down with something at the bottom. I kind of like the feeling that the blowing sheet gives to this photo though.


Next, your editing program can be used to achieve a variety of looks still using the same backdrop and different poses.


A plain sheet would also work well if you were looking for a plain backdrop with natural light, but I think the pretty floral one suits my little sweetie just fine, don’t you?

Filed Under: Uncategorized Tagged With: photography, Tutorials

Shaving cream marbling on paper

by Kelly 1 Comment

This has to be one of the easiest (and messiest!) ways for children to produce a unique art piece.
All you need is paper (160gsm is good), poster paints and shaving cream (the cheapest brand works fine).
Make a layer of shaving cream on a tray. Make dots or lines of paint. Swirl with a chopstick or similar. The more you swirl, the more intricate patterns you will get, however if you overdo it you might muddy your colours.

When you have a pattern you like, carefully place your paper on top and lightly press all over (lightly!) Peel the paper off and use a paint scraper of similar to scrape the excess shaving cream and paint off to re-use. Put you paper somewhere to dry.

Keep re-using the shaving cream, reapplying the paint if desired, until it’s too coloured to use. Then have some messy fun with the leftovers! (Good for making hand or foot prints on paper too).

This is messy. The easiest wash up for hands is to stick them in a bucket of water outside (the hands, not the children). The trays and tools wash up in warm water.

Here are some of our masterpieces.

They can be framed and hung.

Or used as wrapping paper or even for the basis of another project (collage, background for a picture etc).

Filed Under: Uncategorized Tagged With: art for children, creativity, frugal living, hand dyed yarn, Homeschooling, Tutorials

Wool felt donut tutorial

by Kelly 2 Comments

List of requirements for 1 donut:
30 x30cm piece mushroom coloured wool felt
15 x15cm piece of wool felt for icing
Carded wool or polyfil for stuffing
Embroidery floss
Sewing thread
These can be sewn either by hand or machine. Machine will give a neater finish, but I have made them both ways.
Print out the pattern from here. Make sure your printer settings are at 100%.
Trace pattern pieces onto felt and cut out. This picture has a mistake! The top piece should also have a hole, I took the photo before I cut out the hole, sorry about that!

Pin the icing onto one piece of the mushroom wool felt.

Sew around the outside of the icing, either on the machine or with a running stitch or backstitch by hand to secure it.

For sprinkles, use your choice of embroidery floss (here I’ve used a variegated one by DMC) to make short, straight stitches randomly on the icing.

Put your undecorated piece of wool felt on top of the decorated one so that right sides are facing. Sew all the way around the outside (backstitch if you’re hand sewing).

Turn the donut right sides out so it looks like this šŸ™‚

Starting from anywhere around the centre hole, close to the edges blanket stitch by hand with a floss matching the icing, 3/4 way around. *Note – if you’re not confident with blanket stitch you can do either a small running stitch or backstitch. The reason I like blanket stitch is it looks extremely neat and leaves no holes.
When 3/4 of the way round begin to stuff. Poke the stuffing with your fingers to ensure a firm donut with even consistency right around. When you’re happy with the stuffing, continue to stitch around the inner circle until completely closed, knot and sink the finished end in.

Ta da! Isn’t that easy? Don’t you want to make heaps and heaps? 
If you need a wool felt stockist Winterwood Toys is my favourite.

Please respect the fact that I am the original author of this post, that I have spent time and care in putting together this tutorial and drawing a pattern to share with you. Therefore, I ask that you do not steal from me or fail to give credit. Thank you!

*If you have any trouble printing the pattern or following the instructions please take the time to let me know -I can’t fix it if I don’t know about it!

Filed Under: Uncategorized Tagged With: embroidery tutorial, Toymaking, Tutorials, wool felt

Silkies and soap making

by Kelly 4 Comments

I have to show off Mary’s new silkies, they are so gorgeous! If you have ever considered having them, I do recommend them, especially as children’s pets. Don’t those feathers look soft, they’re more like hair than feathers. Look at those comical hair styles šŸ™‚

I’m not sure how old they are (forgot to ask!) but they’re not laying yet, so still young.

These two are classic, they’re totally inseparable, even though the dark black one is much younger. They spend their days roaming our backyard and the best part is they don’t scratch up the garden and make a mess like the Isa browns do!

Soap making revisited. My second attempt – a different recipe this time. While the last batch of soap was nice it was nowhere near what I expect in a bar of soap. Too slimy and soft. This time I’ve opted for a castile recipe using beeswax and palm oil (sustainable of course!) to hopefully make harder, long lasting bars.

Looks like custard, the beeswax gives a beautiful golden glow and a really lovely, honeyish scent.

And finished! After resting overnight I’ll be cutting bars tomorrow, then curing for 4 weeks (that’s the worst part – waiting).

Filed Under: Uncategorized Tagged With: frugal living, hand dyed yarn, pets, soap making, Tutorials

Smaller sized apron

by Kelly 2 Comments

The lovely Baukje likes my apron tute but wants to make a small apron for a grandchild turning 2 soon. So, here are the measurements you will need to make a smaller apron.

Size 2

Bodice – 8″x 5″ – Cut 1 main fabric, 1 lining
Band – 21″ x 2″ – Cut 1 from contrast fabric
Skirt – 35″ x 11″ – Cut 1 main fabric
Bottom hem – 35″ x 2.5″ – Cut 1 from contrast
Back ties – 20″ x 3″ Cut 2 from contrast
Neck ties – 20″ x 2.5″ – Cut 2 from contrast

Best of luck with it Baukje šŸ™‚

Oh, and a huge welcome to my newest followers, it’s so very lovely to know I’m not just talking to myself here!

Filed Under: Uncategorized Tagged With: Tutorials

Little girl’s apron tutorial

by Kelly 4 Comments

To fit approximately size 5, but is also multi fit.
Start with:
From main fabric –
11 x 7.5 ” – Cut 2 (bodice)
45 x 13.5″ – Cut 1 (skirt)
From contrasting fabric – 
25.5 x 3″ – Cut 1 (waist band)
45 x 2.5″ – Cut 1 (bottom of skirt)
24 x 3″ – Cut 2 (waist ties)
22 x 2.5″ – Cut 2 (neck ties)
*Please note that I refer to serging as overlocking throughout the tute (cos I’m Aussie!)
Take all the ties and press them in half. Open out, then press each long edge in 1/4 inch. Press one end in 1/4 inch also. Fold over in half again.
Topstitch down the length of both sides of each tie (including across the short edge you folded in) Overlock the short raw edges that you didn’t fold in on each tie.
Pin the neck ties 1/2″ in from the sides of one of the bodice pieces. Place the other bodice piece on top with right sides facing. Pin, then stitch around 3 sides, leaving the bottom open.
Turn right sides out and press. Topstitch around the 3 sides.
Take the skirt piece and the bottom skirt piece. Sew them together, right sides facing. Overlock the raw seams, then press open. Overlock the sides and bottom of the skirt also.
Run 2 lines of gathering stitches along the top of the skirt. Gather up until it is the same length as the waistband. Pin the waistband to the top of the skirt, right sides together.
Now take the bodice. Measure and mark the centre of the skirt and place the bodice in the centre, on top of the waistband which will be wrong side up. The bodice will be right sides facing with the skirt. Pin on and remove pins from underneath where you pinned on the waistband so that you don’t sew over them!
Sew along the waistband and over the bodice from one edge of the skirt to the other. Overlock the raw seams.
Press. Now topstitch the top of the waistband to the bodice, sewing along the line you made previously. No need to topstitch the full length of the waistband, just at the bodice to attach them together.
Take the waist ties and sew to the edge of the waistband on each side.
Your apron now looks like this. The last step is to fold in the overlocked edges on each side of the skirt and topstitch. When you fold in the edges the ties will face outward and will be caught in the stitching. Add an extra short line of stitching to the tie to secure it more to the waistband if you wish.
Now fold up the hem and stitch.
Lastly, give it to a little girl and make her smile!
I hope you enjoy this tutorial and make lots of pretty little aprons. I’d love to see what you make šŸ™‚
You can use this tute for personal use and to make aprons to sell, provided you acknowledge me, Kelly Casanova as the original author. 
I’d really appreciate you letting me know of any mistakes or improvements – I’m no expert at writing tutes!

Filed Under: Uncategorized Tagged With: Tutorials

Little wool felt purse tutorial

by Kelly 3 Comments

My 6 year old and I were designing a wool felt purse for a sewing machine project and she thought it would be a lovely idea to share a simple tutorial for any other young people who would like to give it a try. The template is at the end of the post.
Oh, and I apologise in advance for my less than perfect photos, but as time is of the essence I didn’t edit šŸ™‚
Cut out your 2 pattern pieces. We used some lovely hand dyed rainbow wool felt.

Pin them together like this.

You can machine or hand sew. If you’re machine sewing make sure you have an adult there to work with you (this is a photo shot, you need to actually look at what you’re doing!)

Sew down either side and across the bottom like this.

We used a snap press to apply a snap closure (a snap press should only be used by a grown up) but you can make whatever closure you like eg. a button, velcro.

Here is another idea for your purse – a ribbon handle! Just stick the ends of the ribbon in either side like this before you sew. You could also cut your pieces of felt out with pinking shears for another pretty effect.

My 4, nearly 5 year old made one too!
Hope you enjoy this tutorial and use your purse for coins, jewellery or any other special trinkets you need a safe place for.
Template. Cut 1 of each.

Filed Under: Uncategorized Tagged With: Tutorials

Teapot rest or mat tutorial

by Kelly 4 Comments

I’m a teapot devotee – teabags just don’t do it for me. Every teapot lover needs a pretty mat on which to rest the pot while the tea is steeping. It’s so long since I did a tutorial, so I got stuck into this one this afternoon. It’s a quick project that is great for using up little bits of fabric.
Requirements list :
  Fabric measuring 25 x 25cm (depending on the size of your teapot – mine is medium sized)
Ric rac measuring approx. 53cm
Small crocheted doily 
Embroidery floss (optional)
Sewing thread
Batting (I’ve used polyester quilt batting)
Air erasing pen (optional)
Iron on adhesive (I’ve used Heat n Bond)
Using a round bowl (mine measures 17cm across) draw 2 circles on your fabric with an erasable pen or lightly in pencil.

Cut 2 squares of batting a bit larger than your circles.

Cut  a circle of Heat n Bond that is the same size as the circular part of the doily (exclude the border). Follow the packet instructions to secure your doily to the middle of the right side of one circle.

Laying the circle with the doily on top of the wadding work some running stitches around in circles between the gaps of your doily. I’ve used cream coloured embroidery floss for this, but regular sewing or a quilting thread would be fine too. Working the running stitches ensures your doily is securely attached and also gives a lovely lightly quilted look. I didn’t stitch down the scalloped border of the doily as I like the way it looks kinda fluffing up.

Lay your two circles right sides together.  Lay your ric rac so that it’s sandwiched between the 2 circles right on the edge so that you can just see the bumps on the outside. Carefully pin around the circle , leaving a 10cm gap open (don’t pin ric rac on the gap either).

Here it is pinned all the way around except for the gap. If you’re worried about the placement of the ric rac you could tack it on before sewing.

Using your sewing machine, sew around circles (don’t forget to leave your gap open!) about 1/4 inch from the edge.

Turn the circles right sides out through the gap. Press lightly around the edges, being careful not to scorch the ric rac. Turn the edges in at the gap and sandwich the remaining ric rac. Tuck the tail of the ric rac inside. Pin in place.
Top stitch right around, close to the edge,  catching the turned in edges at the gap.

Hey, it’s even reversible!
Now go and have a well earned cuppa!
I hope you like this tutorial, please leave me a comment if you make a mat and please let me know if I’ve made any mistakes in the tute!

Filed Under: Uncategorized Tagged With: Tutorials

  • Page 1
  • Page 2
  • Page 3
  • Go to Next Page »

Primary Sidebar

Categories

Archives

Meta

  • Log in
  • Entries feed
  • Comments feed
  • WordPress.org

Copyright © 2025 Kelly Casanova Weaving Lessons on the Foodie Pro Theme