• Skip to main content
  • Skip to primary sidebar

Kelly Casanova Weaving Lessons

  • Hi! I’m Kelly!
    • Disclosure
  • Online Weaving School Class Index
    • Common account issues
    • Common technical issues
    • What do I get with a membership?
  • New to rigid heddle weaving? Start here!
    • Never heard of the rigid heddle loom?
    • How to weave neat edges on the rigid heddle loom
    • Rigid heddle weaving
    • Rigid Heddle Weaving Patterns
  • Patterns
  • Subscribe

Reviews

Avoiding back pain at the floor loom

by Kelly 24 Comments

This is an issue close to my heart, as I have a lower back injury. Over my years of weaving, I’ve had to find the best ways to avoid pain while being able to indulge in as much weaving as possible.

The more time you spend thinking about and implementing comfortable weaving, the more time you will be able to spend actually doing it into the future.

Firstly I’m going to talk about seating.

There are a few important factors here. Generally, a regular chair cannot be used for weaving on a floor loom, so we have to look at the best suitable alternatives.

So, what are these alternatives?

Most floor loom manufacturers also make weaving benches that can be purchased separately but are made specifically for your loom. Benches can be very pricey.

I’ve seen some weavers seated on exercise balls for threading the loom, which allows you to get very close to the shafts – I don’t intend to try this myself, but it’s another option.

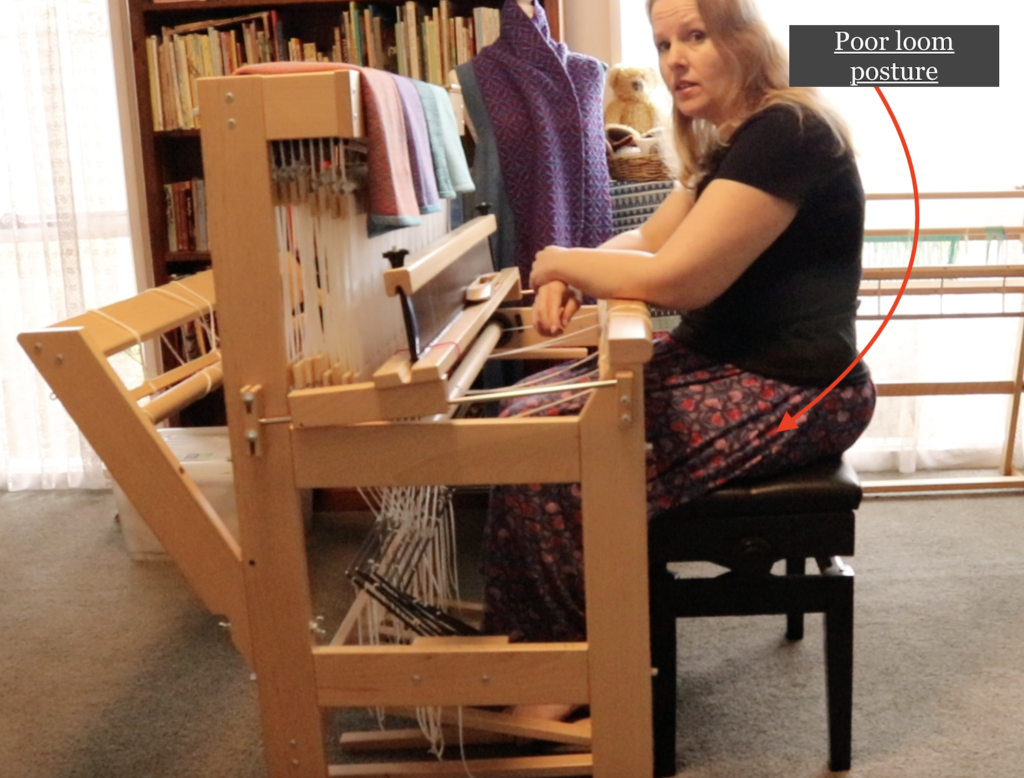
I have been fortunate to find the perfect seating option for me. I use an adjustable, padded piano bench. Let me tell you why I love this option:

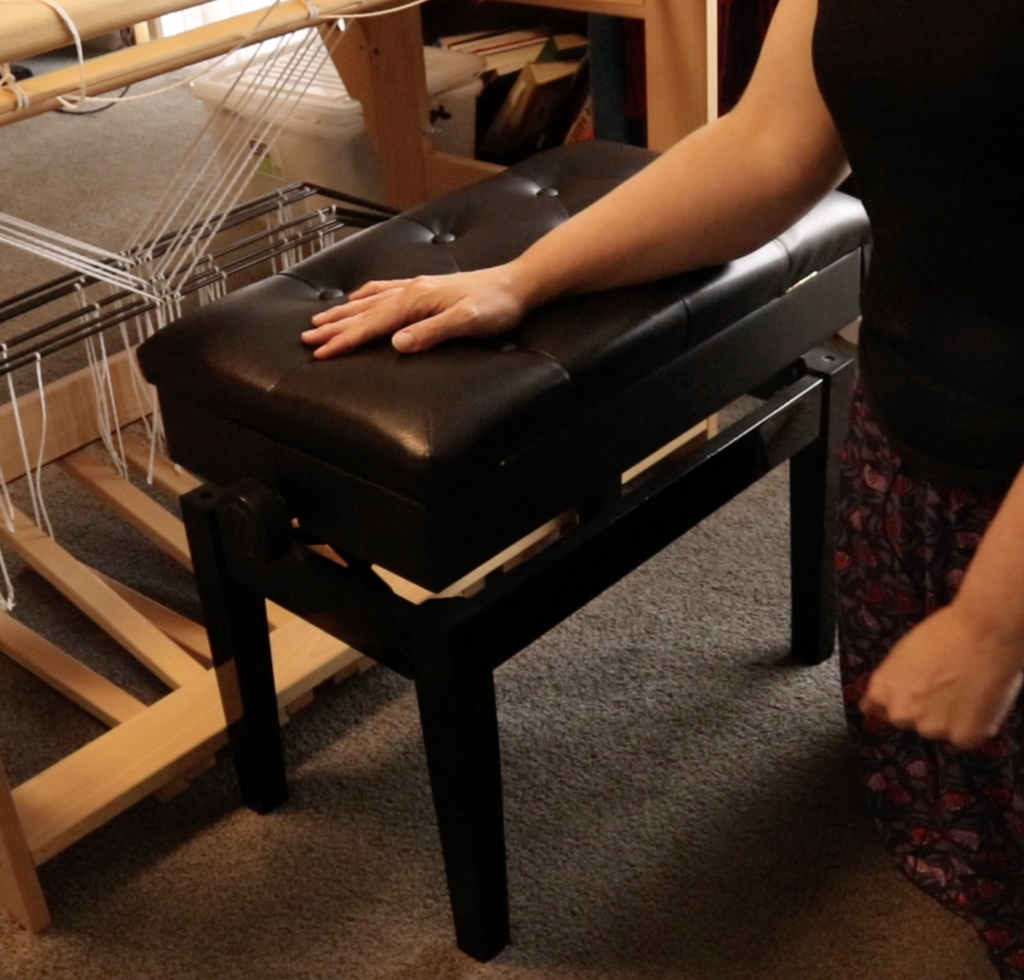
  1. It’s height adjustable.

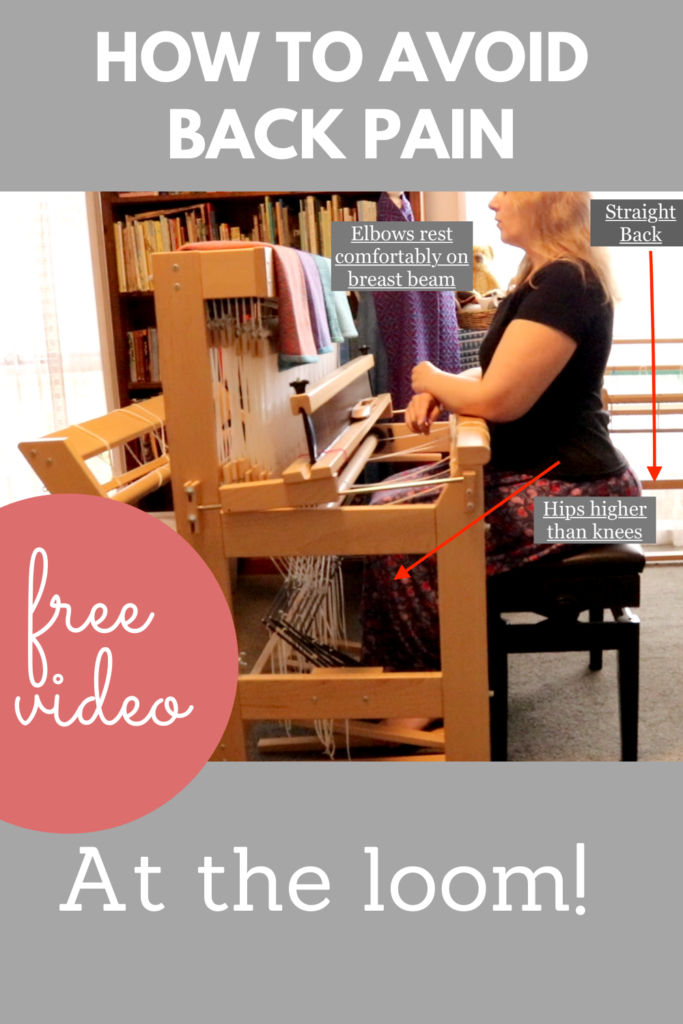
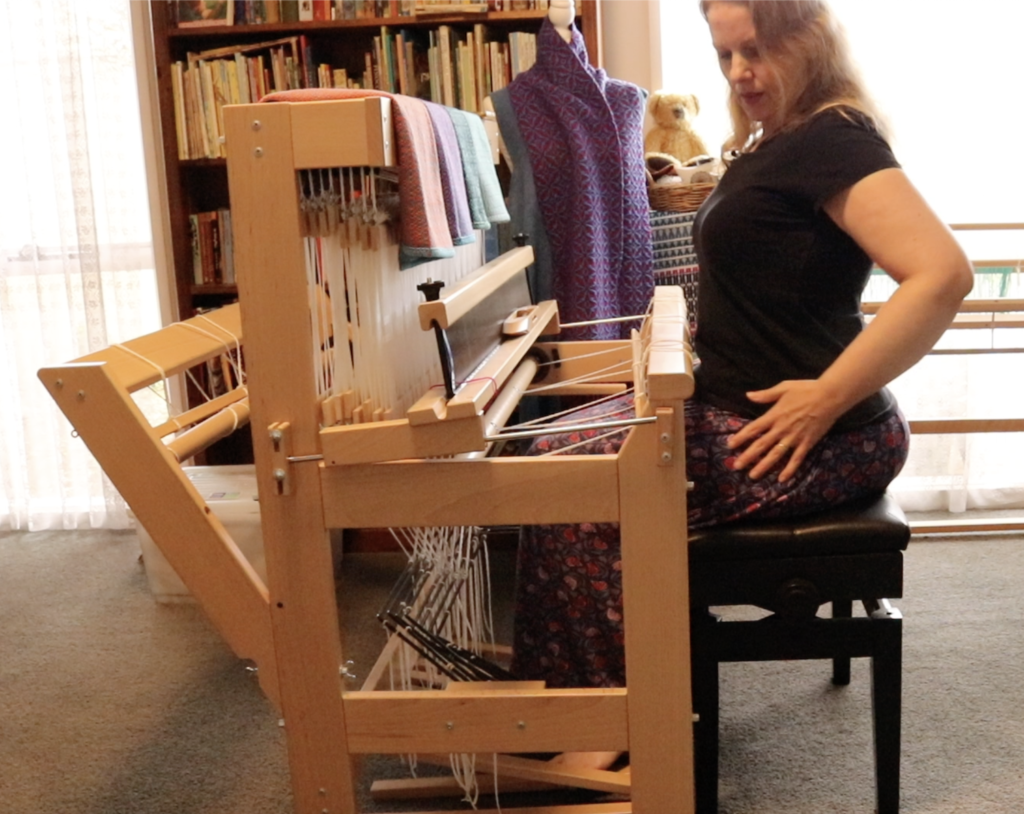
    An adjustable bench is important because it allows you to adjust your seated height to suit the loom. Your posture at the loom is crucial to your long term back health. Your elbows should be able to rest on the front cloth beam without you having to raise them up. Your hips should be higher up than your legs (like they are when you’re driving a car) because otherwise you’re going to have to exert more pressure when treadling and then – hello back pain!

2. It has ample seating space.

When I was looking at buying a weaving bench, all I could think when I saw commercial weaving benches is “they obviously weren’t built for weavers with generous lower proportions!” The piano bench accommodates my… ahem… ample behind (🙈) very well because it is wide enough, but not so wide as to be a difficulty.

3. It’s padded.

I can’t imagine sitting on a non padded bench, ouch. If you can get something with padding built in, that is better because you don’t have to contend with it slipping around. 

4. It has 4 legs.

This is really useful for the threading stage, as I can angle the bench so that two legs sit inside the front of the loom, allowing me to be closer to the shafts and therefore putting less strain on my back.

If you purchase an adjustable piano bench, try to spend a bit more to get good quality. I did not do this, and am constantly having to tighten bolts because the bench is not as stable as I would like. Eventually I’ll invest in a good one!

Also, don’t get the cheap, fold out piano bench. I do have one of these for my kids to use at the piano, and it’s surprising strong, but you want a bench with four legs, as I already mentioned.

Now let’s discuss some other tips and strategies for keeping your back pain free at the loom.

If you already have pain:

  • Firstly, if your lower back is on fire REST IT! I can’t stress this enough. Do not sit at that loom again until your back has settled down, you will only make it worse. I know it’s hard to take a break but it really is necessary.
  • Take anti inflammatories if needed, use ice or heat – whatever works for you to get your back moving towards normal again. If you’re using medications due to a flair up, do it sensibly and in consultation with a medical professional.
  • If your flare up does not settle down, you may need to see someone who can help you. This may be a chriopractor, a physical therapist, a masseuse – there are options to try and you don’t have to suffer alone!

    As you weave:
  • Try to move a little or shift your weight from side to side as you weave rather than keeping your body really rigid – follow the shuttle with your body, especially if it’s a wide warp.
  • Throw and catch your shuttle in a way that is not causing you to raise your arms unnecessarily or at weird angles.
  • Get in close to the loom. The closer you are, the nearer your reach. You can also naturally brace yourself against the breast beam to beat.

Treadle positioning:

A couple of years ago we bought a new (secondhand) van following an accident where our existing van was written off. The new van was the same company and make as the last one, but was a slightly updated model.

As soon as I began driving the new van, I noticed a difference in the height of the accelerator. The new accelerator was so much higher than the old one! I had to lift my foot higher to depress the pedal. And, guess what? Yep, the hip pain started up and is still a problem. I try to limit my driving, but when I do drive I use cruise control as much as possible so that I’m not having to lift my right foot so much.

My point? The higher you have to lift your feet to operate your treadles, the more stress you will place on your legs and ultimately, your back. If your treadles are very low to the floor (as they are for my floor loom) you will not have that stress on your body.

You may find that older looms not only have treadles sitting high, you also have to depress them quite firmly. If you do have an older loom, I recommend looking at any modifications you can do to get those treadles lower to the floor.


Take regular breaks.

It’s tempting to stay in the weaving groove and forget about time, but breaks are necessary. Get up, walk, stretch. Don’t sit at the loom for so long at one time that you feel sore and stiff when you get up. Anticipate the stiffness (even set a timer if you need it) and be kind to your body by resting it.

Batching tasks:

This goes hand in hand with the last point on taking breaks. Plan out your project so that you can batch tasks.

For example, if you’re threading for a full width project, unless you are Speedy Gonzales, you have to expect that the threading will take several hours. Plan to do a certain amount at one time or on one day. Make an agreement with yourself like: “Today I will aim to thread half of this project, taking regular breaks. If I start to experience pain, I will stop or only do a quarter of the threading”. You’re still making progress, but you’re not overdoing it.

Another example: “I will aim to make my warp today, dress my loom tomorrow, do half of the threading the next day and the second half the following day etc”. Break the tasks down to keep them achievable. You may end up doing more than you planned because you are pain free, but the point is to have a plan in place.

Accept bodily limitations:

This is a hard one! I’m sure we all wish that we were completely fit, healthy and pain free. But we need to be realistic and accept that we are not perfect. Accept the physical limitations you may have and don’t push yourself beyond them. Work with what you can do and make that your focus.

Sit up straight!

Did you ever here those words from your mother at the dining table? Well, she was right! 😆 You want to sit naturally, not rigidly at the loom, but you also want to keep your back nice and straight. If you find yourself slumping often, go back and check the seating points I discussed. It may be that your bench is not at a correct height.

Overall loom posture is really important. Remember – elbows on the breast beam, hips higher than knees, back straight!

I hope this post has been helpful to you. I have made a companion video so you can see just how I sit at my loom. You can view that here:

If you want to get started in floor loom weaving, my Introduction to Floor Loom Weaving course is perfect. It takes you through step by step processes to give you the confidence to get weaving!

Want to know more about my floor loom? Check out my review by clicking here.

Let’s keep the conversation going! Do you have any helpful tips to add? Any questions? I would love to hear from you in the comments.

Until next time…

Happy Weaving!

Filed Under: 4 shaft weaving, 8 shaft weaving, All about looms, Floor Loom Weaving, Health and home, Online Weaving School, Reviews, Weaving Tagged With: avoid back pain, back pain, floor loom weaving, posture

How is a knitter’s loom different to a rigid heddle loom?

by Kelly 41 Comments

As you probably already know, I’m a big fan of Ashford looms, I have four of them myself. I have found their looms to be reliable, easy to obtain, excellent learning tools and affordably priced.

Ashford make a variety of looms including the rigid heddle, knitter’s loom, inkle looms, table looms and floor looms. They also make a big range of weaving tools, yarns and accessories, as well as all their other supplies for fibre artists.

*This post contains affiliate links. Please see my disclosure for more details.

Ashford rigid heddle loom, photo courtesy of Ashford website.

I also love that the Ashford factory is based in New Zealand, my second favourite country (after Australia, of course!) and all the wood used is sourced from there too.

But today I want to focus on two of their looms that are very popular but also cause some confusion among new weavers – the knitter’s loom and the rigid heddle loom.

If you’re interested in knowing more about looms prior to purchasing, or just out of interest, I have a list of articles and videos that will be a big help to you.

Ashford Knitter’s loom, photo courtesy of Ashford website.

Having never actually used a knitter’s loom myself, I knew it was time to call in some expert knowledge on the subject, and who better to answer my questions than Kate Sherratt from Ashford.

Kate was very generous in not only answering my questions but in giving me extra information for all of us to learn from. Let’s start with a little history of the rigid heddle and knitter’s looms:

Ashford’s have been making Rigid Heddle looms for over 70 years. Pictured below is Richard Ashford’s mother, Joy with one of their early looms.

The Knitters looms are a more recent addition and were introduced in 2005. These looms are a type of rigid heddle loom but with some differences.

One of the aims of the knitters loom was to change the mindset that you can only weave with weaving specific yarns. It paved the way for knitters, who already had a healthy stash of knitting yarn, to ease seamlessly into weaving and continue to utilise the yarn they already knew and loved.

The release of the knitter’s loom brought a whole new wave of crafters and fibre artists into the weaving world. It had features that were very attractive to the brand new weaver who wanted to get up and weaving really fast.

It folded with weaving in place, it was lighter and more compact than previous rigid heddle looms, it had the factory lacquer finish and it was assembled.

So, which loom is the right one for you?

Ashford now make three types of rigid heddle looms – The Standard Rigid Heddle looms (RH), the Knitters looms (KL) and the SampleIt looms (SL).

Kate points our that all these looms are exactly the same in the way they function – you warp and weave on them in the same way.

The difference comes down to personal preference:

What size do you prefer? What do you intend to weave the most?

How much money do you want to spend? 

How much space do you have? 

Will you want your loom to be as portable as possible? 

Let’s take a look at the differences between the three types:

RH come in four weaving widths 40cm (16″), 60cm (24″), 80cm (32″) and 120cm (48″).

KL come in three weaving widths 30cm (12″), 50cm (20″) and 70cm (28″)

SL come in two weaving widths 25cm (10″) and 40cm (16)

KL come assembled and have a factory lacquered finish and include a carry bag, making it very convenient to take to a class or outing.

RH come kitset and unfinished timber. This means you need to do your own lacquering, painting or waxing and assembling.

SL come kitset and unfinished.

KL fold in half for storage and transportation, can fold with weaving in place. Are made of the lighter timber.

RH are made of thicker more solid timber and do not fold.

SL are smaller, lighter and more compact – the most prominent difference is the depth of the loom – which will only effect the weaving when using non elastic yarns like cotton.

RH have more accessories available – the freedom roller, the table stand, and the warping pegs are exclusive for the standard rigid heddle looms.

What these three looms have in common:

6 different dpi reeds are available for all.

Vari dent reeds are available for all.

Stands are available for all.

They all can be warped the same.

They all can be woven on the same ways.

They all are affordable. 

They all work extremely well, are well designed and do what they are supposed to do.

I also had some specific questions for Kate. These are things I am often asked by students.

*Can you use two heddles on a knitter’s loom?

All our rigid heddle looms come standard with the double heddle sideposts – as far as using three heddles go, I cannot personally comment as I have not tried it myself but I have seen people using three heddles on all our rigid heddle looms – including the SampleIts (see Amy McKnight’s recent posts).

I will also add here that I have several classes available on using more than one heddle. The most popular classes are Three Heddle Adventures and Weaving with Two Heddles

* Students have told me they have trouble when weaving the down shed on their knitter’s loom. They say that the heddle slips out of place.

On the Knitters loom the reed is held in the bottom position by the warp tension. It does not click into place or stay there when there is no warp on it, it is not supposed to. (the standard rigid heddle reed does not either, it only hangs from the upper rail, and as the KL has to fold the rails needed to be different).

*Students have also mentioned that they need to angle the back of the knitter’s loom in order to weave. Can you explain this?

See the attached snippet from the Learn to Weave on the Knitters loom booklet (that comes with the loom)  – the design of the loom, so it could fold etc, requires the back half of the loom to be angled up when weaving. This is probably the number one issue people have when starting out “help I have no shed” – to which the simple answer is lift the back up into the correct position. 

     *Are the heddle positions the same on each loom?   

   The heddle position are actually the same on all the looms – the distance is the same from the top to the bottom and to the neutral positions – it has to be the same as our reeds (the distance from the top rail to the eye and to the bottom rail) are all the same. And the sheds are the same…..

*How long a warp can you fit on each of these looms?

This does depend on a few things – yarn type, sett, warp separators etc. The limiting factor is the distance the cross rails are from the rollers – which varies from 7cm to 10cm. So you can fit quite a length!

*Is there anything else you think is important that people know about the looms?

You can do the same things on all the looms – there is not one that performs better technically – it really does come down to personal preference – and my personal preference is the good old work horse – the standard rigid heddle.

The question when buying a rigid heddle loom should not be “what can I do on a rigid heddle loom?” it should be what can’t you do!  And although I do have Jack and Katie (and a couple of table looms) – my Rigid heddle looms (of course there are several) hold a special place in my heart – my love of weaving came not only from being taught to weave on a rigid heddle loom but more from all the possibilities there was from a simple piece of equipment – I know it sounds corny but there really are unlimited possibilities! 

I get a little cranky when I here people say “oh you are limited on what you can do on a rigid heddle”  – because really when you control the type of yarn (or fibre) you use, the colour you use, the texture you use, the sett you use, the patterns you create – the limits don’t really come from the loom they come for your imagination. And as 75% of the woven fabric in the world is plain weave – do you really need something else?

3 Colour Clasped Weft – free tutorial

Wise words, thank you Kate!

One more thing I want to clear up is how to clamp the knitter’s loom to a table. This can confuse new weavers, because although clamps do come with the knitter’s loom, there are no holes present to insert the clamps into, like there are with other RH looms.

The answer is very simple, as you can see here:

These instructions, and more, are available from the Ashford website.

I hope this post has helped to clear up any confusion and answer some of your burning questions. Of course, you are welcome to leave any additional questions in the comments.

Do you own a knitter’s loom? A rigid heddle loom? A Sampleit? Was it a difficult decision for you? What helped you decide? Let’s keep the conversation going!

Until next time…

Happy Weaving!

Filed Under: All about looms, Inkle Weaving, Reviews, Rigid heddle weaving, Table loom weaving, Weaving Tagged With: ashford, Kate sherratt, knitters loom, rigid heddle loom, sampleit loom, table loom, which loom

Heritage Crafts and Skills Book Review

by Kelly Leave a Comment

My thanks to Pen and Sword Books for asking me to review Lynn Huggins- Cooper’s new book “Spinning and Weaving”.

Disclaimer – Although I received no payment for this post, Pen and Sword generously sent me a copy of the book for free.

This is not an instructional book, but an historical account of spinning and weaving throughout various periods in time.

It begins with a discussion of heritage crafts in the UK and their general decline, something which is obviously close to the author’s heart. It is quite focused on the history of spinning and weaving in the UK, particularly in later periods of time.

Starting with ancient times, the reader is taken on a journey of what is know of spinning and weaving and the significance of these crafts on our civilisation. From the basic tools of drop spindles and homemade looms, to the advances in technology, which ultimately completely changed the cloth industry, each chapter is a fascinating insight into times gone by.

I found so many interesting tidbits to ponder over whilst reading this book. I also learned many things I didn’t previously know or had not really thought about. For example, the massive impact that the mechanisation of spinning and weaving had on the poor, who relied so heavily on the slow, skilled process of basic wheels and looms to earn their bread. How the demand for commercially produced fabric impacted lifestyles and how fabric was viewed.

It is sad to know that the spinners and weavers who were so valued and made first class fabric for wealthy folk were made obsolete by machines. And yet, was it fair that only the rich could afford handspun and woven cloth?

What pleased me most in the reading of this book was the realisation that, perhaps, in a way, things have come full circle. Yes, we live in a very commercialised world but it is also a world full of opportunities. We still have machines producing millions of yards of cloth every year, but we also have people like you and me, who have chosen to take up our wheels and looms in pursuit of authenticity, quality and satisfaction in our work. And thankfully, more and more all the time, we have an audience who appreciate what we do and who also desire quality, slow and beautifully made unique garments and pieces.

The book finishes off with some inspiring interviews with fibre artists (I noticed there was even an Australian included!)

I feel so blessed to be a part of something that many of our ancestors (my ancestors were English) earned their living by and now, we have the luxury of choosing to do. It’s a wonderful thing to be able to practice these crafts and pass them on to the next generation.

“Spinning and Weaving” is available from the Pen and Sword website and also on Amazon (affiliate link).

Until next time…

Happy Weaving!

Filed Under: Reviews, Weaving Tagged With: bookreview

Krokbragd – How to Design and Weave, Book Review

by Kelly 22 Comments

I had been following along the writing of this book for some time, so I was thrilled to see it published and available.

*This post is not sponsored, however it does contain affiliate links, which means if you click and buy I receive a small commission at no extra cost to you.

You all know of my love affair with the Scandinavian weave structure Krokbragd, so a brand new 2019 publication devoted to it was something I had to jump on right away!

I always get this funny feeling when a new weaving book arrives on my doorstep. It’s a mixture of excitement and apprehension. Will this book change my life? Will this book be a total waste of money? Will this be a valuable addition to my weaving library or will it be relegated to the charity bin?

Well, I can assure you that Krokbragd: How to Design and Weave by Debby Greenlaw is not in the least disappointing and is, in fact, very impressive!

It seems that the author Debby is a lady after my own heart, having traded suburban life for a more creative and simple existence in the country, surrounded by animals and weaving.

The book starts out with a historical overview of Krokbragd and other Scandinavian weaving techniques, including beautiful historical pictorial examples. It then goes on to cover threading and treadling options, explanations of the structure, drafts, yarns and weaving options.

This book is so comprehensive, so affordable and there is no fluff or overkill. Just the style I love! I admit that much of what is written and taught in the book is not new to me, but it certainly gave me food for thought on a few levels.

Firstly, the threading variations that I have not yet tried, for example, threading over rose path instead of the usual single point 3 shaft I use.

Secondly, the drafting and designing section. This part is so invaluable! I have always had trouble designing Krokbragd off the loom and usually design as I’m weaving. As krokbragd is weft faced and woven over 3 picks which condense to make a single row, I find it hard to get my head around what a design will look like before I weave it. Debby’s chapter on design has given me some new ideas for how I could better go about designing off the loom, which would allow me to plan my projects more effectively.

But, to be honest, what I love most about this book is that as you read, you feel you are talking to a weaving friend, not someone who has been weaving since forever ago and wants you to know that they know infinitely more about weaving than you do! (Have you ever had someone come across like that in a book?!) It is obvious that Debby has written this book out of a love of weaving and a joy of sharing.

Krokbragd: How to Design and Weave is available as a physical, soft cover book or as a Kindle download.

*Since the completion and publication, Debby has discovered some errors. As a course and pattern writer, I know how easily this can happen and how frustrating it is. If you have purchased the book, you can go to the “Errata PDF” at the bottom of this page to access amendments. Debby is also working with Amazon, where her book is being sold, to determine the best way forward with this issue.

Trust me, if you love Krokbragd, you want this book for your weaving library!

If you’re as interested in Krokbragd as I am, here are some of my past blog posts for you to take a peek at:

I deleted my last post and wrote about Krokbragd instead

New Krokbragd Bag Class

Krokbragd Mug Rug Weave Along

What is Krokbragd?

Krokbragd Weave Along Round Up

Plus I have a bunch of Youtube videos on the topic:

Krokbragd Playlist

And a couple of classes over at my Online Weaving School:

Krokbragd Bag Class

Krokbragd Mug Rug Weave Along

Let me know your thoughts on Debby’s book if you already have it or if you decide to purchase, I would love to know if it has inspired you too.

Thanks for reading dear Weavers, until next time…

Happy Weaving!

Filed Under: Reviews, Weaving Tagged With: book reviews, krokbragd

Mirrix Big Sister Review

by Kelly 9 Comments

In my last post, I talked about my excitement at purchasing a Mirrix tapestry loom.

Now that I’ve had a chance to get to know the loom a little through completing a couple of projects, I’m doing a review for those of you who are interested in purchasing one. Please note, this is not a sponsored post and I have not received any financial compensation or incentive from Mirrix. I just love to talk about things I love! *This post does contain some affiliate links, meaning that if you click on the link and purchase, I receive a small commission at no extra cost to you.

*If you prefer to watch the video of this post, hop over to Youtube-

I purchased the 16″ Big Sister with the shedding device (you can choose a loom with or without the shedding device.) Having one certainly speeds up and simplifies your weaving, so to me, it was worth paying the extra for this feature.

I was undecided as to whether I would buy the Little Guy (12″) or this one, but I was leaning towards the larger size. When I contacted Tracy from Knit Spin Weave, she said she had a Big Sister in stock. That sealed the deal!

Firstly, I will go through the things I really love about the loom, then I’ll mention the things that were not quite what I expected or that will take some getting used to. Considering I’ve never owned or used a tapestry loom before, the latter list is relatively small.

What I LOVE!

Well, I love the way it looks! It’s a beautiful loom. I have always favoured wood over metal, but the addition of the copper, plus the clean and fresh design, makes it very pleasing aesthetically.

The design is very clever. Obviously a very smart lady designed this loom – a weaver who knew what she wanted out of a loom and figured out the best way to make one. The loom is simple to use. You can read more about her here.

Tensioning is controlled with two wing nuts, which you simply wind one way or the other to loosen and tighten. These make the loom extendable as well, so I can actually make the loom taller than it appears here, giving me a longer warp. You can achieve a VERY tight tension on this loom, which is great for tapestry.

The shedding device is controlled with a lever that attaches to the heddle bar. You place the lever up or down to alternate sheds, similar to a rigid heddle. The lever rotates the heddle bar very easily and I love this way of changing sheds.

Spacing for weaving at various setts is provided by a spring that you attach to the top bar. When I talk about the cleverness of designs, this is the kind of thing I mean! The loom comes with 8, 12, 14 and 18 dent springs that stretch across from one side to the other, and it works perfectly.

Advancing the warp is amazingly easy, using a tensioning rod that is installed as part of the warping process. Just loosen the tension, adjust the bar upwards, and your warp advances beautifully. I wasn’t sure before I used the loom how advancing was going to work, but it seriously only takes a few seconds to do it!

What was UNEXPECTED.

The heddles. I didn’t really consider that it would take me quite some time to make all the heddles I needed (and it did take a LONG time!) and I also thought that making them with 8/2 linen would be fine. Linen is super strong, right? Ha ha, well, I learned my lesson. Because the warp is under such high tension, so are the heddles each time you change the shed. I’m being a bit dramatic, because I only broke 1 heddle during the weaving process, and I was able to replace it without too much fuss, but it was enough for me to realise that my thin little linen heddles will not last. And I don’t want to have to make a heap of heddles each time! I found out that Mirrix actually sell a roll of texsolv heddles . Awesome, I’m going to get grab a roll of those ASAP!

The sheds. As a rigid heddle and floor loom weaver, I’m pretty used to large sheds, making it very easy to get a shuttle through. A tapestry loom is different. The sheds are very small and it can be difficult, particularly if you’re near the end of the warp and can’t advance any further, to fit your fingers and yarn through. I imagine this could be challenging when I start warping wider widths, but it’s not really a negative, just something different.

The shedding device lever. The bolt that holds the lever on to the heddle bar kept coming loose. I’m not sure if this is common or whether I need to tighten it with a little wrench or something? Perhaps one of you know?

Not a lap loom. I had the idea that I might be able to use this loom on my lap, but the weight and design makes this not favourable for me. I actually do like using it upright, but often in the evenings, when I’m tired but my busy hands won’t let me rest, I like to have a project I can do while sitting in my comfy recliner. I think the smaller versions would be fine for this, but this one is not the right size or weight for my lap.

OK, so how much did it cost?

Sometimes people are a little taken aback by the price of Mirrix Looms, but you have to consider that they are quality, American made and as I’ve already discussed, the design is excellent. They are assembled by disabled people, and I love that aspect as well. The business is family owned and run. I bought the loom from an Australia supplier, who is also a small business woman I like to support.

So, my Big Sister cost just over $400AUD and that price included the extras I’ve discussed in this post. I patiently waited and saved the money until I felt I could afford it, and I have no regrets. To me, it is well worth the price I paid.

Some of you may wish to look into making your own copper pipe loom, if you are so inclined and wish to save quite a bit of money. A quick google search showed me this page with plans and I’m sure there are more.

So there you have it, my thoughts so far.

I can’t wait to get my next warp on and start my next project, oh! The possibilities!

Do you enjoy tapestry weaving? What sort of a loom do you use? If you have a Mirrix loom, what are your thoughts on it? Let me know by leaving a comment!

Until next time…

Happy Weaving!

Filed Under: Reviews, Tapestry Weaving Tagged With: mirrix looms, review, tapestry weaving

Primary Sidebar

Categories

Archives

Meta

  • Log in
  • Entries feed
  • Comments feed
  • WordPress.org

Copyright © 2025 Kelly Casanova Weaving Lessons on the Foodie Pro Theme