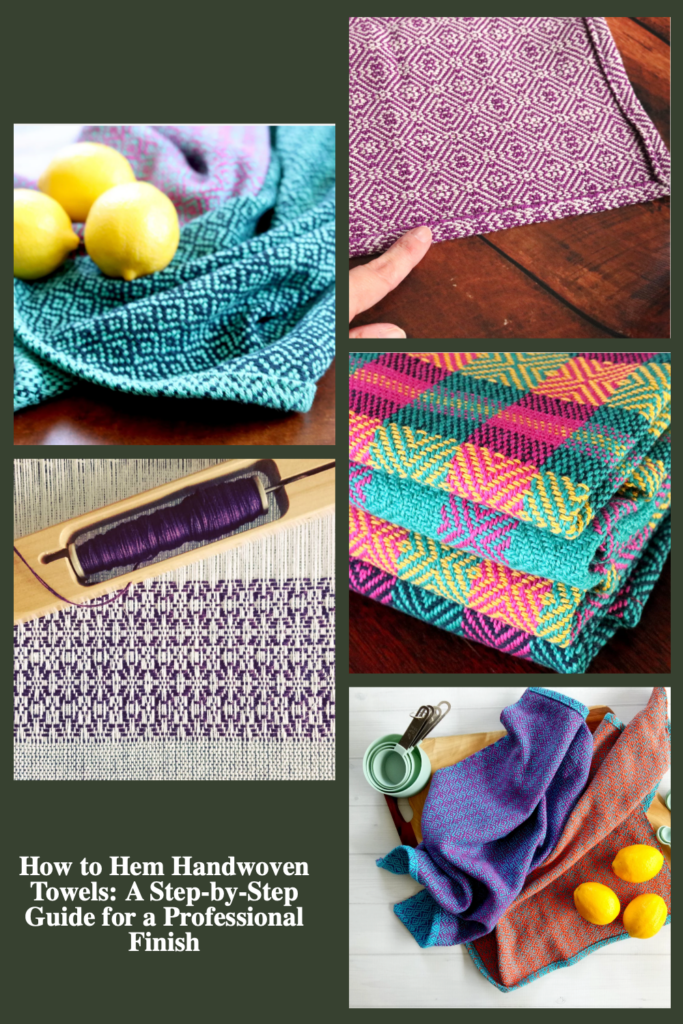
If you’ve ever woven a beautiful towel but put off hemming it, you’re not alone. Finishing touches like hemming handwoven towels often get delayed in favor of new projects, leaving a stack of unfinished weavings waiting for attention. But properly hemming your towels is the key to transforming them from raw fabric into polished, functional pieces.
A well-sewn hem not only enhances the durability of your towels but also gives them a refined, professional look. The good news? Hemming handwoven towels is easier than you might think!
In this step-by-step guide, I’ll walk you through simple yet effective hemming techniques suitable for any skill level. These methods will help you achieve a clean, long-lasting finish—so your handwoven towels are ready to be used, gifted, or even sold with confidence.
The methods I’m showing today use a domestic sewing machine. If you feel you need a little help to get started with your sewing machine, I recommend my free sewing series on Youtube.
If you don’t have a sewing machine, you can still hem towels! Check out my guide for hand hemming towels here.
Let’s get those towels off the “someday” pile and into your home!
1. Prepare Your Towels for Hemming before you dress the loom!
Something you may neglect to consider when calculating and planning your towels is a hem allowance.
There are a few factors that come into play when planning for a hem allowance:
- Loom shrinkage
- Trim/serger allowance
- Fold allowance for actual hem
Think about your “off loom” waste before you do your calculations. This is important because you want to be able to add in this waste and then apply your shrinkage calculation to the total amount of fabric required.
Here is an example:
Say you want your completed towels to measure 25″ in length (after hemming).
I’ll start with the 25. I’ll add on around 1/4″ for serge waste. I’m planning for a double fold hem that will require 1/2″ for the first fold and 1″ for the second fold. That is 1 & 3/4″ extra length required. If I wanted extra leeway I could round that number up to 2″.
Now remember, that 2″ needs to be added to both ends of the towel.
So for my 25″ I would add an additional 4″ for the length of the towel = 29″. Then to this figure I would add my shrinkage allowance in my calculations.
Don’t forget your side hem allowance!
Side hems?!! Is that even a thing? Well, it is now 😆 Add around 1/2″ to the width of the towel on each side (so 1″ total) if using side hems (more about that in the ninja level pro tips section at the end 😉)
2. Wash the fabric first!
I never, ever cut or sew with my handwoven fabric unless it’s washed or wet finished first.
Why?
The fabric needs to get wet, swell with water and then get dry and contract back into itself to be finished and ready for the next step. If you doubt me, try taking two small pieces of handwoven fabric of the exact same type, wet finish one and not the other. Then take a pair of scissors to both pieces and note the difference.
When introducing water to fabric I’m intending to use for towels I always opt for a hot wash in the washing machine rather than a gentle wet finish.
Secure Raw Edges Before Washing or Wet Finishing
- Serging or zigzag stitching is crucial to prevent unraveling. If you don’t have a serger you can do a tight zig zag (a couple of rows is best) on the sewing machine.
3. The “Dog Ear” Technique for Perfect Corners
The corners of handwoven fabric tend to not be so square. This creates a problem for hemming because your towels will want to flare out at the edges, and that doesn’t look so nice!
But don’t worry, my dog ear technique fixes this problem and also has other benefits. In addition to squaring the corners, using dog ears combined with a double fold hem completely encases raw edges. Yes, even secured, serged edges will fray over time when used in an item like a kitchen towel.
Let’s go through the steps for a double fold hem, using the dog ear technique:
- Fold in a corner on each side of the hem at around 90 degrees and press down with an iron.

- Make your first fold over at about 1/4 inch and press down with an iron (don’t burn your fingers!)

- Fold for a second time, making the fold larger this time. It’s your choice how wide, depending on how you like it to look, but generally 1/2 – 1″ is perfect. Iron to make a nice crease and to help the fabric to hold in place.
- At this point you can either pin or clip your hem in place while you take it to the machine. I like to use sewing/quilting clips as they are quick, easy and do the job perfectly. All raw edges should be encased.

4. Stitching the Hem
- Machine Hemming:
- Use a medium straight stitch (on my machine that is stitch length 2.5) close to the folded edge (1/4″ to 1/8″).
- Reverse stitch at the start and finish for durability.
- Take your time. Handwoven fabric is thicker than most commercial sewing fabrics.
- If you experience any fabric bunching pause, lower your needle but lift the presser foot to allow the bunching to ease out. Lower presser foot and continue.
- When your hems are sewn, give the whole towel a good press with an iron, paying particular attention to the sewn hems.

5. Tools and Materials for Success
- Recommended tools:
- A good-quality sewing machine or serger. Now, I don’t advocate for machines with “all the bells and whistles” unless that is what you really want. A basic machine from a reliable brand is a great way to go and won’t break the bank.
- Gutermann sewing thread or other high-quality brands. Don’t get stuck in the false economy mindset. Yes, good quality thread is more expensive. Cheaper quality thread will break. It will bunch up in your machine. Don’t do it, it’s not worth the headache!
- Sharp scissors (scissors from the Dollar Store and just not going to cut it here. Sorry, I couldn’t resist 😆), pins, or fabric clips.
- A steam iron for pressing.
- That Purple Thang (absolutely non essential but mega handy). This tool is so good for helping to keep fabric in place and push it under the presser foot when needed, instead of risking your precious fingers getting too close to the needle!
Extra Ninja Level Pro Hemming Tips
- Side hemming
So, what is this “side hemming” I speak of? Well, I noticed over time and with repeated use that my handwoven kitchen towels would get a bit worn and ratty along the long edge, which is the selvedge of the cloth.
I thought, couldn’t I protect and reinforce that edge and at the same time make it even more beautiful to look at?
As it turns out, yes, I could!
This is such an easy step, you simply do a single fold hem, around 1/4 inch, iron and sew it and then complete the rest of your hemming.

And as if all those benefits are not good enough, if you are at all disappointed with the lack of straightness of your finished edges, the single fold hem is a great disguise!
- Marking cutting lines
Having a marker for cutting your towels apart makes straight cutting a breeze. This quick video shows you the simplicity of this technique:
- Press, press, press!!
Pressing with a hot iron is everything! Set it on the cotton setting and go for it. In sewing, this is how we get crisp lines and set the stitches we’ve made.
- Contrast border
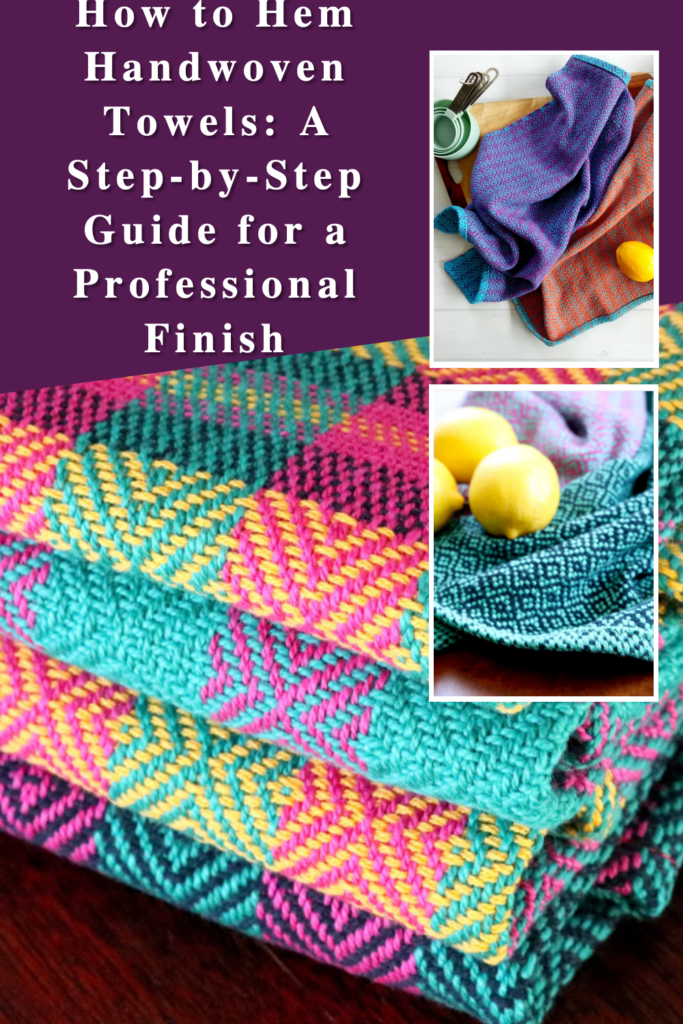
If you have woven a pattern, a couple of inches of contrast at the start and end of a towel looks really lovely. It can be in a different colour or weave structure. Plain weave as a border works well because it looks great when contrasted when a pattern weave and also provides an excellent, solid base for hemming.

Ready to weave some awesome towels?
Towels are one of my favourite projects to weave. They are beautiful but oh so practical as well. If you’re looking for some towel weaving resources, I have you covered!
ONLINE CLASSES:
PDF DIGITAL DOWNLOAD PATTERNS:
FREE TOWEL PATTERN:
There’s something deeply rewarding about taking a project from start to finish, and hemming is the final step that brings it all together. Whether you’re creating towels for yourself, as gifts, or even to sell, these simple methods ensure your hard work shines.
So, grab those unfinished towels, set aside a little time, and give your handwoven creations the perfect finishing touch. You’ll feel the joy of accomplishment every time you use them—proof that every detail in your weaving journey was worth it.
Until next time…
Happy Weaving (and hemming!)
*This post contains affiliate links. For more information please see my disclosure policy.