• Skip to main content
  • Skip to primary sidebar

Kelly Casanova Weaving Lessons

  • Hi! I’m Kelly!
    • Disclosure
  • Online Weaving School Class Index
    • Common account issues
    • Common technical issues
    • What do I get with a membership?
  • New to rigid heddle weaving? Start here!
    • Never heard of the rigid heddle loom?
    • How to weave neat edges on the rigid heddle loom
    • Rigid heddle weaving
    • Rigid Heddle Weaving Patterns
  • Patterns
  • Subscribe

Weaving

3 ways to start selling online for free!

by Kelly 4 Comments

When you have a desire to start selling your handmade items, it can feel like an overwhelming leap to take.

But it doesn’t have to be. There is no rule that says to start selling you need to launch a full on business with all the bells and whistles. That is certainly not the way I started out.

  • This post may contain affiliate links, please see my disclosure policy for further information.

If your budget is tight or you are wanting to just dip your toe in the selling game to find out if it’s something you want to continue to do, I have 3 ways that you can start selling online for free!

Now, just as a little disclaimer, a couple of these methods are not necessarily 100% free, due to payment processing fees. But, as far as actually making an item available for sale, these methods do not cost you anything until you’ve actually made a sale (and even then, I’m going to talk about other ways to take payments without fees).

Firstly I’m going to talk about the pros, or positives of these methods. I’ll cover the cons (negatives) at the end.

Now that we have that out of the way, here are my 3 recommendations for starting out selling for free online:

  1. Social Media

2. Mailing List

3. Family and friends

Let’s look at each one in more detail.

SOCIAL MEDIA can include Facebook, Instagram, Twitter, TikTok and others. Today I’m going to be talking about Facebook and Instagram, as these are the platforms where I have specific experience selling handmade.

A misconception is that you need to have a large social media audience in order to sell anything. Let me tell you, the quality of your audience is way more important than the quantity.

A small audience of people who are genuinely interested in what you do is so much more valuable than a huge pool of people who couldn’t really care less.

On Facebook, groups have been a good way to sell in the past and could still be relevant, depending on the group. Make sure the group is very relevant to what you sell and educate yourself as to the rules. You don’t want to get booted out of groups for infringing on the rules!

Another way to sell on Facebook is to simply make posts. I will be going into more detail with this when I talk about Instagram, but basically you can make a selling post either on your personal Facebook profile or you can make a business/fan page.

I recommend the business page route, as your Facebook friends may not appreciate feeling like they are being spammed with sales posts. A business page is a more appropriate place for these styles of posts.

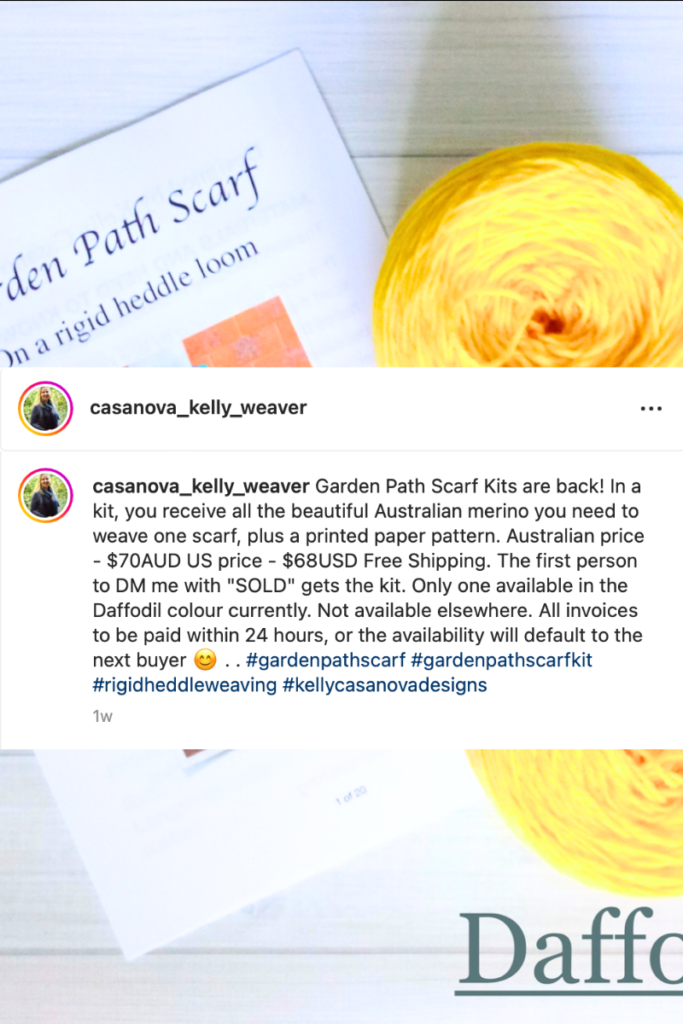
Now we will look at Instagram. I have recently been testing selling on Instagram, (not following me yet? You can find my account here.) with successful results. I’m going to show you my exact post from last week that I used to successfully sell a weaving kit.

Again, check the rules of any platform you’re using first to ensure no violation of rules is occurring.

If you look at my wording for this sales post, you will notice that it’s very clear and provides all the detail the buyer needs to make a well informed purchase, without being too wordy or overdone.

Importantly, I’ve clearly stated my terms for payment, the exact items that the buyer will receive, the price, and a good quality photo of the item. The invitation to be the first buyer to DM (direct message) me with “SOLD” creates a sense of urgency and competition.

This particular kit sold within 8 seconds of posting and the invoice was sent a paid for well within the 24 hour time frame.

I use PayPal to create and send invoices, but this is where this method is not completely free. There are payment processing fees through PayPal – usually a few dollars but it does depend on the value of the item sold. I factor these fees into the total cost of the item before I sell it. The “free shipping” is also calculated beforehand so that I’m not paying for that out of my own pocket.

Going through PayPal means that once the sale is made, I get the buyer’s email, make up their invoice (which takes less than 30 seconds) and send. As soon as the buyer has paid the invoice, PayPal emails me with the buyer’s shipping details and notification of payment.

You could still get around these fees by doing something like a direct bank transfer, but that is not such a popular way to make online payments these days. I recommend researching and experimenting to find a happy medium that suits you.

Now we will talk about selling through EMAIL. If you have watched any of my business videos or read any of my posts, you will have already heard me talk about how essential it is to have a mailing list to build an audience.

Want to start selling your handmade items but don’t have a mailing list yet? Start one today! You can get started with Convertkit (my email provider) for free.

Contrary to popular belief, you do not need a huge amount of subscribers on your email list in order to make money. The quality of subscriber is so much more important than the quantity. A quality subscriber is already interested in your work (that’s why they joined your list!) and they may be interested in purchasing from you.

Selling through email is very similar to making a social media post. The key is to not make every email a sales post, that can make your audience feel like they are constantly being inundated and they may unsubscribe.

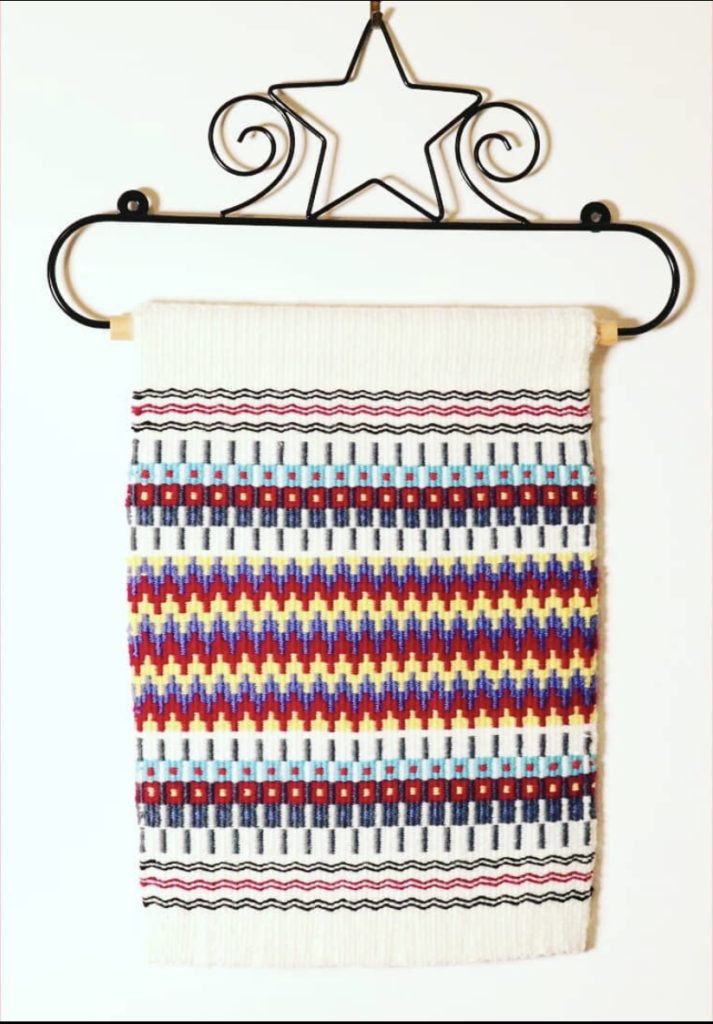
What I like to do is to provide my mailing list with valuable and good quality news and information and include a small section on the item I’m selling. Very recently I sold another Garden Path Scarf kit this way, by sending out my weekly email, The Weekend Edition.

In this weekly newsletter, I provide links to blog articles and videos, update my audience on what I’ve been working on and basically share whatever I feel will be interesting to them. For the kit, I did the same as I would for a social media post – the clear photo, all the details, my terms and conditions. Again, this kit sold rapidly and I had multiple buyers who missed out.

If you want to take a look at how it might look to have a mailing list, I recommend that you sign up to mine for inspiration.

The third and final way that you can start selling online for free is through FAMILY AND FRIENDS.

This is such an easy and organic way to get started, without the pressure of selling to people you don’t know. It can be so natural that you don’t even realise a sale is happening until it’s done!

It could be as simple as someone in a social situation asking you what you do, or what you’ve been doing and you tell them about your craft. They may ask more questions and become interested. This can lead to them asking either whether you have a specific item for sale that they want or whether you would be interested in making them something (custom order).

To sell in a relaxed situation, perhaps in your home or someone else’s requires no technical knowledge of online processes or payments – often you will be paid in cash in this type of scenario. You don’t need to take photos or make online posts.

Friends and family will also likely advertise for free on your behalf, by telling others about what you do and what you sell. Perfect!

OK, I’ve talked about how great these three methods are, but are there any downsides?

Yes, but they are very minimal, I think the positives outweigh the negatives here.

  • If posting to sell online, make sure you’re aware of regulations to ensure you don’t violate rules and possibly lose your account.
  • These methods are not automated. If you’re selling on Etsy for example, the work is all done beforehand, the listing is published and then Etsy takes care of the rest once there is a sale (apart from you sending out the physical product). If using any of these 3 methods, all the steps of the process are up to you (including sometimes having to chase buyers for payment and sometimes hearing crickets in return šŸ™„).
  • If you’re selling a larger number of items, you will definitely want to be able to automate your process more. These free methods are better for the seller just dipping a toe in, or selling items occasionally rather than frequently and at a higher volume.

I have some additional resources for you if this is a really interesting topic for you:

Do You Want To Start Selling Your Weaving?…

Selling for Weavers Online Class (members only)…

Starting a Weaving Business in 2023…

10 Things I’ve Learned about Etsy in 10 Years…

I hope these ideas have been super helpful to you. If you want to see this post in video format, you can view that here:

Until next time…

Happy Weaving!

Filed Under: Business, Selling, Weaving Tagged With: handmade business, selling for free, selling handmade, selling weaving, weaving business

2 Hacks for Clear Sheds on a rigid heddle loom

by Kelly 10 Comments

Threads that tend to stick to one another when you change sheds can be so frustrating!

Some yarns are prone to doing this more than others, and it also commonly occurs when you’re weaving with more than one heddle or are using additional aids (like pick up sticks and heddle rods) to create extra shafts on your rigid heddle loom.

For more information on threads that are notoriously sticky, visit this post.

*This post contains affiliate links. For further information, please see my disclosure policy.

Why is it a big deal if not every thread is exactly where it should be?

Well, it’s going to mess up your pattern. Your weaving pattern is created by the interlacement of threads – the weft going over some warp threads and under others. Now, if the weft ends up going over one or more threads that it should be travelling under, and vice versa, then you have a problem.

Floats will be created where they are not meant to be and this will show as a mistake in your pattern. If you have already checked that your threading and weaving sequences are correct, you don’t have crossed threads or anything else weird going on, the problem is very likely to be caused by unclear sheds and sticking threads.

Before looking at using clearing methods, ensure you have adequate warp tension. If your tension is too loose, threads may sag and interfere with your sheds. If your threads are loose on just some sections, you may need to try some wedging techniques to help your warp tension to be more consistent.

There are 2 main methods I use to ensure a clear shed when sticky threads are proving to be an issue.

The first method involves the use of a pick up stick, extra stick shuttle or even a paint stirring stick will do the trick! Basically, a flat, smooth stick.

Before inserting the stick into the shed, ensure that all of your threads are in their correct places. The easiest way to do this is to understand where all threads should be at all times according to your threading and heddle/weaving sequence. For example, in this picture my first heddle is up and my pick up stick is forward. For the way that I threaded, this means that all the hole threads on heddle one should be up, and all the threads on top of the pick up stick will also be up. The rest of the threads will be down, forming the bottom layer of the shed.

Once you understand where all the threads should be and you are sure they are correct, you can insert your pick up stick into the shed. Be sure to insert close to your heddle, where the shed space is at it’s widest.

Once the stick is in the shed, hold it on either side.

Pull the stick towards you, and towards the fell (edge) of your weaving and bounce it off the woven edge.

This action is firm and decisive, but doesn’t have to be a super hard whack. If there were any threads that were sagging or tending to want to stick together, this will shock them back into place.

If you prefer to see a video of this technique in action, you can view that here-

Now let’s have a look at the second shed clearing technique I mentioned.

This technique is so simple and easy. No extra tools are needed, just your trusty hands and fingers. I call this “strumming the warp”, but it doesn’t have anything to do with playing the guitar!

Again, the first step is to ascertain whether the problem lies with your threading, sequence or tension.

Next up, place your heddles/rods/sticks in the correct position for the shed you want to weave. Once again, I’m using the front heddle up, pick up stick forward combination as this combination frequently has sticking threads.

Place both hands, from either side of the warp, into the shed so that your fingers roughly meet around the middle of the warp.

Tilt your fingers slightly upwards as you pull your hands apart and out of the shed. You want your fingertips to “strum” the threads on the way out.

This is such a great technique for snapping threads into place with no ill effects on your warp. Give it a try!

If you would like to see this technique in action, check out this video:

You may have noticed the beautiful piece of weaving I have on the loom in these examples. You can find the PDF pattern for The Ripple Scarf in my Etsy shop. It’s a wonderfully luxurious scarf for rigid heddle weavers, you will love it!

I hope this article has been helpful to you, be sure to leave comments or questions down below, I love to hear from you.

Until next time…

Happy Weaving!

Filed Under: Free tutorial, Rigid heddle weaving, Tutorials, Weaving Tagged With: clear sheds, rigid heddle weaving, weaving hacks, weaving tips

How to use a metric weaving raddle

by Kelly 2 Comments

A raddle is a simple device that allows the weaver to space out warp threads in order to dress the loom at the desired warp width.

Most available raddles are based on imperial methods, so it can be a surprise when you find yourself the proud owner of a metric one!

*This post contains affiliate links. Please see my disclosure policy for further information.

Louet looms, like my Louet David come with a metric raddle built into the top of the loom. The Ashford raddle kit, which I use with my Ashford table loom, has an imperial raddle.

Personally, I find the imperial measurements easier to use in weaving (even though I was brought up using the metric system) just because most weaving information is formulated for the imperial system.

The Louet David raddle and the Ashford raddle

Today I’m going to show you my process for easily spacing my warp threads in my metric raddle.

I have two yarns to use as an example –

  • 8/2 cotton
  • Fingering weight wool

The first step to starting a new project is to do the calculations. If you’re a rigid heddle weaver, I have a free printable calculations sheet, plus a short class on how to use it.

Included in your calculations are the width of the item on the loom and the ends per inch (sett) you intend to weave at – these calculations are particularly relevant to the raddle.

You can determine your ends per inch by doing a wrap test with your desired yarn. Then, if you are weaving plain weave, you simply divided the wraps per inch in half to get your ends per inch. This determines how close together your warp yarn will be on the loom.

The 8/2 cotton wrapped 28 times around the inch ruler. My equation then looks like this –

28 Ć· 2 = 14

Now, as a little disclaimer, and because I’ve used 8/2 cotton extensively in my own weaving, I want to point out that I would not normally weave at 14 ends per inch, it would be more like 20-24.

But let us use that figure of 14 for our example.

What it means is that, when my warp is spaced out in the raddle, ready to be wound onto the loom, I want to have approximately 14 ends of yarn in every 1 inch increment.

If I was using an imperial raddle with half inch dents, all I would need to do to space my warp is place 7 threads in every raddle space. Over 1 inch, that would give me 14.

But the metric raddle has many more, smaller spaces, so here is how we deal with that:

From the middle of the raddle, use a tape measure to measure out 1 inch along the raddle. Place a marker, like a piece of waste yarn to keep the spot for you.

Now you can count the number of raddle spaces that are within that one inch of measurement. I counted 5 spaces on my raddle. The next step is to be able to place my 14 ends into those 5 spaces.

You have probably figured already that it’s not going to be exact, but that is just fine. The raddle is to space our threads to the width we want our item to be on the loom, but that doesn’t mean that every raddle dent has to contain the exact same amount of threads. We have some wiggle room here šŸ˜‰

You can either calculate the number of threads first, or you can “wing it”. I’ll explain both ways.

To calculate, I would divide 14 by 5, which gives me 2.8.

I cut some short lengths of my yarn to simulate an actual warp. I began by laying in 2 threads in each raddle dent (as the “2” in the 2.8 figure lets me know that at least 2 threads are needed in each dent initially).

After all my spaces were full, I had 4 threads left over. So, I started laying them in, one at a time, until I ran out. This meant that I had 3 threads in all the spaces except for the last one, which just had 2.

Doing this showed me an established pattern I could follow for accurately spacing my threads across the desired width. 4 spaces with 3 threads, 1 space with 2 threads. That becomes the spacing pattern to repeat over and over until all the threads are in the raddle.

Now we will look at the fingering weight wool. The wrap test showed me that I could wrap this yarn 18 times, so that is 18 wpi (wraps per inch).

Using a plain weave example again, I divide the 18 in half to get my ends per inch, which is 9. I need to do the same as before, make those 9 ends fit as evenly as I can into the raddle spaces.

9 Ć· 5 = 1.8

That tells me that I need at least one thread in every raddle space, and I’m going to have some left over to figure out afterwards.

Using the exact same method as before, I lay in those ends one at a time, then go back and lay in the leftovers. For this yarn, that meant that I had two in every space, except for the last space which only had one. So once again, I’ve established my pattern for spreading the yarn in the raddle.

Now, a couple of things I need to mention:

I did say earlier that you can use a “wing it” method, but this is best done in practice, with short pieces of your yarn as I have done here. That way you can visualise how the yarn will be laid out prior to actually doing it with a real warp. For a real warp, you really should have all of your calculations done first so there are no surprises.

To “wing it” you would simple cut your little lengths of yarn, as many as you need for the inch space (you get this figure from your “ends per inch”). Then you can measure out your inch on the raddle and just start laying your yarn pieces in, one at a time, continuing back and forth across the inch until they are all laid in, then count them up and see how many you end up with in each space.

The next thing I want to mention is odd numbers. I’m not a fan of using odd numbers in weaving, I always find it easier to round things up or down to simplify. An example is that for the fingering weight I used in this example, instead of 9 ends per inch I could have chosen to round up to 10.

This would simplify the raddle process, as I would be able to place 2 threads in every heddle space (given that there are 5 raddle spaces in and inch and 2 multiplied by 5 is 10 😊)

These are the kind of decisions I make in the planning and calculating process before I actually begin the warp.

If you would prefer to view this article in video format, please watch here-

I hope that this article was useful in showing you how you can use a metric raddle in a simple way. Feel free to leave your questions or comments down below!

Until next time…

Happy Weaving!

Filed Under: All about looms, Floor Loom Weaving, Free tutorial, Warping, Weaving Tagged With: David louet, floor loom weaving, imperial raddle, metric raddle, raddle

Zucchini Bread Recipe

by Kelly 4 Comments

Many years ago, my sister in law used to make this bread. It was in the days when the zucchinis from the garden were plentiful and Autumn weather had set in. Baking this bread always brings back very fond memories of that time for me.

Jump to Recipe

I feel that that naming the recipe “bread” is a little misleading, as it’s really more similar to a cake in taste and texture.

  • This post contains affiliate links. For further information, see my disclosure policy.

Currently, we are knee deep in zucchinis. So, so many zucchinis. Grating, roasting, steaming, freezing, making relish. So, this beautiful zucchini bread is a lovely treat and a great way to use up excess fresh zucchini.

Another thing I love about this recipe is that it uses everyday ingredients that I always have on hand. Ingredients like flour, sunflower oil, vanilla extract, walnuts and ground cinnamon are all easy to come by.

This is also a very simple, one bowl, mix and bake cake. That’s my kind of baking!

There is no need to skin your zucchinis prior to grating, just make sure they are washed first. Leaving the skin on adds colour and keeps more of the nutrients in the vegetable.

You will need a medium to large mixing bowl to mix up the ingredients. I love to pull out my vintage manual hand beaters for beating the eggs, oil and vanilla.

I use loaf baking tins and I always line them with non stick baking paper, even if the tins are non stick. This helps to preserve the tins for a long time, and I use the same sheets of paper over and over until they are no longer useable – I get many uses out of them. This is, of course, optional.

This recipe makes 2 generous sized loaves.

Zucchini Bread

5 from 1 vote
Print Recipe Pin Recipe
Prep Time 20 minutes mins
Cook Time 1 hour hr 15 minutes mins

Ingredients
  

  • 3 Eggs
  • 2 and 1/4 cup Caster sugar (Superfine)
  • 3 tsp Vanilla extract
  • 1 cup Vegetable oil (I use sunflower)
  • 2 cups Grated zucchini (skin on)
  • 3 cups Plain flour
  • 1/4 tsp Baking powder
  • 1 tsp Salt
  • 1 tsp Bicarbonate of soda (baking soda)
  • 3 tsp Ground cinnamon
  • 1 cup Walnuts, chopped

Instructions
 

  • Preheat oven to 180 degrees celsius (350 Fareneit)
  • Grease and line 2 x 14cm x 22cm (5.5″ x 8.5″) bread loaf tins.
  • Ā Beat eggs until they become pale in colour and fluffy in consistency.
  • Add the sugar, oil and vanilla. Beat until thick.
  • Stir in the grated zucchini.
  • Ā Sift the flour, baking powder, bicarbonate soda, salt and cinnamon into the wet ingredients. Fold the ingredients together.
  • Ā Fold in walnuts, if using.
  • Pour equal amounts into the 2 tins. Bake for 1 hour or until a skewer inserted into the centre comes out clean. Allow to sit in tins for 5 minutes before turning out onto a baking rack to cool. Lovely to eat warm or cool.

The sugar content is quite high (though, remember you are making two loaves, not one) and I can imagine that you can substitute or even just reduce the amount, as it is quite sweet anyway.

*Tip* If you have a glut of zucchinis, you can grate and freeze the flesh. That way you can have zucchini on hand throughout the year to make recipes like this one year round. Simply defrost the frozen zucchini and use as normal.

Want to make a double batch and freeze the extra loaves? This recipe is perfect to freeze, so go for it – I do this frequently šŸ˜‰

I hope you try this recipe, let me know if you try and enjoy it!

Filed Under: Recipes, Weaving Tagged With: baking, recipe, Recipes and food, zucchini bread

Affordable weaving tools I use every day

by Kelly 7 Comments

When you start a brand new hobby, it is easy to feel that you need to buy “all the tools” before you can begin and weaving is certainly no different.

But, once you have your loom (and the tools that come with the loom) there is not actually too much more you need to make a start.

And really, why overwhelm yourself by having to learn every new gadget and gizmo available when you can minimise your tools, stay within your budget and focus on using your loom?

*This post contains affiliate links. For more information, please see my disclosure policy.

Today I want to share with you the affordable tools I own and use constantly in my weaving studio.

  1. Clover Bent Tip Jumbo Tapestry Needle

I have talked about these needles frequently (ok, perhaps a little too often!) but I can’t really sing their praises highly enough.

If you do hemstitching with any amount of regularity, you need these needles in your life. They are smooth but not slippery to hold, they have a large eye for easy threading, they slide through hand woven cloth like butter, they are gold (so they are hard to lose!) and the bent tip makes the angling of the needle for hemstitching just right.

2. Ashford Double Ended Threading Hook

I was so happy when I first discovered these double purpose hooks. I abandoned my former metal threading hook and separate reed hook very quickly and have not used them since!

These double ended hooks are made of flat, durable, flexible plastic, which makes them perfect for manoeuvring through holes and slots on your rigid heddle loom. I also use them for floor loom and table loom weaving, the hole threading end is just right for threading string heddles.

Rather than having to use two different tools, you simple switch the end of the hook with a quick hand swivel to swap between threading holes and slots or string heddles and reed dents.

Their flat design makes them easy to store (I even use them as bookmarks in a pinch!) I suggest that you have several in order to have spares for the times you, ahem… can’t quite locate one when you need it! 🤭

3. Pick up Sticks

Pick up sticks are one of the most economical ways to drastically increase the possibilities of weaving patterns on your rigid heddle loom.

A multi shaft loom can be quite a financial investment, but with your rigid heddle loom and a couple of pick up sticks, maybe a heddle rod or two, you can increase your shafts from two to three, four or more!

Using pick up sticks can be completely planned or quite random, depending on what you want to do. I think the really cool part for newer weavers is that you don’t really need to know what you’re doing to get some awesome results.

They are low cost to purchase new, or if you or someone you know are crafty with wood, you can make your own.

4. Boat Shuttle

This is a bit of a luxury item, but something that you may want to consider purchasing eventually. You can certainly just use your stick shuttles with no problems, but if you’re going to be weaving with finer yarns very often, a boat shuttle is really useful for quick weft winding and smooth weaving.

One thing to be aware of is the price difference in boat shuttles, depending on the company of manufacture, size and function, the wood used and whether it’s hand or machine crafted. My Ashford boat shuttles have served me very well for many years and were very affordable.

One day I may splash out on a special shuttle, but I’m very happy with these for now.

5. Dressmaker’s Shears

I love my dressmaker’s shears and have been using them for around 15 years. In that time, I’ve only had them sharpened a few times, so they have been a great deal for me.

My shears are the Stag brand, which unfortunately does not seem readily available now.

What I recommend is to not buy the cheapest, nor the dearest pair of shears, but go for the middle ground. Something similar to these looks good.

So, why dressmakers shears as opposed to regular or smaller scissors? Adaptability!

I can use my shears to snip yarn at the loom, make my warp, cut across my warp to take it off the loom AND cut through my handwoven fabric when I want to do that for a project. All of these things can be done with the one pair of shears, making them a very economical tool.

Well friends, although I do use other weaving tools, these 5 tools are the ones that are on regular standby and that I use almost daily in my weaving studio.

I hope this has been an informative and interesting post for you! If you would like to see this in video format you can do that right here:

Until next time…

Happy Weaving!

Filed Under: Rigid heddle weaving, Weaving Tagged With: budget weaving tools, weaving tools

49 Weaving Project Ideas

by Kelly 10 Comments

Feeling a little stuck for ideas for your next weaving project?

The options are almost unlimited, but here are 49 weaving project ideas to get you started!

Whether you’re weaving on a rigid heddle loom, a table loom or a floor loom you are sure to find these weaving project ideas super helpful.

Weaving a scarf is the perfect starting point for the new weaver.

It’s a narrow piece, which makes it easy to tension. It’s a long warp, but not so long as to be likely to cause any real issues. And once you’re done weaving and wet finishing, you have a completed woven piece, ready to wear.

That is so rewarding and empowering to the beginner weaver!

Once you’ve completed your first scarf, you may want to build on that success and hone the skills you learned by weaving another. Great! Another beautiful scarf to wear!

What is next? Another scarf? Well, I guess you could either add to your scarf collection or start giving them as gifts. Some weavers will continue weaving scarves until they have so many they’re not sure what to do with them. That could be a time to start selling for some extra income, if that is something you are interested in.

But not everyone wants to continue just weaving scarves for the rest of their weaving lives.

I often see weavers chatting and asking questions online, wondering if there is anything beyond the humble scarf.

Well, rest assured, there are SO many things you can make as a weaver!

Once you take up weaving, you become a maker of cloth. In quite a magical way, you are able to produce your own fabric.

You can either choose to weave an item that is basically finished when it comes off the loom, or you can use your hand woven cloth as a stepping stone or starting point for something else.

If you have, or can learn basic sewing skills, you are well on your way to creating unlimited projects with your handwoven fabric.

Here is a list of ideas to get you started:

Scarves (obviously! šŸ˜‰)

Shawls

Bags (totes, handbags, shopping bags, carry bags)

Rugs

Wallhangings and tapestries

Blankets

Pillows/cushions

Purses/ pouches

Kitchen, bath and hand towels

Face washers

Apron

Book covers

The free Stashbuster Notebook Covers class can be found here.

Bookmarks

Kitchen cloths

Soft toys

Ponchos

Jackets

Tops

Read about my hand woven tunic project here

Skirts

Dresses

Pants

Coats

Framed art

Lampshade covers

Loom covers/bags

Upholstery fabric for unique furniture pieces

Historical re-enactment costuming

Hats

Jewelery

Wallhanging from the Krokbragd 101 Online Class

Baby wraps, carriers and blankets

Drink coasters or mug rugs

Curtains

Patchwork and quilting projects

Hair accessories/ head wraps

Saddle blankets for horses

Dog beds, coats

Potholders/trivets/oven gloves

Dining table ware – table runners, place mat sets

Bedding – throws, coverlets, pillow covers, blankets, quilts

Well, what do you think, have I convinced you that you can weave more than just scarves with your loom?

If you’re looking for some free projects to get you started, check out my Free Projects list and be sure to check out my Youtube channel for even more ideas and tutorials. My design store contains my original project designs as digital downloads as well as my ebooks.

At the Online Weaving School you will find many classes to choose from, and as most of my lessons are project based, you can often complete a finished woven item.

So, as you can see, the possibilities for woven projects is really unlimited! Please add your own ideas in the comments to share with other readers.

Until next time…

Happy Weaving!

Filed Under: Rigid heddle weaving, Weaving Tagged With: rigid heddle weaving, weaving, weaving projects, whattoweave

How to fix snags in your weaving!

by Kelly Leave a Comment

That awful moment when your lovingly hand woven piece catches on something sharp and pulls, leaving an unsightly loop.

I’m sure we’ve all been there and collectively cringed when this has happened.

Thankfully, the fix is a quick and easy one, once you know how.

*This post contains affiliate links. For further information, please see my disclosure policy.

If you are interested in the fabric I’m working with here, it is a sample from my Plaid Double Width Ebooklet.

All you need is the snagged piece of cloth and a tapestry needle. My favourite tapestry needles are the Bent Tip Needles by Clover.

The first thing to do is to have a look at the loop so that you can determine which row of your weft has been affected. We want to work on this row to redistribute the slack that occurred when the weft was snagged. Have a look at the way the weft row is running. This will tell you the direction in which you need to work.

Here you can clearly see the loop and the way in which it runs through the cloth (horizontally, not vertically).

Using the tapestry needle, go to one of the weft stitches either side of the loop. It doesn’t matter which side at this point, as we’re going to be alternating.

Pull up gently on the weft stitch so that some of the slack goes out of the loop and into this stitch.

Now go to the opposite side of the main loop and repeat with the stitch next to it on this side. The aim here is not to pull up big loops, but just to begin to ease and decrease that main loop. The weft stitches you are working on will become looser as you do this – that is normal and expected.

Once you have redistributed some of the slack among the other stitches (I started by doing 3 stitches either side of the main loop) it is time to get a bit rough on the fabric.

Holding onto the fabric either side of the main loop, pull it outwards, away from the loop. It is very helpful to use a “snapping” action for this. The idea is to shock the fabric and re-tension it in order to settle the weft back into the pattern it belongs in.

After snapping the fabric several times, you may see that the weft loop is now laying flat. If this is the case, your work here is done! However, if any of your wefts are still raised (either the loop itself or the weft threads around the loop) then more attention is required.

Simply go back in with your tapestry needle and gently repeat the process, including the fabric snapping afterwards.

By this time your wefts should all be happily settled back into place and laying flat. Ideally, it is now hard to see that there ever was a weft loop. I am pointing to my original loop in the photo above.

If you want to see this whole process in the form of a video, please enjoy watching this one:

I hope this tutorial was really helpful to you! Thank you for visiting me today and until next time…

Happy Weaving!

Filed Under: Free tutorial, Tutorials, Weaving Tagged With: fix snags, troubleshooting, weaving, weaving fix

Do I need to pack the front beam?

by Kelly 17 Comments

When warping our rigid heddle looms, we are careful to pack the back beam as we wind on the warp. This may be done with a variety of materials, and some are more effective than others. It can be a personal preference too!

What a lot of weavers don’t seem to be so familiar with is the idea of packing the front beam. Quite often, when I’m troubleshooting with a student and I ask if they’ve packed the front beam, they seem surprised by the question. Packing the front beam? I’ve never heard of that!

*This post may contain affiliate links. For more information, please see my disclosure policy.

So, why would you want or need to pack the front beam? And what exactly do I mean by that?

Let’s start with the definition so we’re all on the same page!

Packing the front beam is simply introducing something extra to separate the warp as you weave and it begins to roll around the front beam.

Now we can look at the why. There are a couple of reasons as to why packing the front beam is a really good idea.

When you have finished warping and threading, you then need to tie or lash on your warp onto the front apron rod. Doing this results in knots or bumps on the apron rod.

As you begin to weave and advance your warp, you will reach the point where your warp is rolling around the front roller beam and onto itself. As this advancing of the warp happens, the knots, plus the apron rod ties can begin to have a detrimental effect on your weaving.

Firstly, you will likely begin to see some lumpiness at the bottom of your weaving (note that the white line of weaving that was previously straight is now a bit wavy!)

This is caused by the knots or apron ties pushing against your weaving from the underside. There are two problems with this happening:

  • The raised and lowered parts cause a change in the warp tension. The bumps tighten the tension and the dents lower the tension, so you end up with slightly uneven tension.
  • The worse case scenario is that your weaving is irreparably damaged because the knots or ties push the weaving apart. This can be more likely to happen when using a slippery thread like tencel, silk or bamboo, where your woven threads can move more easily, rather than something like wool, which is more “grabby” and unlikely to move out of place.

Fortunately there is a really simple solution to the problem, and that is to pack the front beam, or insert something that will separate those layers of fabric and act as a barrier between your weaving and the knots and ties.

Weavers use a variety of materials for packing, and it can really be a personal preference or what you find most effective. Initially I used the cardboard separators that came with the loom, and while they do work well, I find that the brown craft paper on a roll that I now use to be the superior choice.

What I love about the paper on a roll is that it’s thick and sturdy (a thinner paper will not work in the same way as it tends to crumple while you’re trying to advance your warp), you can purchase it to the width of your loom (or if the same width is unavailable, it’s easy to cut pieces to size) and you can use it over and over, so it’s very economical.

The roll that I bought years ago is still going strong and there is still a huge amount left.

An additional benefit of packing your front beam as you advance the warp is that your overall tension will vastly improve, and will continue to do so as you continue to weave.

I pack the front beam, whether I’m weaving on my rigid heddle, table or floor loom, it is beneficial for many types of weaving.

If you would like to see how I insert the paper roll at the front beam of my rigid heddle loom, please watch this video-

Until next time…

Happy Weaving!

Filed Under: Rigid heddle weaving, Weaving Tagged With: pack front beam, rigid heddle weaving, weaving, weaving tips

Kelly’s Basic Raisin Bread Recipe

by Kelly 2 Comments

OK, so you can call it raisin bread, fruit bread, or whatever. I don’t mind, I just know that I love to eat this stuff!

It tastes absolutely wonderful on the day of baking, spread with soft butter or as toast on following days. My girls are slightly disgusted that I absolutely love to slather my raisin bread toast with peanut butter, but there you have it šŸ˜‹

Jump to Recipe

I’ve been making this version of raisin bread for years, but most of the time I will call it fruit bread, as I tend to use sultanas rather than raisins.

*This post may contain affiliate links. Please see my disclosure policy for more information.

The beauty of it is you can add whatever dried fruit you like. Dried figs are gorgeous, currants, raisins, sultanas and dried apricots (I recommend dried organic apricots if you can get them, they taste so much better!) all work very well.

You also have the option of playing with the spice levels. Although this recipe only uses a mild dose of ground cinnamon, you can alter this if you are a spice lover and want more flavour. Add in some Christmas spices like nutmeg or other mixed spices if that is more your style!

This recipe makes 2 good sized loaves.

A word about bakeware. I generally bake 6 loaves of bread a week, all at one time. Sometimes they will all be just regular bread, often I do 4 regular and 2 raising bread and this tends to last my family a week.

I have fancy bread tins and non fancy bread tins. To be honest, I don’t find any difference between the two. A tin like this one will not cost you a fortune and will last for many years if you look after it.

My routine for bread tins is that I line them with non stick baking/parchment paper. I reuse these pieces of paper until they are so used that they are breaking apart. I haven’t counted, but I do know that I get many, many reuses from one piece when baking bread. I don’t care if they end up looking all browned and ratty, I conserve them as much as I can so I’m not overusing paper.

Using the paper also means that I don’t wash my bread tins very often and don’t need to.

Kelly’s Basic Fruit Bread Recipe

A simple fruit bread that is delicious fresh or toasted
Print Recipe Pin Recipe
Servings 2 loaves

Ingredients
  

  • 1 kg White flour
  • 2 tsp Dried Instant Yeast
  • 2.5 tsp Salt
  • 2 tsp Cinnamon
  • 2 tbsp Brown sugar
  • 3 tbsp White sugar
  • 2.5 tbsp Melted butter
  • 550 ml Warm milk *More may be needed
  • 1 Large Egg, whisked
  • 1 cup Sultanas *Raisins and other dried fruits may be used

Instructions
 

  • Warm the butter and milk together until butter is mostly melted.
  • Add sultanas to warm liquid and set aside.
  • Place all dry ingredients together in a large bowl (or the mixing bowl of your stand mixer).
  • Whisk dry ingredients together briefly until blended.
  • Add whisked egg to the warm milk and whisk in
  • Add wet ingredients into dry. You can use the dough hook on your stand mixer, or mix by hand. If mixing my hand, spend a few minutes kneading the dough on a lightly floured bench until smooth.
  • If your mixture seems too dry, add a little more milk in small amounts until the consistency is better. You don't want a super stiff dough, nor do you want a sloppy dough. Something in between is good!
  • Place dough in an oiled bowl and cover. Allow to rise until doubled in size – usually this takes around 1.5 hours, depending on the room temperature.
  • Remove dough from bowl and knead lightly. Cut into 2 equal portions.
  • Place in lined bread loaf tins or place rounds on lined trays.
  • Cover and allow to rise once more, this time for around 30 minutes.
  • Preheat oven. Fan forced 210 celsius (410 Fahrenheit), regular 220 celsius (428 fahrenheit).
  • After the second rise, slash the loaves and place in oven for 35 minutes. *Please note, this time can vary between ovens.
  • Remove from oven and tins and place on a cooling rack.
  • It is best to allow the loaves to cool completely before slicing – if you can wait that long…

You can see me baking this recipe in this video:

I have some other recipes you may be interested in:

Soft and Sweet Bread Rolls

Milk and Honey Bread

No Knead Whole Wheat Bread Recipe

Easy Flat Bread Recipe

Filed Under: Recipes, Weaving Tagged With: raisin bread, recipe, Recipes and food

Christmas Trees Weaving Tutorial on a Rigid Heddle Loom

by Kelly 2 Comments

With Christmas just around the corner, my head has begun swimming with festive ideas!

Christmas, as the song goes, “is the most wonderful time of the year” – at least I think so, I love to celebrate the birth of Jesus.

I also love the atmosphere, the colours, the change in mood to one of joy and relaxation. The excitement of finding the right Christmas tree and the wonderful scent of pine filling the house is a real highlight for our family.

You may have previously seen my Winter Trees Tutorial but I thought it was high time we do a good and proper Christmas Tree Tutorial.

*This post contains affiliate links. For further information, please view my disclosure policy.

This tutorial is inspired by the Russian Branoe technique and involves picking up threads with a pick up stick in front of the heddle on a closed shed. We then use a “pattern weft” to build up pattern as we weave through the rows. It’s a lot of fun and you can make some super cool characters and pictures.

The threading for the loom set up is just plain weave, and all patterning is done by picking up warp threads. There is no need for specialist knowledge, just a bit of patience!

You can choose to weave plain Christmas trees, or there is an option to “decorate” your tree at the end of the tutorial.

I used my rigid heddle loom to weave this on, but all you really need is a loom that is capable of tensioning a warp and opening 2 sheds. A frame loom would work, it would just be a bit more work for the weaver

If you find this technique interesting, I have plenty of other resources and tutorials for you to delve into:

Baubles and Candles

Little Trees

Exploring Branoe (Online weaving class)

Gift Boxes

Reindeer

Snowmen

You will find all the materials and instructions for the Christmas Trees in this downloadable, printable PDF. I recommend that you use this PDF in conjunction with the instructional Youtube video for best results. Click on “download” at the bottom of the file.

Christmas-trees-PDFDownload

The free video tutorial is available to view here-

I hope that this tutorial and pattern brings some Christmas cheer into your homes and lives!

Until next time…

Happy Weaving!

Filed Under: Free tutorial, Tutorials, Weaving Tagged With: christmas, christmas trees, weaving tutorial

  • « Go to Previous Page
  • Page 1
  • Interim pages omitted …
  • Page 7
  • Page 8
  • Page 9
  • Page 10
  • Page 11
  • Interim pages omitted …
  • Page 25
  • Go to Next Page »

Primary Sidebar

Hand crafted boat shuttles

Categories

Archives

Meta

  • Log in
  • Entries feed
  • Comments feed
  • WordPress.org

Copyright © 2025 Kelly Casanova Weaving Lessons on the Foodie Pro Theme