Starting a handmade business can be a big step in your life but it doesn’t have to be complicated. Today we’re going to look at what I consider handmade business beginner essentials.
Organic Business Growth
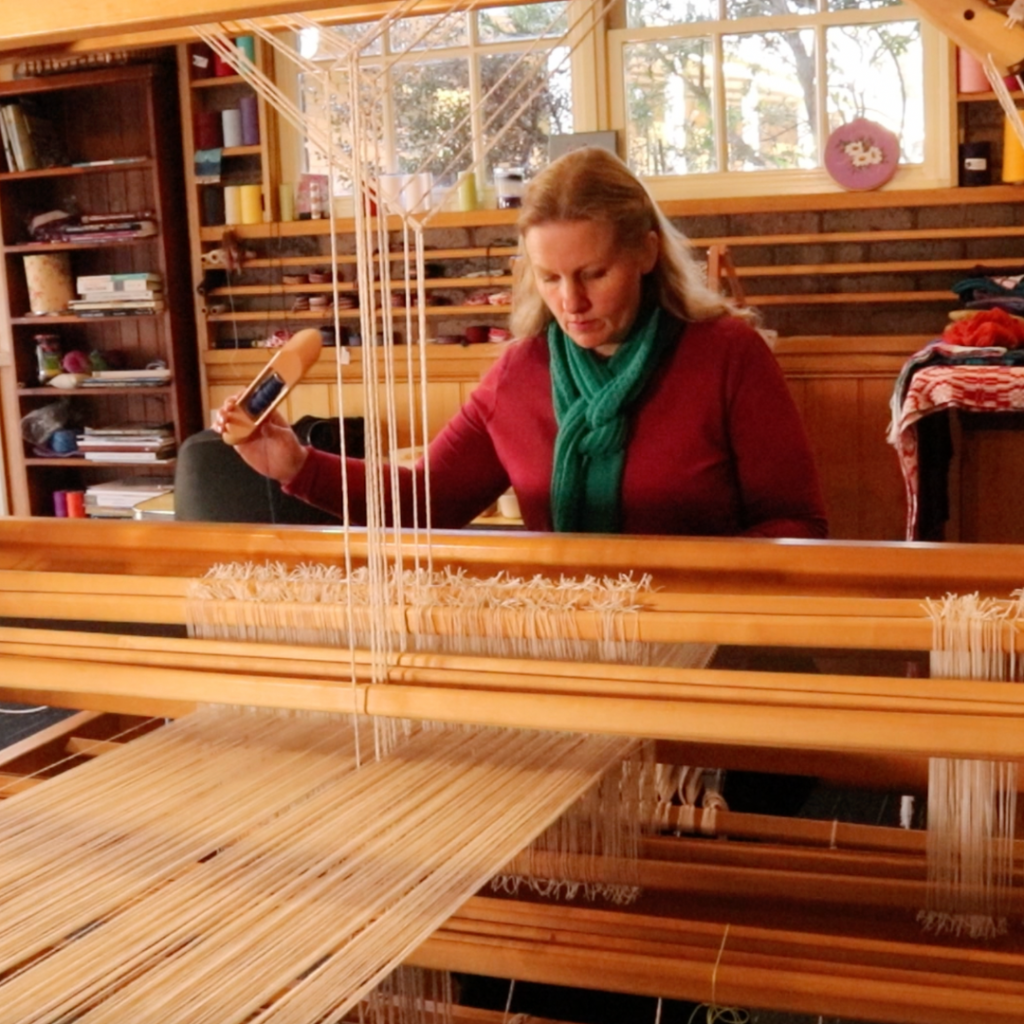
My own business is a shining example of how a handmade hobby can organically grow into a business. The funny part is that I had been trying to make a living from my handmade goods for around 10 years when I shared my first weaving tutorial on Youtube that ultimately saw my business develop and eventually take off.
Many people in the business niche will tell you that the formulation of a business plan is an absolute must before starting a new business. While it can help you to plan and gain clarity around what you want to do or what your vision for your business is, it is not essential.
I never developed a business plan for my online business and I have no regrets about that.
However, there are aspects to a handmade business that I do think are really important. Some of these can develop over time and others are better to be put in place as soon as possible.
Determine Product Need or Demand
Basically, without demand, you don’t have a business. You could make something that is really cool and that you love to create, but if no one wants to buy it that can be a harsh reality to face.
My initial Youtube tutorials showed me very clearly that there was a demand for the product I was able to provide. Again, this happened organically for me and wasn’t planned but if you are wanting to sell your handmade products, actually having an idea beforehand whether or not there is a demand for them is super helpful.
You can get a basic idea of demand by googling your intended product or search terms associated with it. Let’s take an example here. I will use a handwoven scarf as our guinea pig.
Determining demand for handmade products is a little different from more commercial products because handmade is often unique and doesn’t “fit in a box” or typical niche. There are more factors involved than just looking at trends and what is selling well right now. Handmade is more nuanced than that.
Do Your Research
When I google “handmade scarf” it comes up with a myriad of results. Some are local, authentic hand woven by usually a single person owned business (sole trader). Others are made overseas, woven on hand looms but by groups of people and marketed by an organisation. Some are commercially woven (you can always recognise these are they are much cheaper and usually more generic in appearance).
Googling is useful though, to see what is out there, where they are being sold and what they are charging. These factors can help you not only to find where potential customers might be looking to find hand woven products, but also what kind of pricing is realistic for the type of scarf you’re selling.
A terrific way to help determine demand for a handwoven scarf is social media – Instagram in particular is a very visual platform. I use Instagram not only to sell my products (you can read more about how I do that here) but to gauge interest in new products/ colours/ styles. It’s a simple and free way to get public opinion but in a more targeted way because all the people who follow you on a social media platform and potential customers – their opinion matters!
The Product
You do need to have a good quality product and ensure that it meets quality standards, but if you tend towards perfectionism, please do not overcomplicate it! Next time you buy an item of clothing, a towel, whatever from a commercial source, I guarantee that if you inspect it carefully you will find small faults.
Handwoven is beautiful and unique, but it’s made by a real person often in a home or studio setting. It needs to present well and do the job that it’s made for – it does not need to be perfect.
Pricing
This is a non negotiable. You do not have a smooth running and profitable business without correctly priced items. Handmade creators are notorious for under pricing (I know, in my early days I was definitely guilty of this!)
While it is fine to price a bit lower when you’re just starting out, you need to know when to raise your prices and how low is too low. Price your handmade products too low and you don’t have a handmade business, you just have a hobby (and often an expensive one at that!)
Pricing is very tricky and often a fine balance of cost of materials, how much you want to be paid and how much the customer is willing to pay. In this article I talk about this more in depth, based on my personal experiences and I include a helpful formula for pricing handmade items.
Where and How to Sell
Again, you really don’t have a business until you have a way or location to sell. To begin with, this can be as simple as selling to friends and family and gradually growing your brand by word of mouth. This is an excellent way to sell initially. It allows you to get a feel for it, you don’t have to pay for advertising, hosting and processing fees and as already mentioned it can help you to determine demand.
I’ll put in a little caveat here that some sellers find it a negative experience selling to family and friends. I have heard quite a few people say that those who are closer to them expect heavily discounted prices, free products or just to pay for the cost of materials but not your time.
On the other hand, those who are familiar with what you do may have a better understanding of the time, skill and quality of materials you put in to your work.
This is something you can explore for yourself and hopefully it is a positive experience for you!
It is quite simple to get started selling online these days. The main avenues I recommend are Etsy and Shopify. Which one suits you will depend on a number of factors and for that reason I have provided a comparison between the two here.
Personally I am moving away from Etsy to focus more on my Shopify store as Etsy is changing and not for the better, in my opinion. Shopify does offer a trial where your first month is only $1, plus you actually earn credits on your own sales to help your shop pay for itself – this is a great deal if you’re curious as to whether it would be a good fit for you.
Start a Mailing List
Start a mailing list from day one. No, really!
This will become one of the most important aspects of your business as it allows you to not only contact your audience in a reliable way (you can’t necessarily rely on social media platforms for this) but they are also qualified leads. People sign up to your mailing list because they are interested in what you do.
I use Convertkit for my mailing list and have for many years. They have the best functionality and are constantly improving. Yes, it does get more expensive as you gain subscribers and as you start using automations but for those starting out it is free way to start growing a list.
You can get subscribers to your mailing list in many ways. The first way is to just ask them to sign up if they are interested in your work and provide a way for them to do that (with Convertkit you can make landing pages).
You can also provide an incentive for sign up. Examples could include a discount to purchasing your products, a free guide, downloadable PDF or some other small incentive that provides value to your audience.
Knowing Your Taxation Responsibilities
Ew, the unglamorous side of business no one wants to think about! So you stow it away and not think about it. Until it comes back to bite you!
How do I know? Because I didn’t keep records to begin with in my business and that was a big mistake. To be kind to myself, because my business grew so organically I didn’t keep records initially. I didn’t think of it as a business.
Then it started making money!
No, record keeping is not glamorous, but trust me folks, you need to do it. This will save you a big headache and a lot of extra work down the track. Make it a habit from day one and it becomes a part of your routine and it’s easy.
I started out by just using a spreadsheet to record sales and expenses, it was very simple. As your business grows you definitely want to look into account keeping software.
The beauty of doing this is you can set up automations. Or have someone set it up for you if you have no clue – this is what I did. I use the online accounting software Xero to automate my record keeping. All of my transactions filter through Xero, every day. So when it comes time to submit my Business Activity Statements and end of financial year tax return, all the information is there and ready. Doing this has reduced my stress levels significantly!
Have Patience, My Friend
Building a business takes time, and so does learning business skills. I’m 8 years in and still learning. But that’s ok, you tend to learn what you need to know as the business grows.
Be willing to try new things as the same methods won’t necessarily work for everyone.
A slow growing business, in my opinion is advantageous as it allows you to learn and adapt as you need to. It will teach you a lot about yourself and what kind of business owner you want to be. Embrace the slowness!
Further Resources for Learning
I hope this article has been helpful to you and given you some ideas for getting started. I have some additional resources here in case you want to do some more research:
3 ways to start selling online for free…
Do you want to start selling your weaving?
What would I do differently if I started selling now?
Selling for weavers online class (members only)
Until next time…
Happy Weaving!
*This post may contain affiliate links. For more information, please see my disclosure policy.